Tag: costume

  • DIY Ruth Bader Ginsburg Dog Costume

    DIY Ruth Bader Ginsburg Dog Costume

    Ruth Bader Ginsburg’s dissent collar is an instantly recognizable icon of women’s rights and the trailblazing woman who worked so hard to secure them. In honor of her legendary life, I wanted to create a DIY Dissent Collar for Halloween this year. Once the collar was crated I couldn’t resist fashioning a full costume for my sweet girl Wrigley. Read on below for my DIY Ruth Bader Ginsburg Dog Costume, no sewing involved!

    Note: This tutorial will focus on the costume I made for my dog, but the collar turned out so nice my daughter wants to wear it! And you know what, it fits her too. If you want to dress up as the Notorious RBG this tutorial will also work for people.

    This post contains affiliate links– thank you for supporting us.

    Ruth Bader Ginsburg Dog Costume

    Craft Supplies

    Michael’s:
    – One 9 x 12 inch sheet of black felt for the collar
    – One 12 x 18 inch sheet for the cape.
    Amazon:
    – Self-Adhesive Rhinestone Stickers
    – Gold Cording
    – Black Pipe Cleaners

    RGB DIY Dissent Collar

    Ruth Bader Ginsburg DIY Dissent Collar

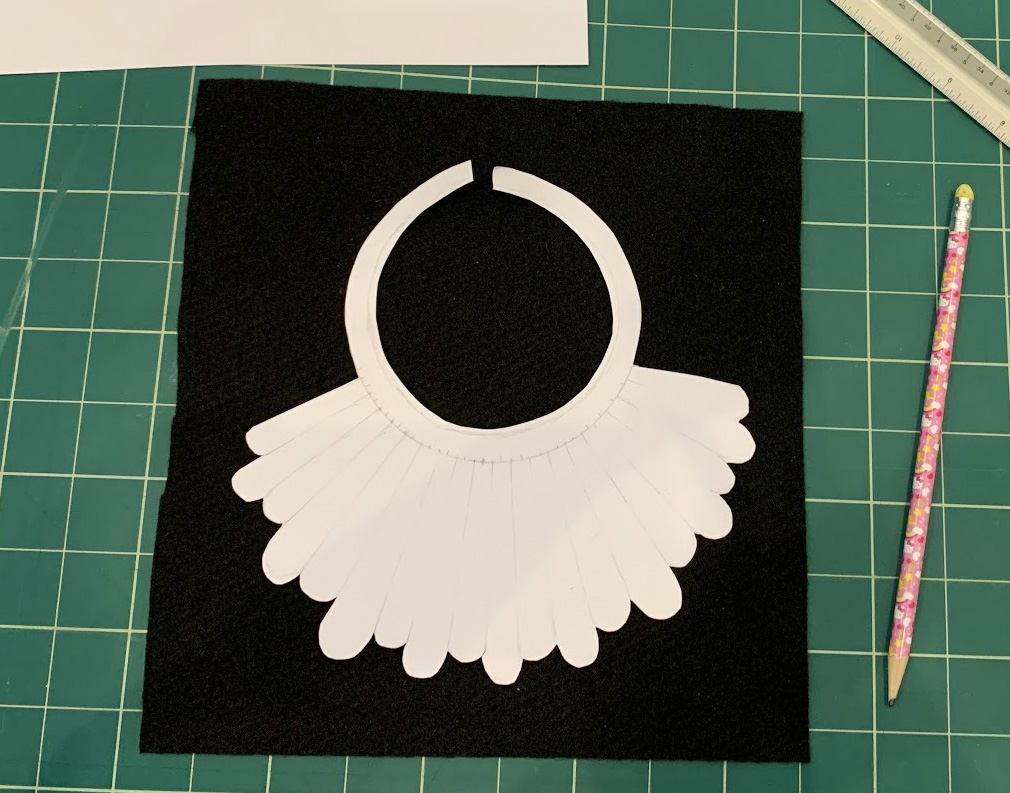
    I hand-drew a template on paper to trace for the main collar shape. It turned out so well that I created a graphic version of my template to share with you! See below. Save the image to your desktop and then print it for your own costume. You may need to resize before printing depending on the size of your dog!

    Dissent Collar Template

    Ruth Bader Ginsburg Dissent Collar Template

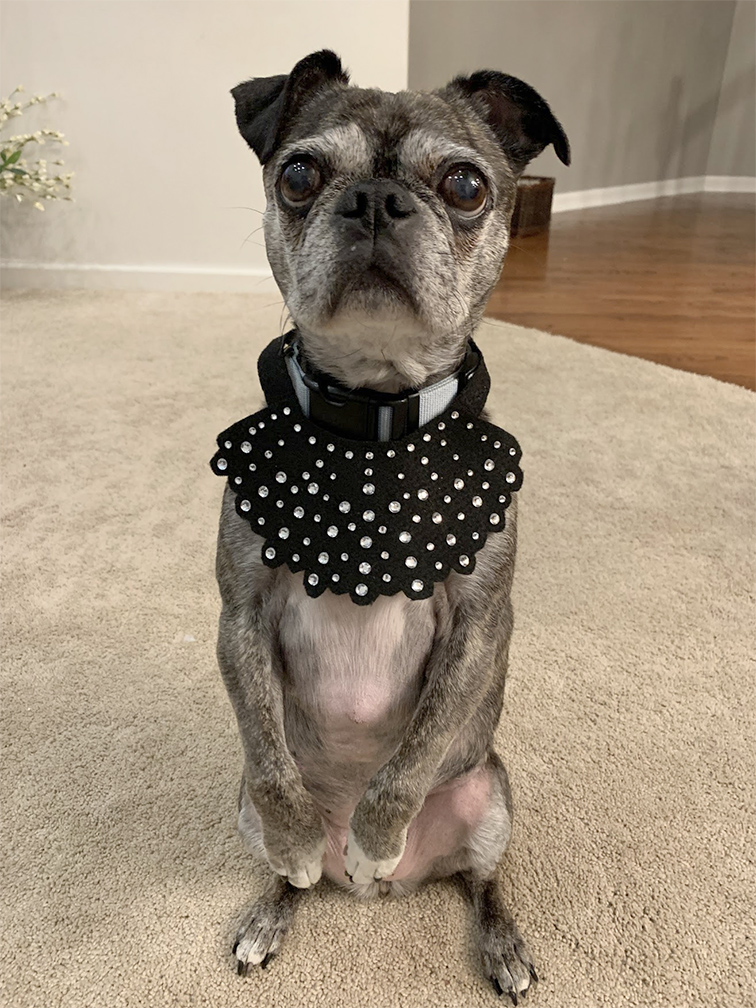
    Once I cut the collar shape out of felt, I added adhesive rhinestones to each of the vertical sections. The rhinestones I used are similar to these: Self-Adhesive Rhinestone Sticker

    I started at the bottom by adding one rhinestone to the lowest sections (the ones that stick out a little lower than the others). I then went up from there adding more stones in a straight line up to the neckline. After that, I added a horizontal row along the neckline. Reference the photo below for rhinestone placement, you will see that some are larger than others.

    After the rhinestones were completed, I cut out two strips of felt for the necktie. These you will need to size to your dog. Finally, I used hot glue to secure the strips to the top of the collar. You can add Velcro or a snap on the ends for a smoother look.

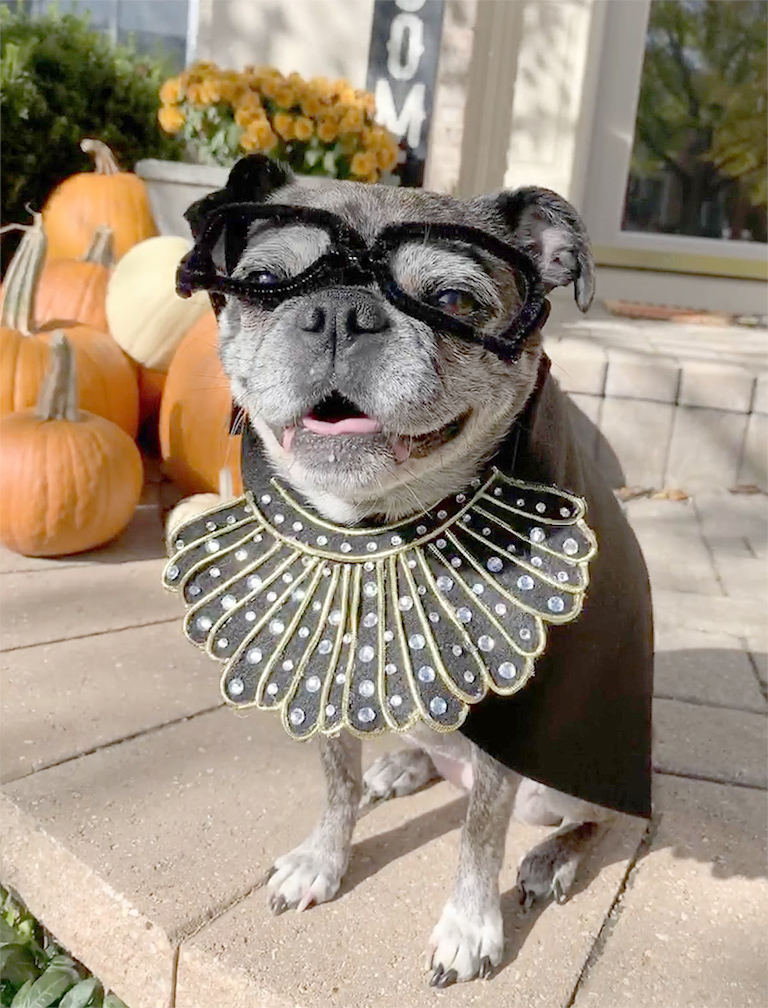
    As you can see my dog looks utterly thrilled to be trying on her new RBG collar 😂. She looks adorable, but something was missing so I decided to add gold cording between the rows of rhinestones.

    Ruth Bader Ginsburg Dog Costume

    The cording I used was actually up-cycled from the handles of a gift bag. You can find similar cording here: Metallic Tinsel Cord Rope

    I cut strips and hot glued them between the rows of rhinestones, around the edges and along the neckline. And voila, a totally beautiful collar worthy of an American icon. It’s a little fancy for a dog, but it can be used on humans too!

    *Tip: If you have trouble with removing any hot glue from the black felt you can color it in with a black sharpie to make it less noticeable.

    DIY Halloween Dog Glasses

    For the glasses, I made a simple pair from pipe cleaners. My dog did NOT like them, but was such a good sport wearing them for the pictures. You can use any glasses without lenses you may have as well.

    DIY Dog Robe

    To make the robe I used the same technique as my Harry Potter Dog Costume Robe, just without the white shirt collar. See it here: DIY No-Sew Harry Potter Dog Costume! It is basically a rectangle of black felt wrapped around my dog and glued together at her chest area. This way it can just slip over her head and I don’t have to worry about it falling off and it doesn’t restrict her movement.

    RBG Dog Costume

    Here is the completed look – don’t you love that smile? Happy Halloween!

    Other Halloween Posts You Might Like

  • DIY Light-Up Astronaut Jet Pack

    DIY Light-Up Astronaut Jet Pack

    DIY Light-Up Astronaut Jet Pack

    Guys, something amazing happened in female history this past Friday! The FIRST all-female spacewalk took place! I kinda can’t believe it took this long, but it is still an amazing achievement nonetheless. 👏 GO GIRLS! 👏 As it just so happens, my younger daughter is going as an astronaut this Halloween! We saw the costume in the store last month and both instantly thought it looked amazing. In honor of this historic event, I wanted to share how I created a DIY Light-Up Astronaut Jet Pack for her costume. She wanted it to be big, have fire coming out of the jets and light up. Never one to back down from a challenge, I got to work. Here’s what I did:

    Jet Pack Materials

    I wanted the jet pack to be light. My daughter is 5 and it needed to be light enough that she wouldn’t hand it to me half-way through trick-or-treating. (You know, like she’s done in years past with various costume accessories.) I found an oatmeal box which was the perfect shape for the middle portion and super light when empty. It had angled corners instead of standard right edges that I thought would make it look more, I don’t know the word for it, space-like. I also used two plastic juice containers for the jets. Below is a list of the materials I used. *affiliate links

    Cardboard box – this is a link to the actual box I used: https://amzn.to/2Sa6bCy
    Ribbon for straps – similar to this, mine was from Michael’s and leftover from another project: https://amzn.to/2vCoAAt
    Silver Spray Paint https://amzn.to/2qzpTxP
    Glue Gunhttps://amzn.to/2tgXmPb
    Felt – like this, again mine was from Michael’s and leftover from another project: https://amzn.to/2OhEMO1
    LED Lights – Similar to these, these have more lights on each strand. Mine were from the Dollar Store: https://amzn.to/2tYnAX9

    First, I added straps made of ribbon to the box by cutting two holes on the top and bottom of the box. Then, I tied the ribbon in knots inside the box. I tied the ribbon to the top two holes first, then measured the strap length on my daughter while she held it to her back. I then used hot glue to connect the juice containers to each side, this formed the basic jet pack shape.

    Painting & Design

    Once the glue cooled, I chose to paint the jet pack silver. To do this I used a silver spray paint + primer similar to this one (affiliate link). I covered the straps with paper before I sprayed anything. It took me two coats to completely cover the writing on the box.

    For the flames coming out of the jet pack, I cut out yellow and red pieces of felt in a flame shape. I hot-glued them into the bottle openings. I printed out a NASA logo and glued it to the front of the jet pack and made a black stripe using electrical tape under that. Here is what it looked like before I added the lights.

    DIY Light-Up Astronaut Jet Pack

    How I made the Jet Pack light up!

    I could have stopped there, the jet pack looked great and fit my daughter well. But, she really, really wanted it to light up in some way so I thought, why not. I got two sets, one red and one yellow, of the battery-powered LED Lights from the dollar store. Yes, they only cost me a dollar! I decided to make two rows of each color lights underneath the black stripe.

    DIY Light-Up Astronaut Jet Pack

    First, I measured out that a light would be placed every half-inch, based on the size of my LEDs. I marked a spot for each light with a ruler. Then I used an x-acto blade to cut x shapes on each spot. Once I had an x cut into the cardboard, I used a small screwdriver to push through the x. This made a hole the perfect size for each light. The holes were just about the exact size of my lights.

    I pushed the lights through each hold, securing with hot glue as I went a light at a time. Then, I secured the battery pack on the inside of the box with hot glue as well.

    I left the bottom of the jet pack open for now so I can access the lights and turn them on when needed. I just tape it shut with clear tape when she wears it. She is thrilled how it turned out and I am too!

    Note: It’s hard to see the lights in the picture above because I took these pics when the sun was shining brightly. You can see in my other pictures at the top of the post that the lights are surprisingly bright! And there you have it, a DIY Light-Up Astronaut Jet Pack for a little one in your life! Have fun creating!

    DIY Light-Up Astronaut Jet Pack

    We have other DIY crafts, check them out here: DIY Harry Potter Dog Costume or our Harry Potter Howler Valentines!