Grab Bags are notoriously hard gift exchanges to buy for and sometimes you just can’t give another bottle of wine to the party host. Whether you are buying for coworkers, relatives or neighbors, we have some great ideas for you. 🛍️ This post contains affiliate links– thank you for supporting us.
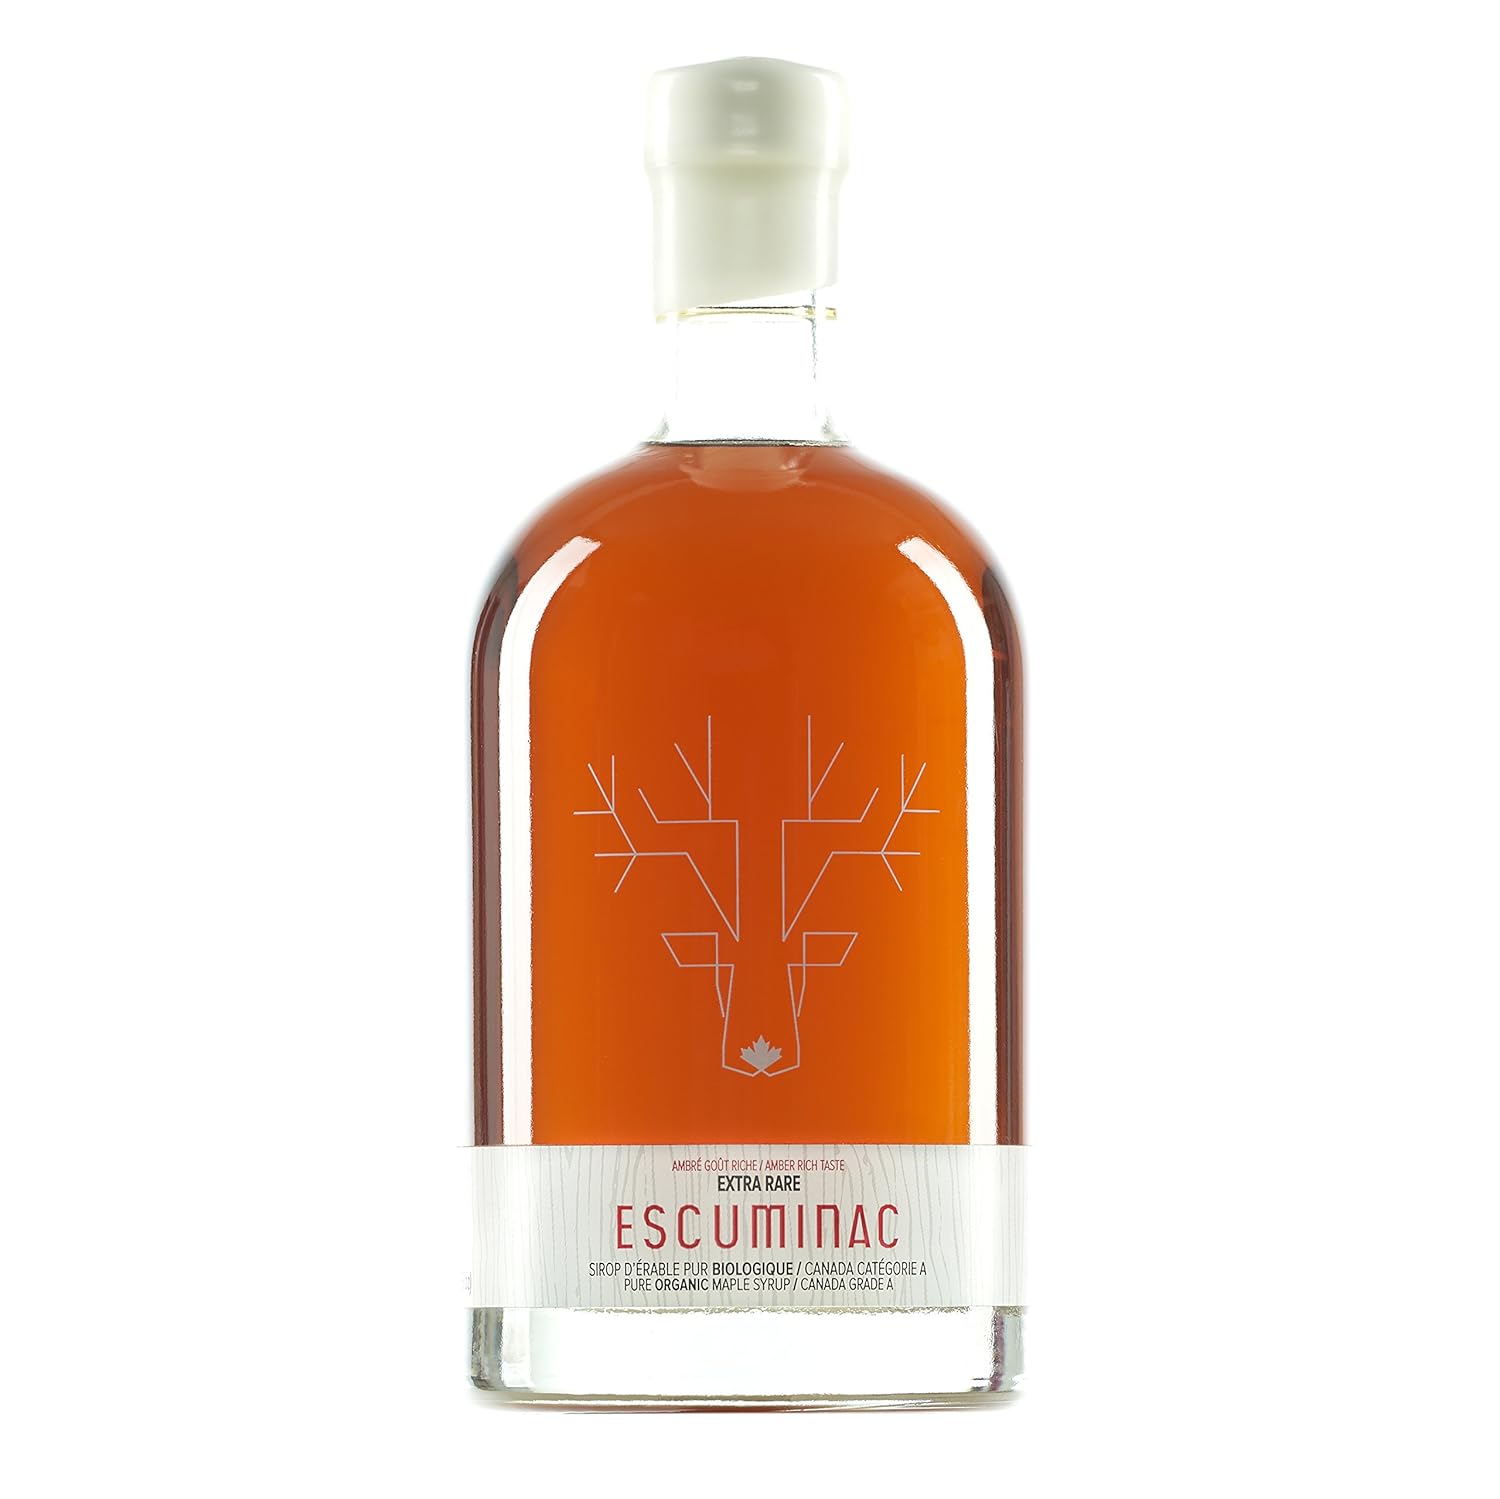
Award Winning Canadian Escuminac Extra Rare Maple Syrup – I don’t know a single soul who doesn’t enjoy maple syrup on something. From pancakes to candied bacon, real quality Maple Syrup is always a winner. https://amzn.to/33I2mIz
Royal Rose Syrups Organic Moscow Mule Kit (or any of their simple syrups, really) – Whether it’s for cocktails, mocktails or even for drizzling on desserts, simple syrup is a fun & versatile gift idea! http://shrsl.com/1ztu0
Tea Drops Gift Set – This tea is shaped in cute little drops that can be added to your hot water, no tea bags or strainer necessary! The wooden box also adds to the gift appeal! https://amzn.to/2qhuwg5
Marble and Wood Serving Board – Present your artisan cheeses in style and leave the host this gorgeous serving board. goto.target.com/P9Dqj
Natural Agate Slice Napkin Rings – Do people still use cloth napkins? I do and I would love to use these napkin rings! https://amzn.to/2DQVezm
Urban Accents BUTCHER SHOP Gourmet Grilling Spice Rub Gift Set – For the grill master in your life. https://amzn.to/2r865lP
Acacia & Gold Metal Coasters – You can never go wrong with coasters, especially these. The gorgeous modern design adds a fresh take to any decor. goto.target.com/XAevG
Cheeky Oven Mitts – If you want a truly unique gift, check out the fun and cheeky oven mitts over at Perpetual Kid. http://shrsl.com/200k2
Geometric Drinking Glasses – I am in love with these drinking glasses! They are a classic gift, but their geometric design gives them an interesting twist! https://amzn.to/2Lq6IOd
Aromatherapy Shower Bombs – Not everyone wants to take a bath, but everyone does want to relax. Just pop these little tablets in the bottom of the shower and they vaporize into a relaxing aromatherapy experience! https://amzn.to/2PlFCJg
Yummy, this family loves HelloFresh! Read further for our full HelloFresh Review.
This is our second time trying HelloFresh, 2 years ago we decided to get their meal delivery boxes after we found Blue Apron to be lacking in family friendly meals. They did deliver to our small town in Maine but the ‘fresh’ in HelloFresh was lacking and we had to cancel.
Fast forward 2 years and we found the need to try meal delivery again so we decided to give HelloFresh another go. We chose them because of their family friendly meal options. Our two girls aren’t super picky but they can’t handle spice and prefer comfort food.
HelloFresh Review
I was very happy to see all of the changes they made. You can choose from MANY different meal options each week instead of just a handful. Their delivery is spot on and everything has been arriving very fresh. We have had a few leaky chicken and salmon packages but customer service is very slick and we have been issued credits quickly.
The most impressive thing are the meals themselves. They are super flavorful and easy to adapt for children who prefer less spice or no sauce… or their veggies untouched by seasoning. There are audible “This is sooo good”, “Mom, I LOVE this!” and “This is the best meal ever.”
Meal Cards vs. Actual Meals
Below I have taken some meal card vs. actual meal shots. My presentation isn’t great but you get the idea. My kids favorite is the Crispy Parmesan Chicken and my husband loves all the burgers and the Tunisian-Spiced Meatballs.
Tips on Picking a Recipe
Tip: On every recipe you can see the approximate time it takes to cook and prep! You can choose a quicker meal for the weekday and something that takes a little longer for the weekend. If you can cook uninterrupted and know how to prep foods quickly these times are fairly accurate. If not, they may take a little longer. Getting the timing right takes a little practice – once you get going on a recipe there isn’t much room to stop so plan accordingly. Distract your kids with an activity so you can cook!
This is our second time trying HelloFresh, 2 years ago we decided to get their meal delivery boxes after we found Blue Apron to be lacking in family friendly meals. They did deliver to our small town in Maine but the ‘fresh’ in Hello Fresh was lacking and we had to cancel.
Fast forward 2 years and we found the need to try meal delivery again so we decided to give HelloFresh another go. We chose them because of their family friendly meal options. Our two girls aren’t super picky but they can’t handle spice and prefer comfort food.
I was very happy to see all of the changes they made. You can choose from MANY different meal options each week instead of just a handful. Their delivery is spot on and everything has been arriving very fresh. We have had a few leaky chicken and salmon packages but customer service is very slick and we have been issued credits quickly. The most impressive thing are the meals themselves. They are super flavorful and easy to adapt for children who prefer less spice or no sauce… or their veggies untouched by seasoning. There are audible “This is sooo good”, “Mom, I LOVE this!” and “This is the best meal ever.”
Below I have taken some meal card vs. actual meal shots. My presentation isn’t great but you get the idea. My kids favorite is the Crispy Parmesan Chicken and my husband loves all the burgers and the Tunisian-Spiced Meatballs.
Tip: On every recipe you can see the approximate time it takes to cook and prep! You can choose a quicker meal for the weekday and something that takes a little longer for the weekend. If you can cook uninterrupted and know how to prep foods quickly these times are fairly accurate. If not, they may take a little longer. Getting the timing right takes a little practice – once you get going on a recipe there isn’t much room to stop so plan accordingly. Distract your kids with an activity so you can cook!
If you like spice or tomatoes, this is the recipe for you! A light sauce packed with flavor combined with earthy mushrooms and salty bacon makes this a meal that hits the spot each and every time I make it. This is also a great recipe to make quickly with a grocery store rotisserie chicken!
For my kids who don’t like anything spicy, well they don’t like tomatoes either, so they get noodles with some of the chicken I save before it goes in the sauce and parmesan.
Spicy Chicken & Bacon Pasta
Ingredients:
1 16 oz. box of pasta (I prefer farfalle, but penne or rotini will work)
1/2 small white onion, chopped
6 cloves garlic, minced
2 14.5 oz cans of diced tomatoes
8 oz fresh, sliced mushrooms
1 pre-cooked chicken breast, cut into bite sized pieces (I try to make my life easier and use a rotisserie chicken from the grocery store)
4 – 6 pieces cooked bacon, crumbled
1-2 tsp of crushed red pepper – or more/less depending on how spicy you like it.
A handful of chopped basil
Parmesan cheese to taste
Directions:
Bring water to a boil in a pot and add the pasta. Follow directions on the box for recommended water and cooking time for al dente pasta. While the pasta is cooking, get started on the sauce, but make sure to stir the pasta every now and then.
Next, on a stove, bring a large pan to medium heat. Add about two tablespoons of olive oil to the pan followed by the chopped onions and minced garlic. Stir and saute until the onions are semi-transparent, about 2-3 minutes. Add the mushrooms and continue to stir for about 2 more minutes. Finally, add the tomatoes, chicken, basil, crushed red pepper and crumbled bacon.
Let the sauce heat through for about 5 minutes. When the noodles are done, drain but save about 1/2 cup of the pasta water. Add a small amount of the saved pasta water to the sauce if it gets too thick in the pan. You may not need to add any.
Put a serving of pasta on each plate, layer on the pasta sauce from the pan and finally add some parmesan to top it off. Now, eat till your hearts content. I know I will!
Every year around the end of September a few of us go to a pumpkin farm where they have a flat fee to fill your trunk with pumpkins. Seriously, as many as you can fit in the trunk of your car. Even after splitting it with one or two other families I still have roughly 30 pumpkins of all different sizes lining my front steps and porch. After carving a few for Halloween and putting smaller pumpkins on my mantle for Thanksgiving decorations, I STILL have more than a few left.
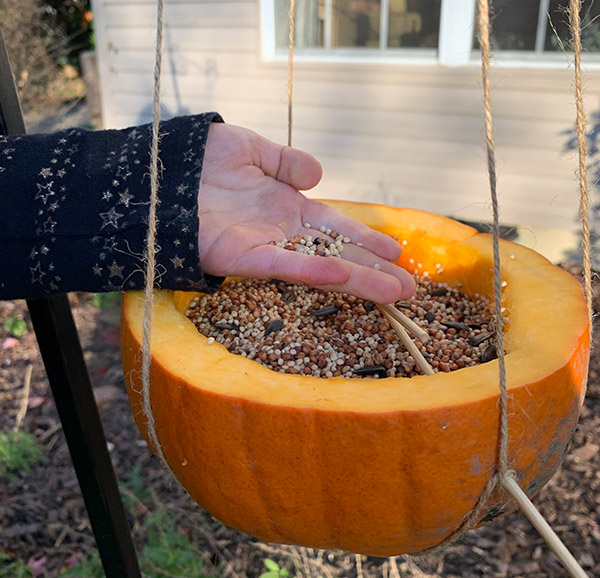
So, when I saw a pumpkin bird feeder how-to video created by Audubon.org online I thought it would be the perfect way to use up one or two more of my fall pumpkins. Whether you are just looking for a way to get rid of a pumpkin or you are looking for a fun fall activity for your family, give this bird feeder a try!
I linked the original video and directions above. Here is what we did:
Pumpkin Bird Feeder:
First, we chose a smaller pumpkin, one that wouldn’t be too heavy. I cut it in half and then let my kids scoop out all the seeds.
Next, I used bamboo skewers. I slowly and carefully twisted and pushed them through each side of the pumpkin to make perches for the birds. This part was a little difficult and needed some force.
Once the skewers were secure, we needed to add some twine/string to hang the pumpkin with. My daughters cut four pieces of some-what equal length and we tied them all together. In the video the instructions are to use a push-pin to secure the knot of twine to the bottom of the pumpkin. I didn’t have a pushpin, so I wrapped the twine a few times around the skewers. I made sure the twine came up each side of the pumpkin so it would hang evenly. Finally, I tied the four pieces of twine at the top.
That’s it! Now just add bird seed and hang! I hung mine off a shepherds hook, it was a little heavy and we have tons of squirrels in our yard. (Not that the squirrels can’t climb a shepherds hook, but it does last a little longer this way before they can gorge themselves like they’re Joey at Thanksgiving dinner and they’re wearing maternity pants.) Have fun bird watching!
Update: The pumpkin feeder is still up a week later, although covered in snow here in Chicagoland, and it is not showing any signs of rotting. Maybe it’s frozen, but it seems to be holding up well. We’ll see how it does once the snow eventually melts.
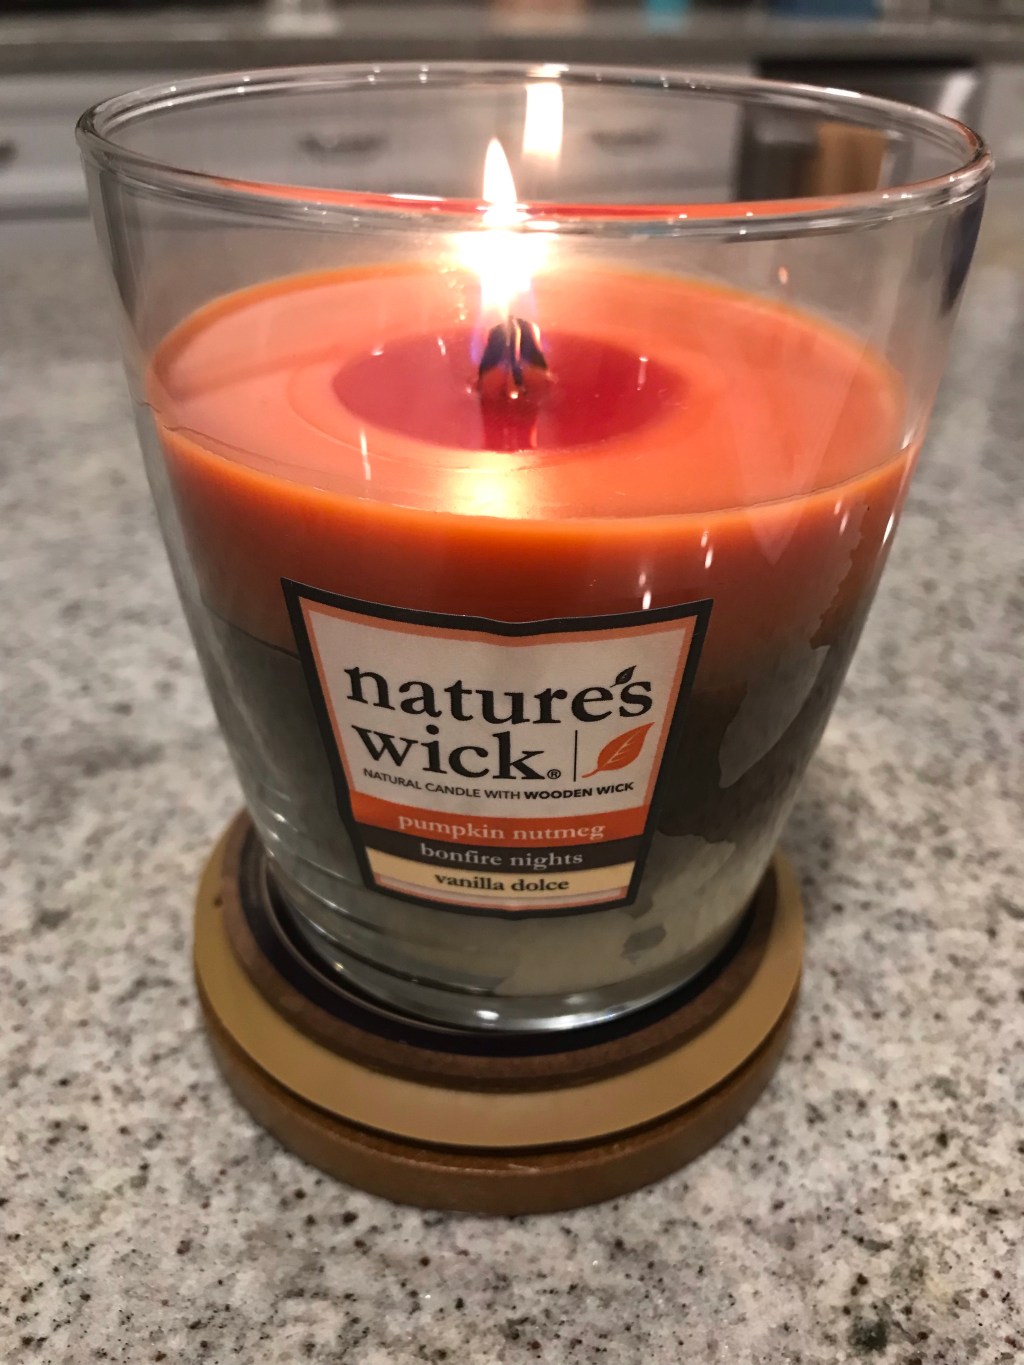
Are you looking for the perfect host gift for your next holiday party? Look no further!! On a whim I picked up this Nature’s Wick Candle at Target, on sale of course, and was pleasantly surprised.
I was shocked at how LOUD it crackles! It really sounds like a cozy crackling winter fire and it smells amazing to boot. They offer layered candles so you have different scents to look forward to as the wick burns down.
You can check out Target’s selection using our affiliate link here: goto.target.com/93dAW. The candles start at only $10.79 for a 10 oz. jar and if you are lucky you can catch them on sale!
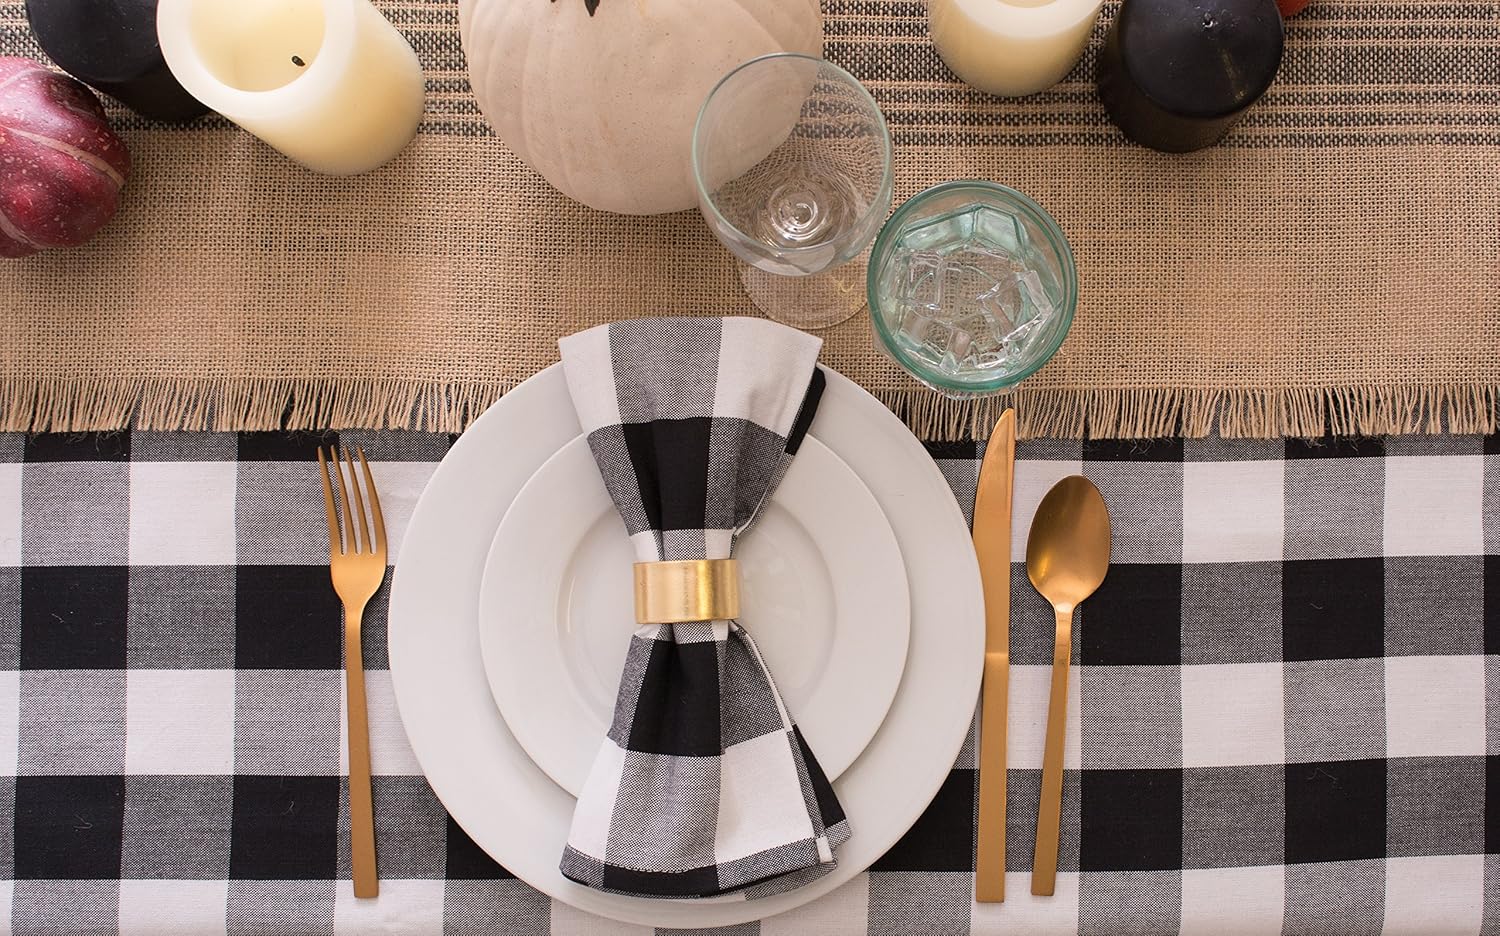
Buffalo Check Table Runner and Napkins – Get that cozy, rustic feeling with a buffalo check tablescape this year. (If you’ve read this blog before, you know how I love my buffalo check.)
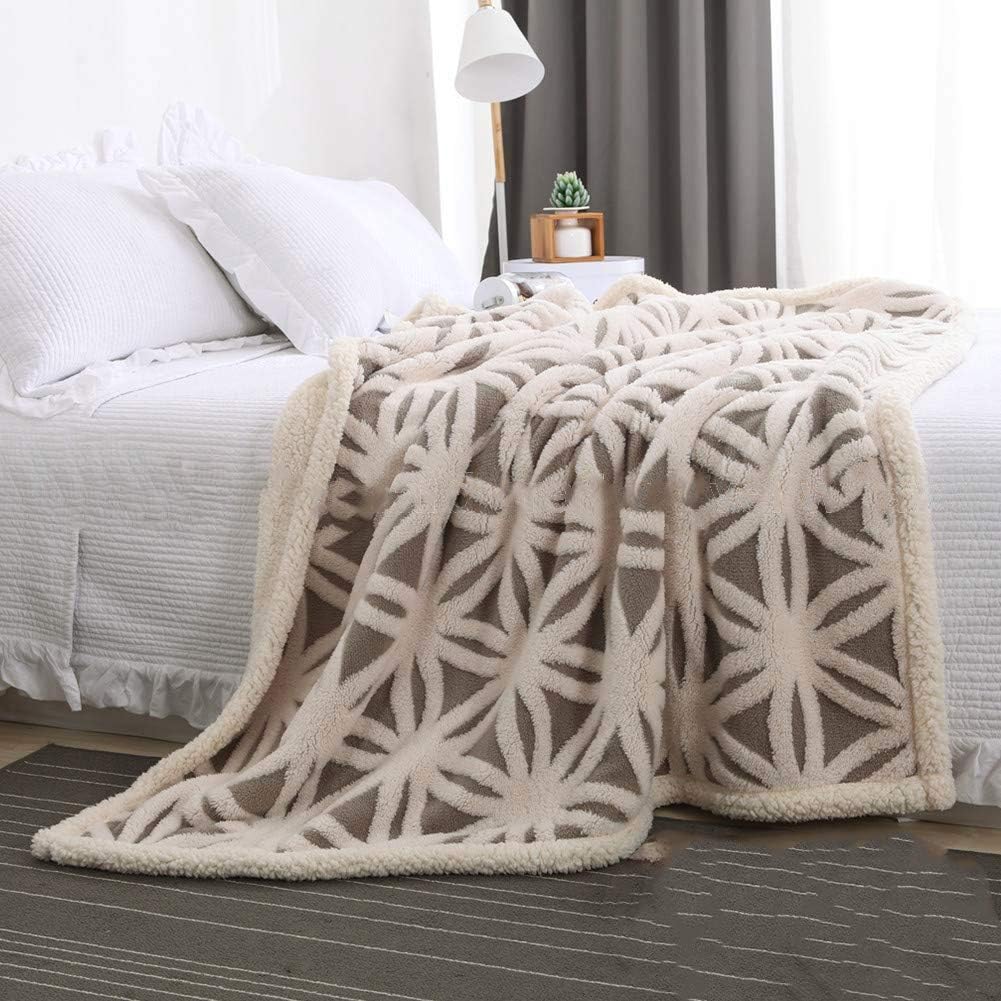
Super Soft Sherpa Fleece Blanket – To keep you warm as you cuddle up on the couch. I kinda want one in every color and with such great reviews I just might grab a few extra for hostess gifts.
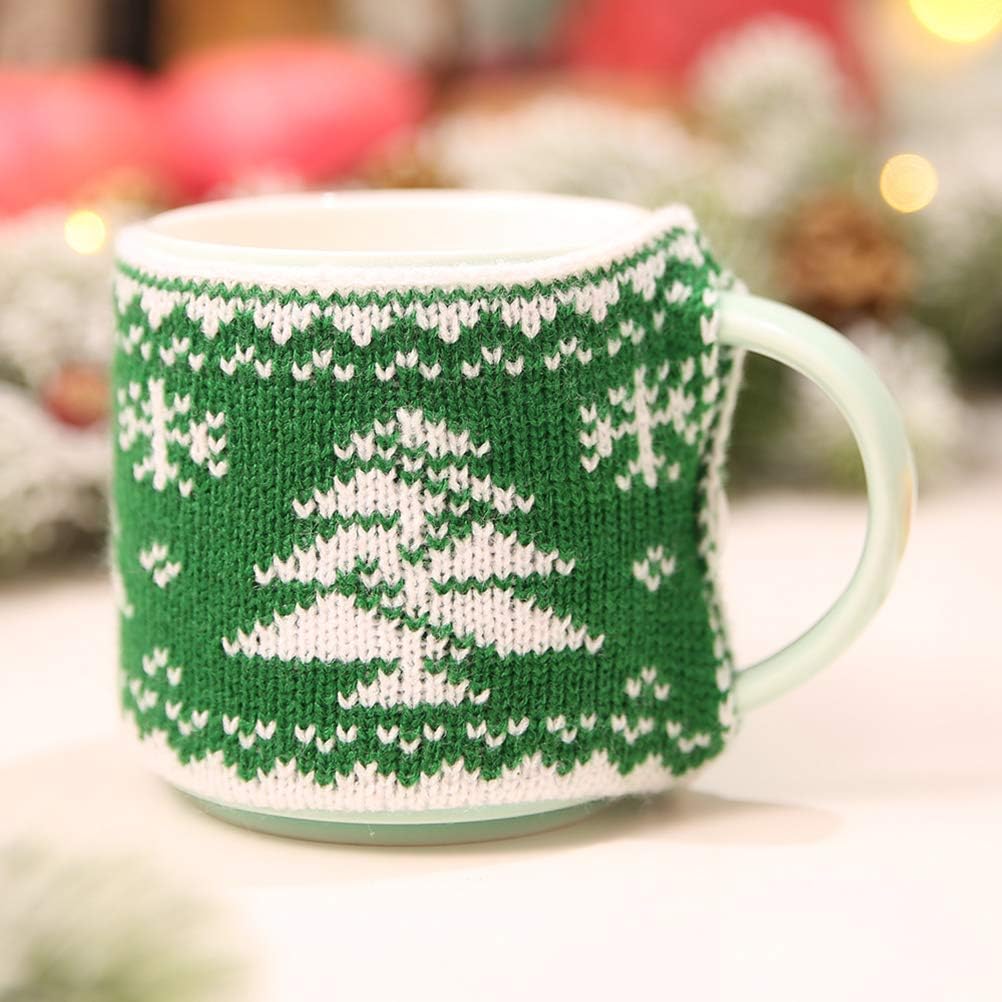
Campfire Mug – Image yourself cuddled up on your couch, with a throw blanket and pillows, drinking hot chocolate out of this cute campfire mug. Soooo cozy. This mug comes in lots of colors, so you can match any decor.
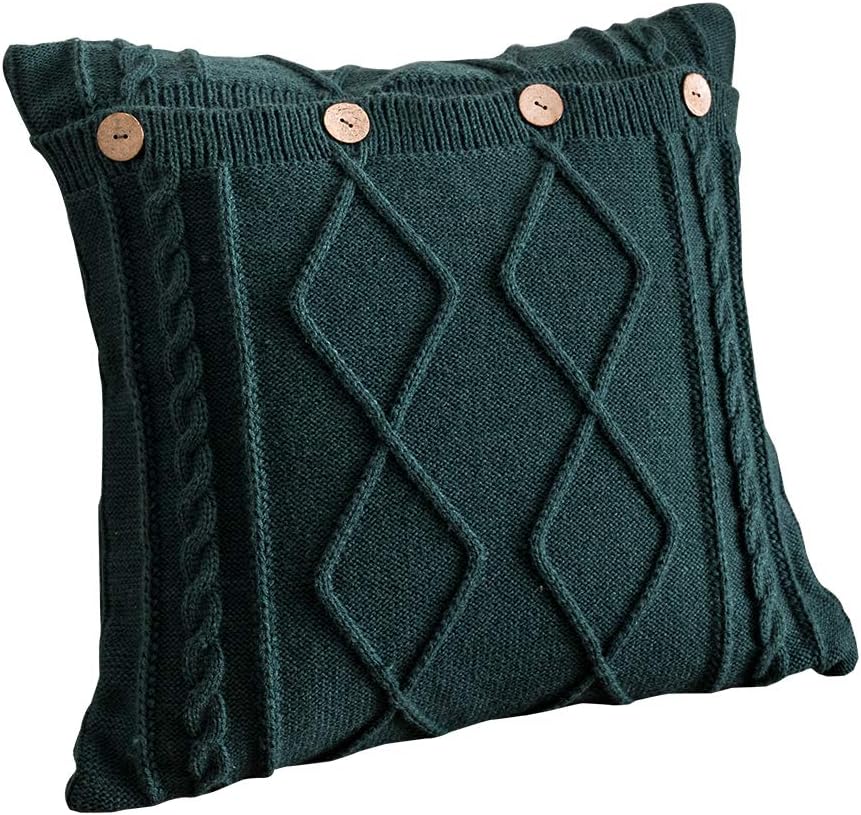
Gorgeous Tufted Ottoman – A cozy fabric ottoman will change the look of your living space, use as a coffee table with a rustic tray.
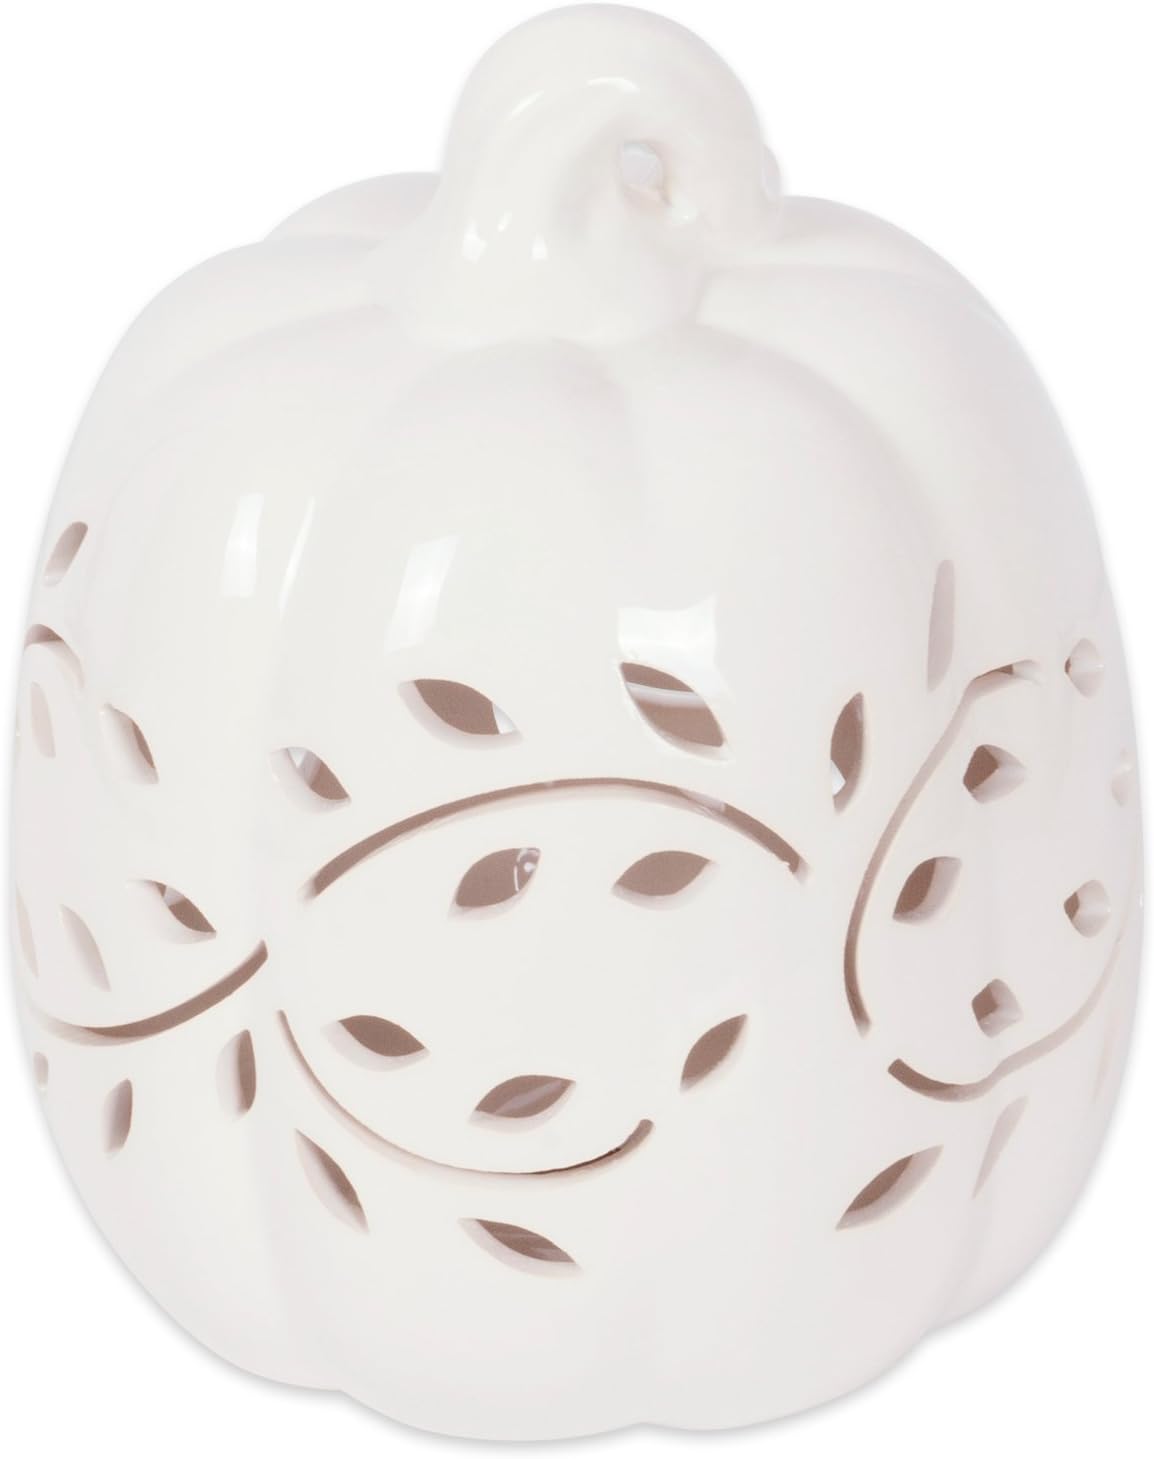
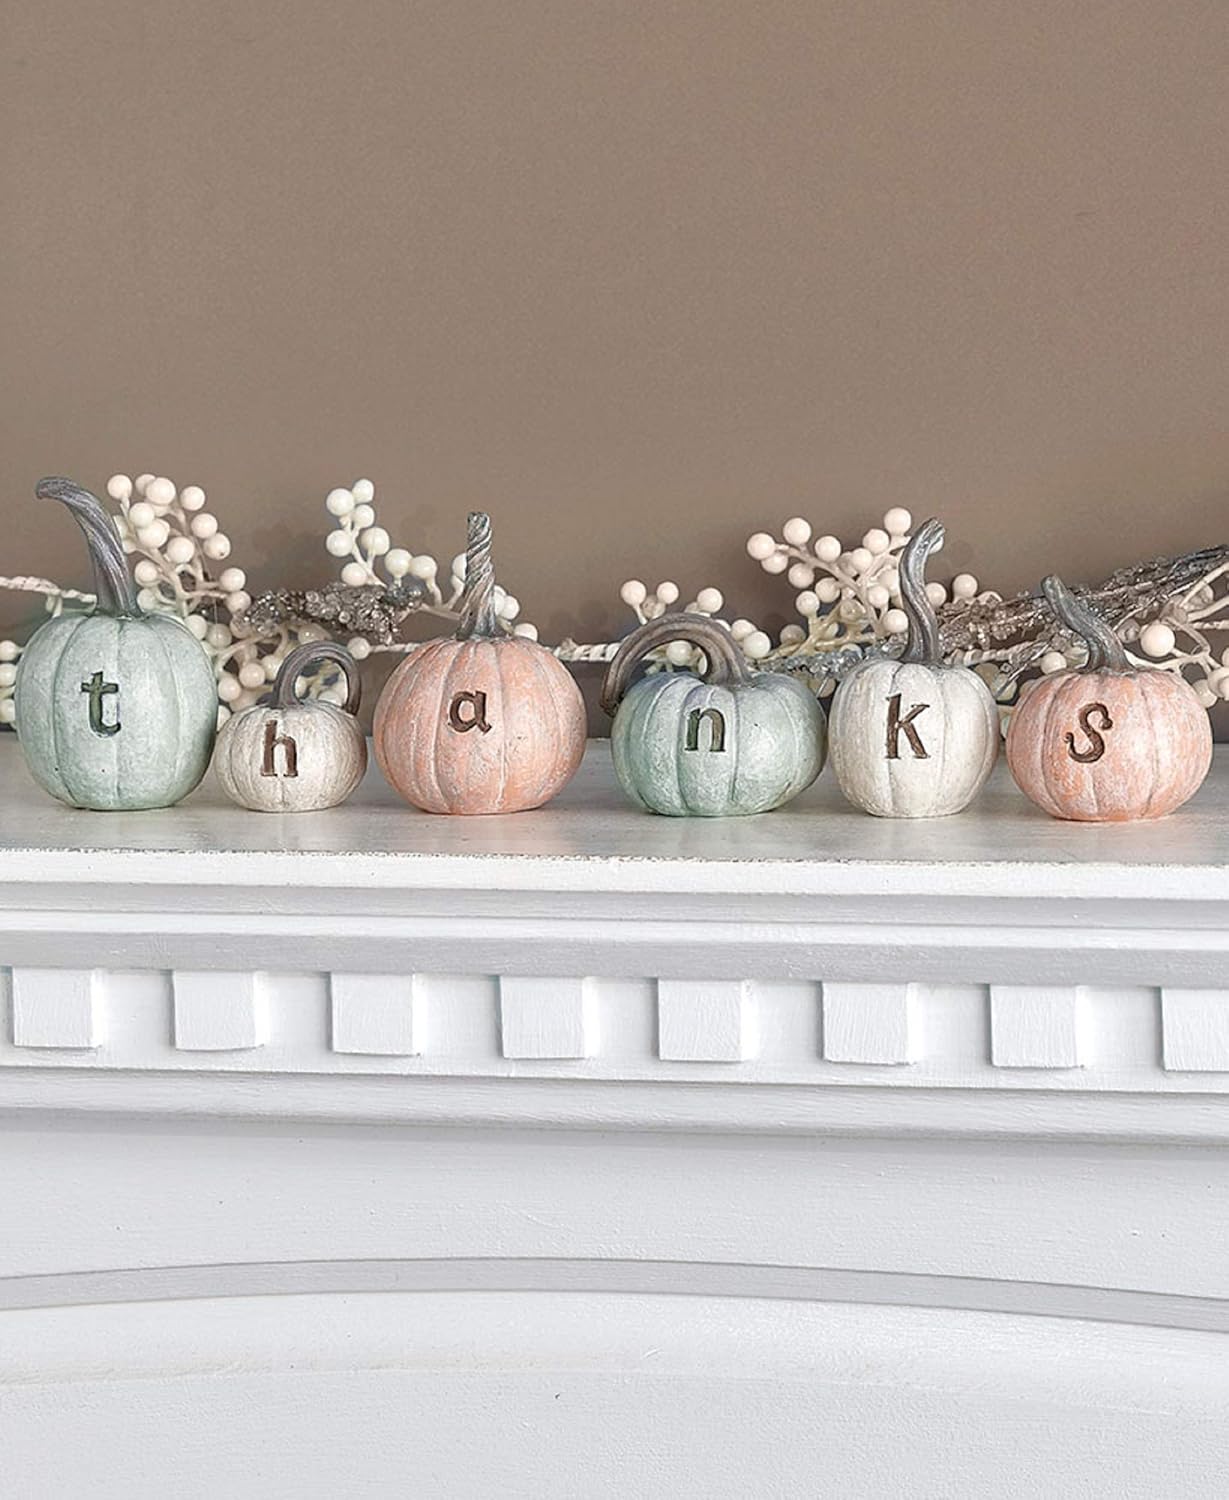
Thanks Pumpkins – Finally, bring a calming pastel color palette to your Thanksgiving decor with these Thanks Pumpkins. They would make a nice addition to your mantel, coffee table or dining table.
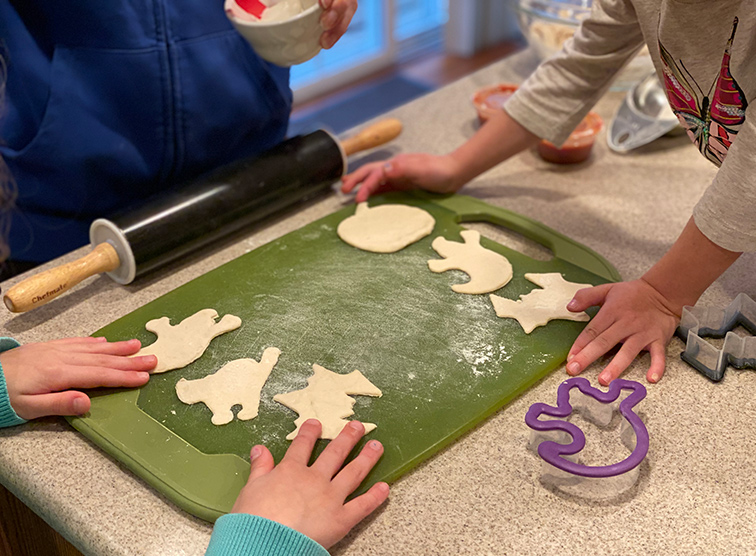
Need something quick and easy to make on Halloween before you trick-or-treat? This is a family favorite and so easy – Cast Iron Cookie Cutter Mini Pizzas! You can make these as easy or fancy as you would like and use any cheese or toppings that you and your kids enjoy. Here’s what we did.
Using either homemade (recipe is at the bottom of the post) or store-bought pizza dough, roll the dough out on a cutting board or clean counter. Each of my kids picked out the Halloween-themed cookie cutters they wanted to use and cut their own mini pizza crusts out.
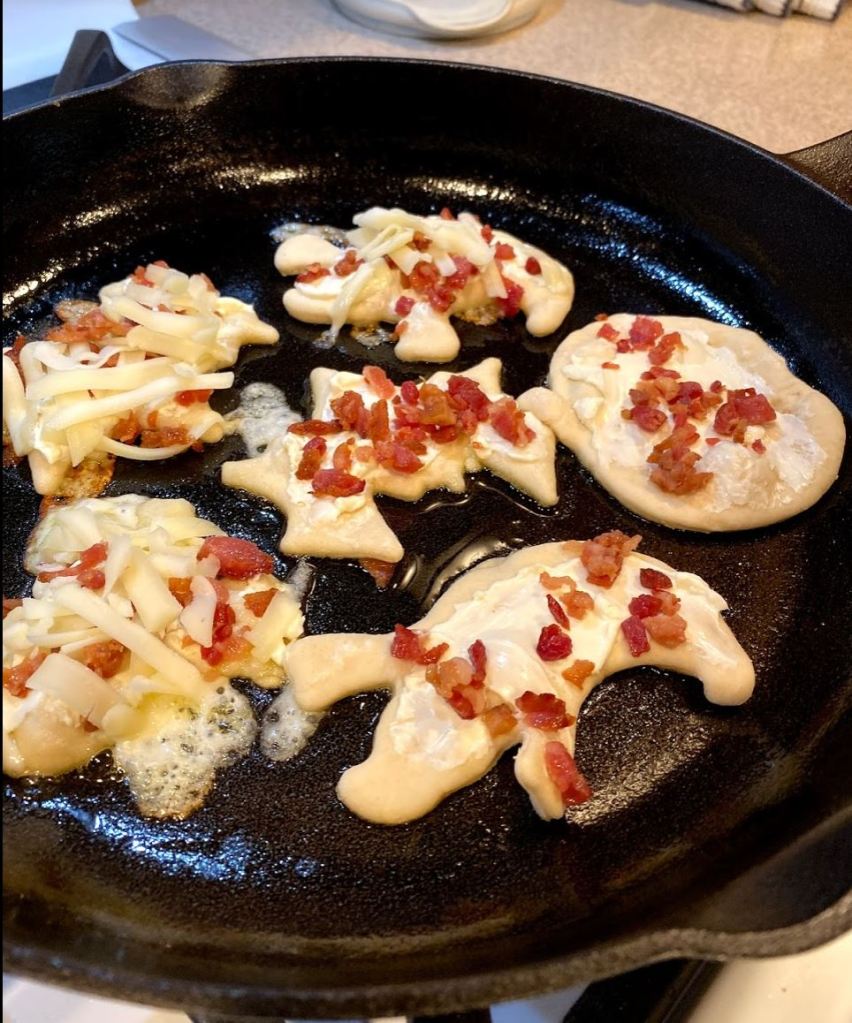
For toppings, my kiddos chose cream cheese, bacon and a small amount of shredded cheddar-jack on top. You can make any flavor combo you want and tailor it to each person.
Once done adding toppings, preheat your cast-iron on medium heat on the stove. Add your mini pizzas to the pan once it is hot and cook the bottom of the crust for just about a minute (depending on how hot the pan is). This step will get the crust crispy. Then, take it off the heat and put under the broiler in your oven set to high to melt the cheese on top, about 1 – 2 minutes. Again, watch to make sure they don’t burn.
And that’s it! Festive, easy and delicious Halloween dinner is done. Sorry for the bad pictures, it has been rainy and cold these past few days around here. It’s like we went straight from summer to winter with hardly any fall in between. Have a fun and safe Halloween everyone!
Easy Pizza Dough Recipe
This is the recipe I have been using for years and it never disappoints!
Ingredients:
3/4 cup warm water 1 packet instant yeast 2 tablespoons honey 1 tsp salt 2 to 2 1/2 cups all purpose flour
Directions:
Add warm water, yeast and honey to a large bowl. Stir to mix ingredients and let sit for about 15 minutes or until the yeast is frothy.
Next, add 1 cup of flour and salt. Mix until combined, then start kneading with your hands adding more flour a little bit at a time until the dough isn’t sticking to your hands. The more flour you add, the tougher the dough will be so try not to add too much. I usually end up using about 1 1/2 cups of flour total.
Form the dough into a ball and place in the bowl. Cover the bowl with a towel and place in a warm spot for the dough to rise for at least 30 minutes, but 2 hours works best. I use my microwave for this step.
Once your dough has risen it should be ready to go. Lightly flour a cutting board or work surface and you are ready to roll it out with a rolling pin.
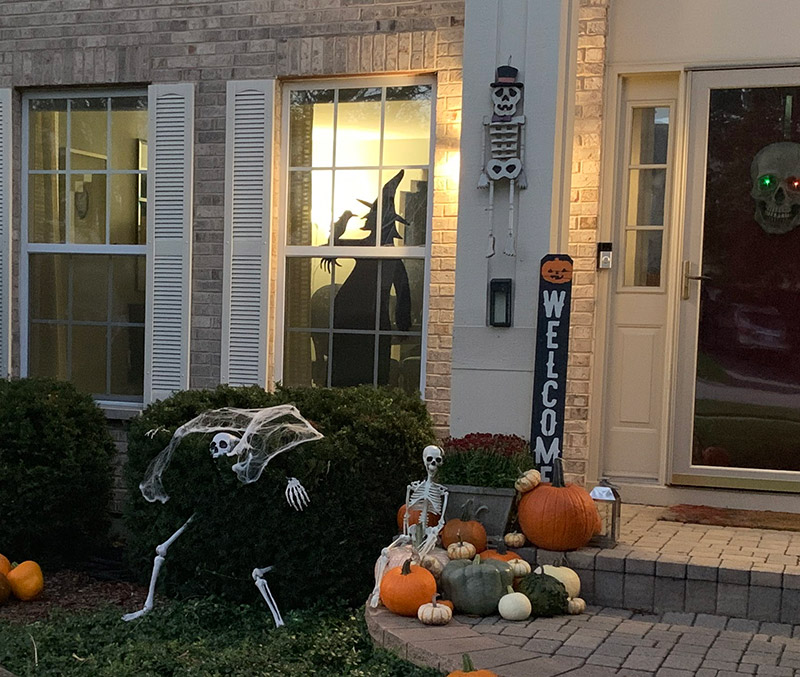
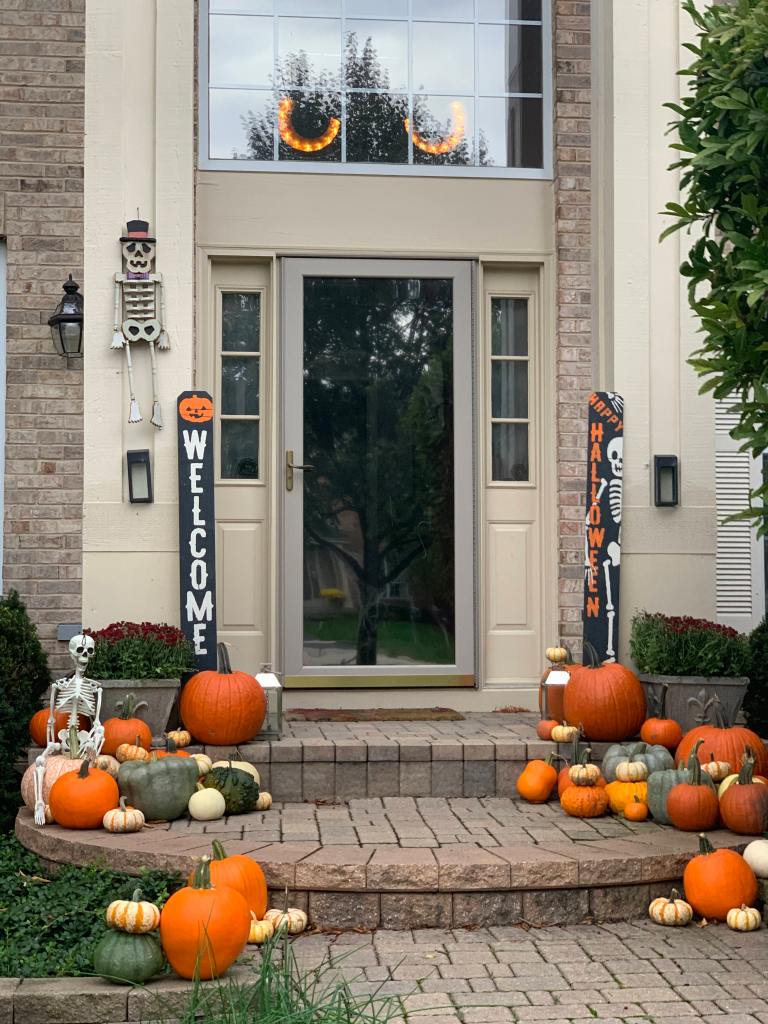
Halloween is so much fun to decorate for. Whether you like making your house super spooky or you like keeping it cute and rustic, there are so many ways to add a little pop of Halloween to your home. I love setting up my mantle every year along with spooky and fun accents in every room. Usually, I add one or two new decorations to my collection each year and I have so much fun shopping for them, but this year I decided to make them instead! Below I’ll walk you through what I made, I hope it inspires you to create something fun for your own home! 🛍️ This post contains affiliate links– thank you for supporting us.
Halloween Window Silhouette
This is such an easy project. You literally just need cardboard and black paint. I just free-hand drew the outline of a witch on the cardboard and cut it out, you could project an outline to trace if you have a projector or even trace around your child in a fun position! Get creative! I drew a witch, but you can do any silhouette that is Halloween themed. Try a stack of jack-o-lanterns and cut out their eyes and mouths, or cauldron, ghost or skeleton! *TIP: This knife – the CANARY Corrugated Cardboard Cutter -makes cutting cardboard SO MUCH EASIER!
Then I painted the whole cut-out black. Once dry, all you have to do is fix the silhouette to your window – I used clear packaging tape. When it’s dark outside, any light from behind the silhouette will make it stand out in your window.
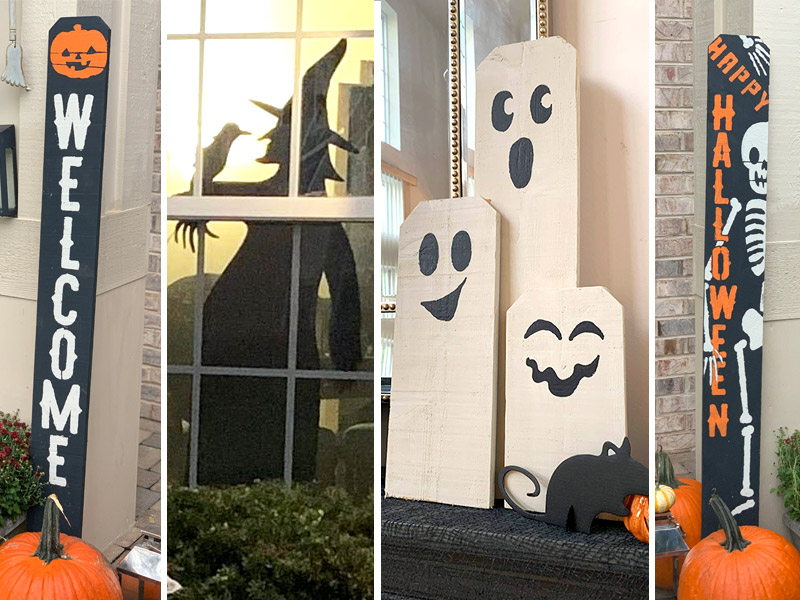
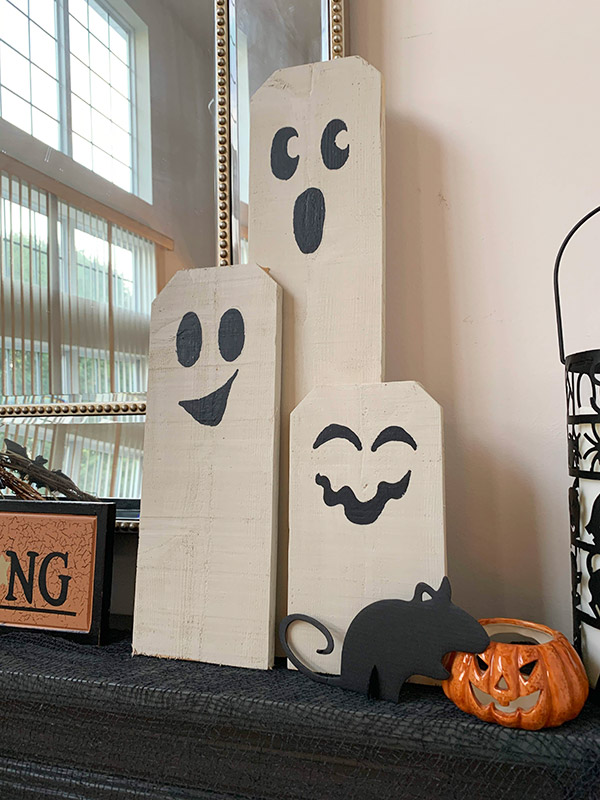
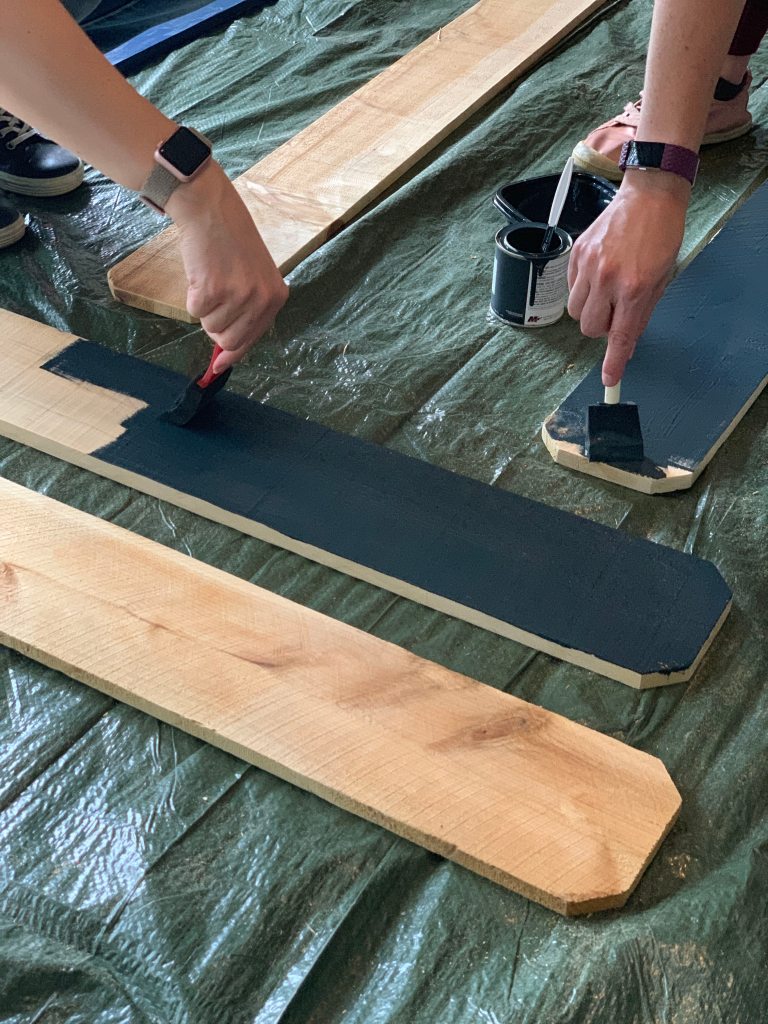
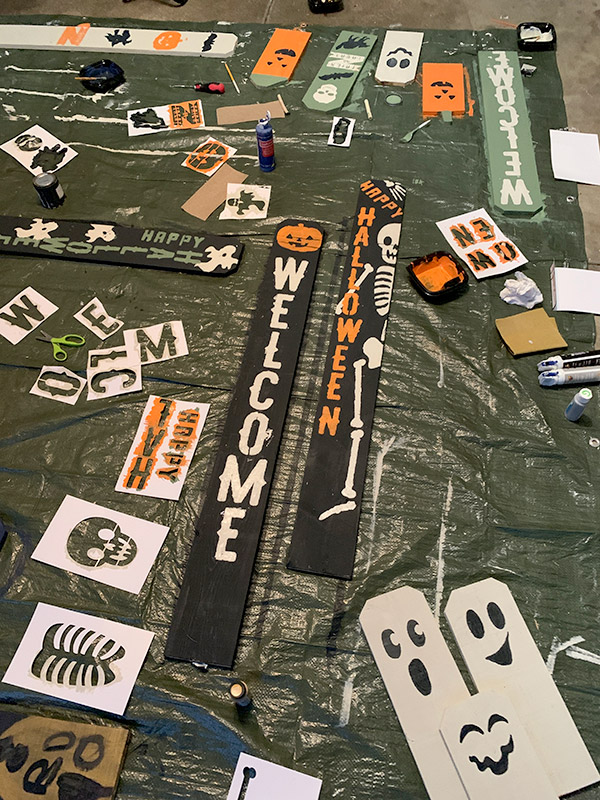
Painted Fence Picket Signs and Decorations
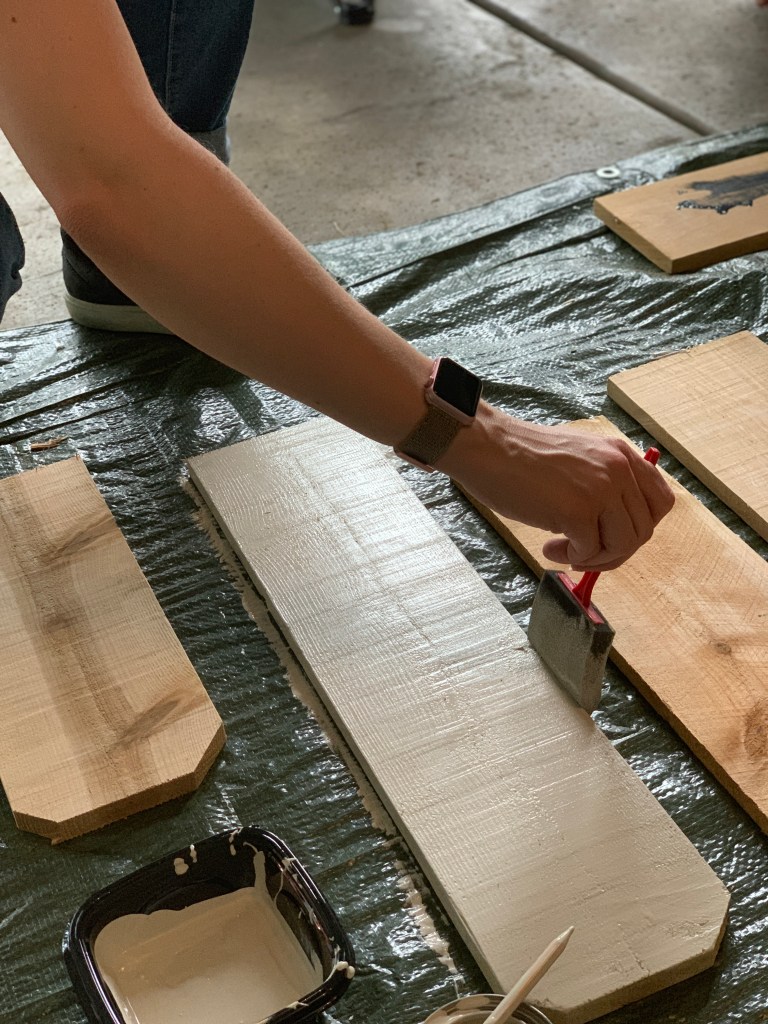
My second project for this year were these Painted Fence Pickets – a set that says Welcome and Happy Halloween for outside my door and a smaller set painted as ghosts for my mantle. First, you will need wooden fence pickets. We went to our local hardware store and bought 3 cedar pickets that are 5 feet tall. They cost about $1.60 each making this a really cheap project! I left two of them their original size for the front door signs and cut one into 3 different, but smaller, sizes for the ghosts with a miter saw. Use whatever saw you have and are comfortable using. If you have sandpaper, you can sand them a bit to get rid of the rough edges.
Next you’ll need stencils and paint brushes/sponges. I bought stencils from Joann Fabric, but you can find some that say Trick or Treat on Amazon here: https://amzn.to/2qi9xt9. You’ll also need paint. Pretty much any acrylic or house paint will work fine, I used KILZ brand interior chalk paint that I got free samples of in small pots. I used black, orange, white and some of the kids (we let each of our daughters make their own – they LOVED it and are already asking if we can do it again for Christmas) used green and blue.
Once you have all of your supplies, choose the colors you want to use and paint the pickets all over the front and sides. I painted my welcome signs black and the ghosts white. Let those dry. Have some wine, dinner, watch a movie! You could even make it a paint party with your friends or neighbors. Then come back to the dry pickets and get to stenciling! Lay the stencil on the picket. With the stencils that took more than one sheet, I traced them with a pencil onto my picket to make sure they would fit first. To stencil, you want to make sure to press the brush/sponge up and down instead of brushing it back and forth. That way the paint doesn’t get under the edges of the stencil. It can also help to have someone hold all the edges of the stencil for you so they stay flat again the wood. Remove the stencil and you’re done!
For the ghosts, I hand painted the faces with black paint. I didn’t do much research or stencil those, I just drew them with a pencil first, then filled in with a paintbrush. And that’s it! Super easy. I let everything dry and placed them in my house. So far the signs outside have held up to a few minor rain storms without any issues, but I may seal them with a clear outdoor sealer eventually.
If you are going to reuse the stencils, make sure there is no paint underneath them when you lay it back down on the board after the first time you use it.
You may need a few coats of paint depending on how thick your paint is and how light of a color you are putting over a dark background color. I used one coat of paint, but filled in a few small areas of the orange after it dried with a paintbrush.
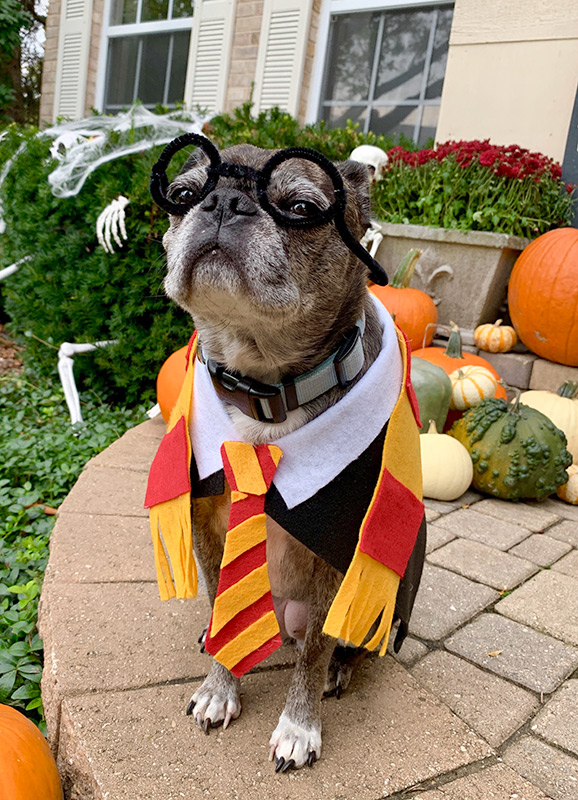
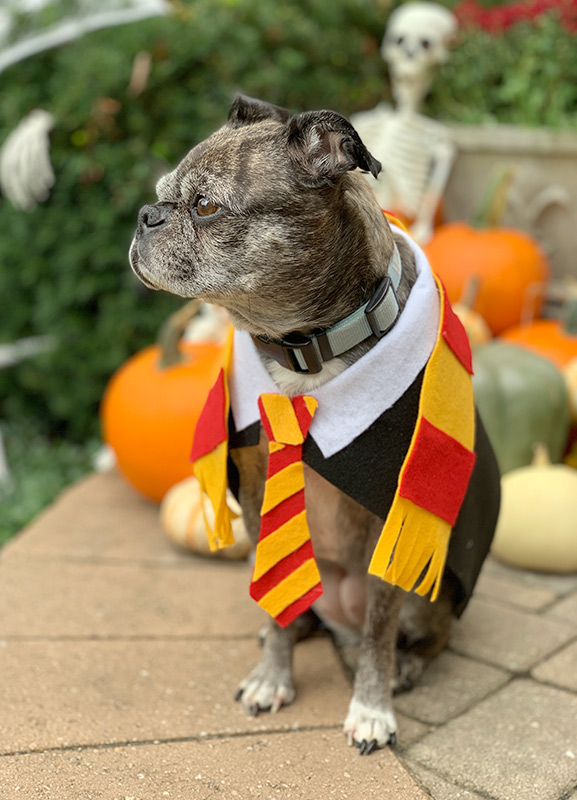
I am always looking for easy, non-expensive costumes for my dog. My girls LOVE taking our dog with us when we go trick-or-treating. I also usually wait at the bus stop on Halloween afternoon with her in costume and all the kids on the bus get so excited to see her dressed up. Last year she was a Jelly Bean, before that she had been a strawberry and a pumpkin. This year she will have a Harry Potter dog costume!
My 8 year old decided to be Hermione Granger for Halloween this year. I was so excited for her to embrace the Harry Potter series – I loved reading the books when I was younger. So naturally, our dog just had to be a Harry Pottery character. The problem was that I could hardly find anything online and if I did, it was too expensive for a dog costume IMHO. That’s why I decided to make one for her! This costume cost me a grand total of $2!
See below for links to buy materials
This costume is a NO-SEW costume which makes it easy and quick to make. You need felt in the correct colors for whatever house you want your dog to be in, (Gryffindor: Scarlet and Gold, Ravenclaw: Blue and Bronze, Slytherin: Green and Silver, Hufflepuff: Yellow and Black) hot glue and a scissors. That’s it! I wanted our dog to match my daughter, so she is officially in Gryffindor House. I bought black for the robe, white for her collar, and yellow and red for the tie and scarf.
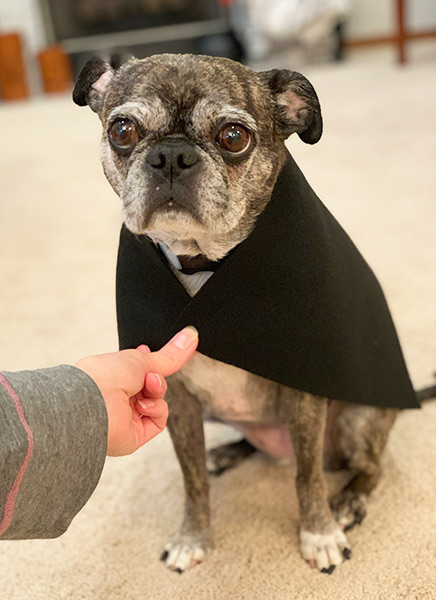
Looking a little concerned as I measure.
I bought the felt in two sizes, the larger piece in black was just about right for the size of my dog. It was 12 inches x 18 inches. My dog is a Boston Terrier Pug mix, so she is relatively small and I didn’t want the robe to be dragging on the ground. If you have a larger dog, you may need to go to a fabric store and get a yard of black for the robe, then cut to fit. The red, yellow and white are all half the size of the black, 12 inches x 9 inches. Again, if you have a large dog, you may need larger sizes of colored felt. I got all of my felt at Michael’s.
Harry Potter Style Robe
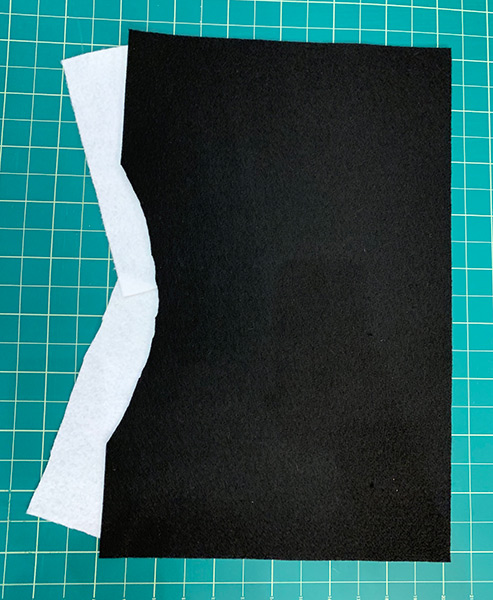
First, you will need a rectangle or square of the black felt for the robe. I wanted to round the neck area out, so I cut a curved piece out of one of the long sides of the black felt. (See picture above for cut – I enlisted a helper with this step, the kids loved being involved in this project.) I then cut the white felt into three equal pieces, I only needed two for the collar. I laid them on an angle under the curved collar area, glued the to the underside of the black felt then folded them over and glued them to the top side. See pictures below.
Gryffindor Tie
Next, I made the tie. I cut out a tie shape of red felt in a length that wouldn’t hit the ground when my dog walked. I cut equally wide strips of yellow felt to make the stripes, glued them down with hot glue, then trimmed the excess.
DIY Gryffindor Scarf
Next was the scarf. I cut the yellow felt into two equal strips and laid them end to end to make the scarf long enough. Again, you’ll need to make the scarf bigger or smaller depending on how large your dog is. I then cut equal sized rectangles for the stripes on my scarf and glued them down to the yellow. Finally, I cut some fringe at each end of the scarf as you’ll see in the pictures.
At this point, all the separate pieces are done, now you can decide how you want to attach them. I hot glued the tie to one side of the neck of the robe. You could use a piece of velcro beneath that with the matching piece of velcro on the other side of the neck. I chose to just glue the tie to both sides of the robe so my costume just slides over my dogs head.
I put a big glob of hot glue right in the middle of the ties “knot” and then pressed it to both sides of the collar.
Options:
You can cut a small slit along the back of the robe if you use a harness with your dog. Just put your dogs harness on first, then the costume over it to measure where to cut.
You can choose to glue the scarf to the back of the robe if you don’t want it to slip off as your dog walks. That is what I did.
You can make a pair of Harry Potter glasses out of a few black pipe cleaners. I made two small circles out of pipe cleaners, then I twisted a small piece between the two circles as the bridge for the nose and to hold the circles together. Then I made a long loop instead of standard earpieces on glasses by twisting two pipe cleaners together and to the ends to each of the circles. My dog did not love the glasses and they are just for pictures. She doesn’t have much of a snout so the glasses didn’t want to stay up on her head.
She was such a good sport trying to keep the glasses on her head. 🙂
Have fun – Happy Halloween, everyone!
Materials List:
Below I have affiliate links to all the materials I used in this post. I didn’t have to purchase anything but the felt making this project just $2!