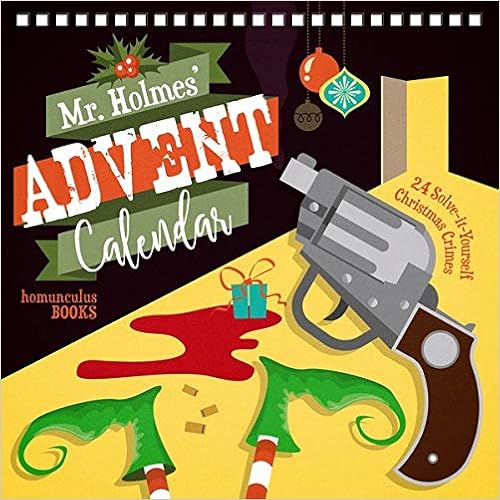
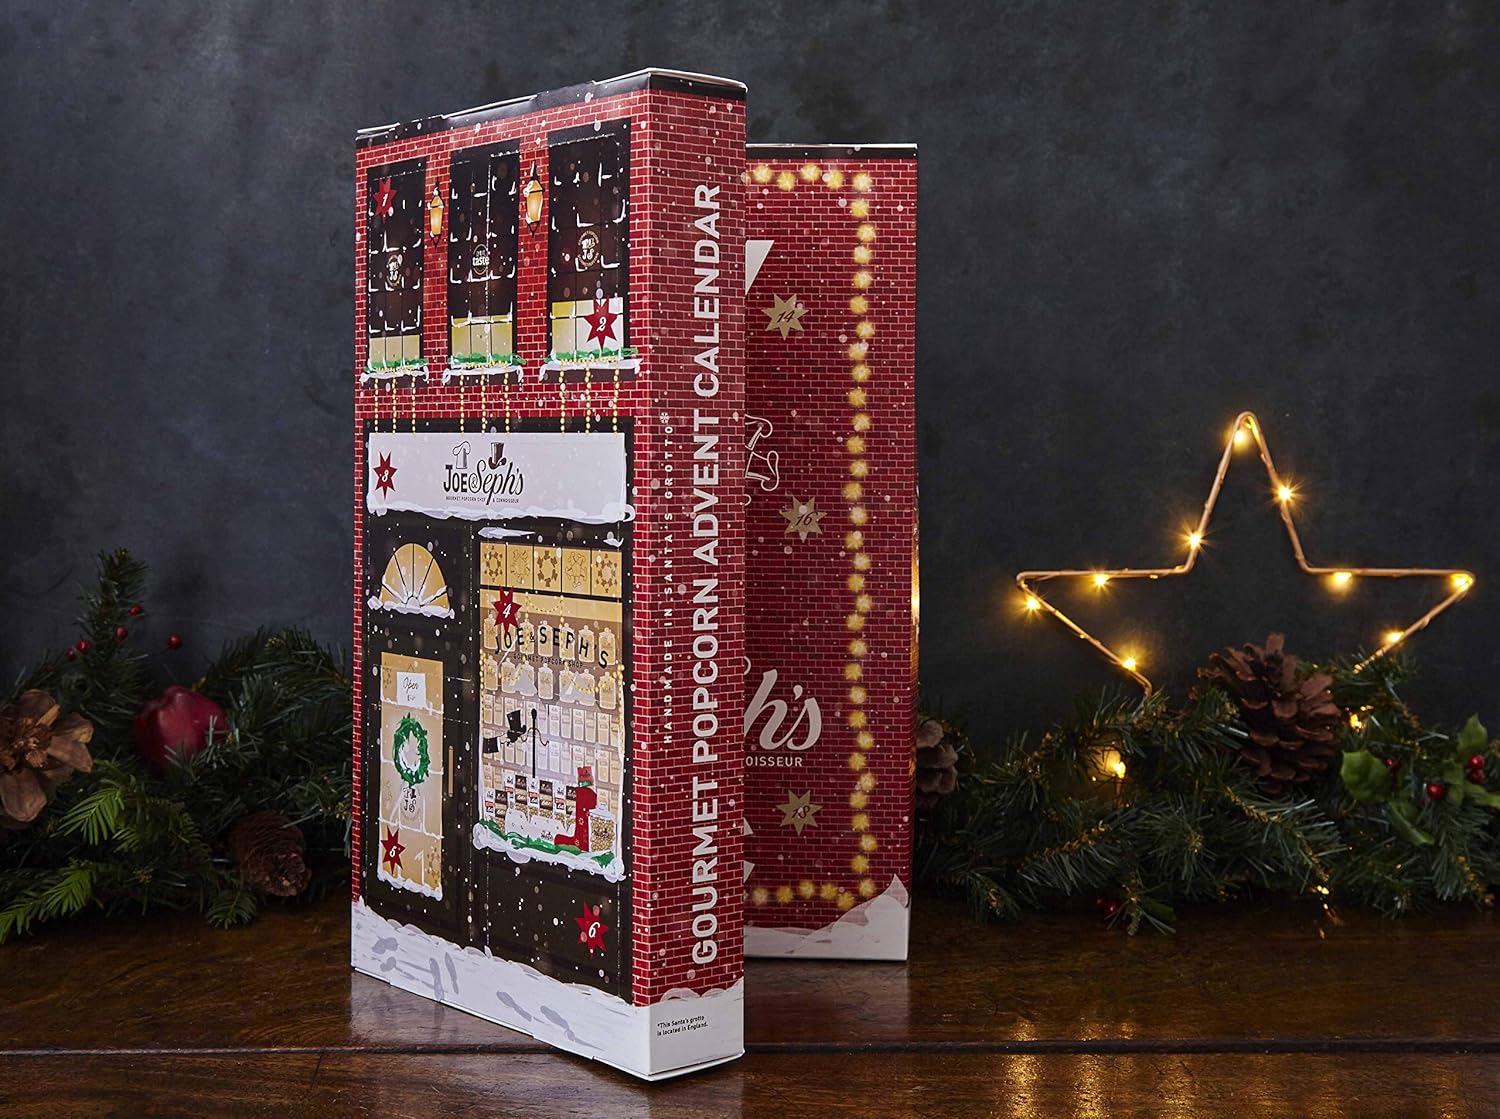
Get yours today before they sell out! We absolutely loved getting Advent Calendars as kids, it was so much fun and something to look forward to opening each night. With that in mind, we put together a list of some great grown up Advent Calendars to keep the fun and nostalgia going. 🛍️ This post contains affiliate links– thank you for supporting us.
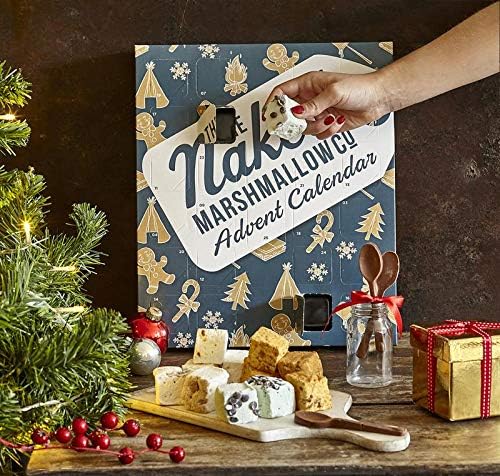
The Naked Marshmallow Gourmet Advent Calendar – You had me at Gourmet Marshmallows. https://amzn.to/2WW6a7h
Lindt Chocolate Advent Calendar – This is not the chocolate advent calendar from your childhood, this calendar has quality Lindt chocolate! https://amzn.to/36VCo7w
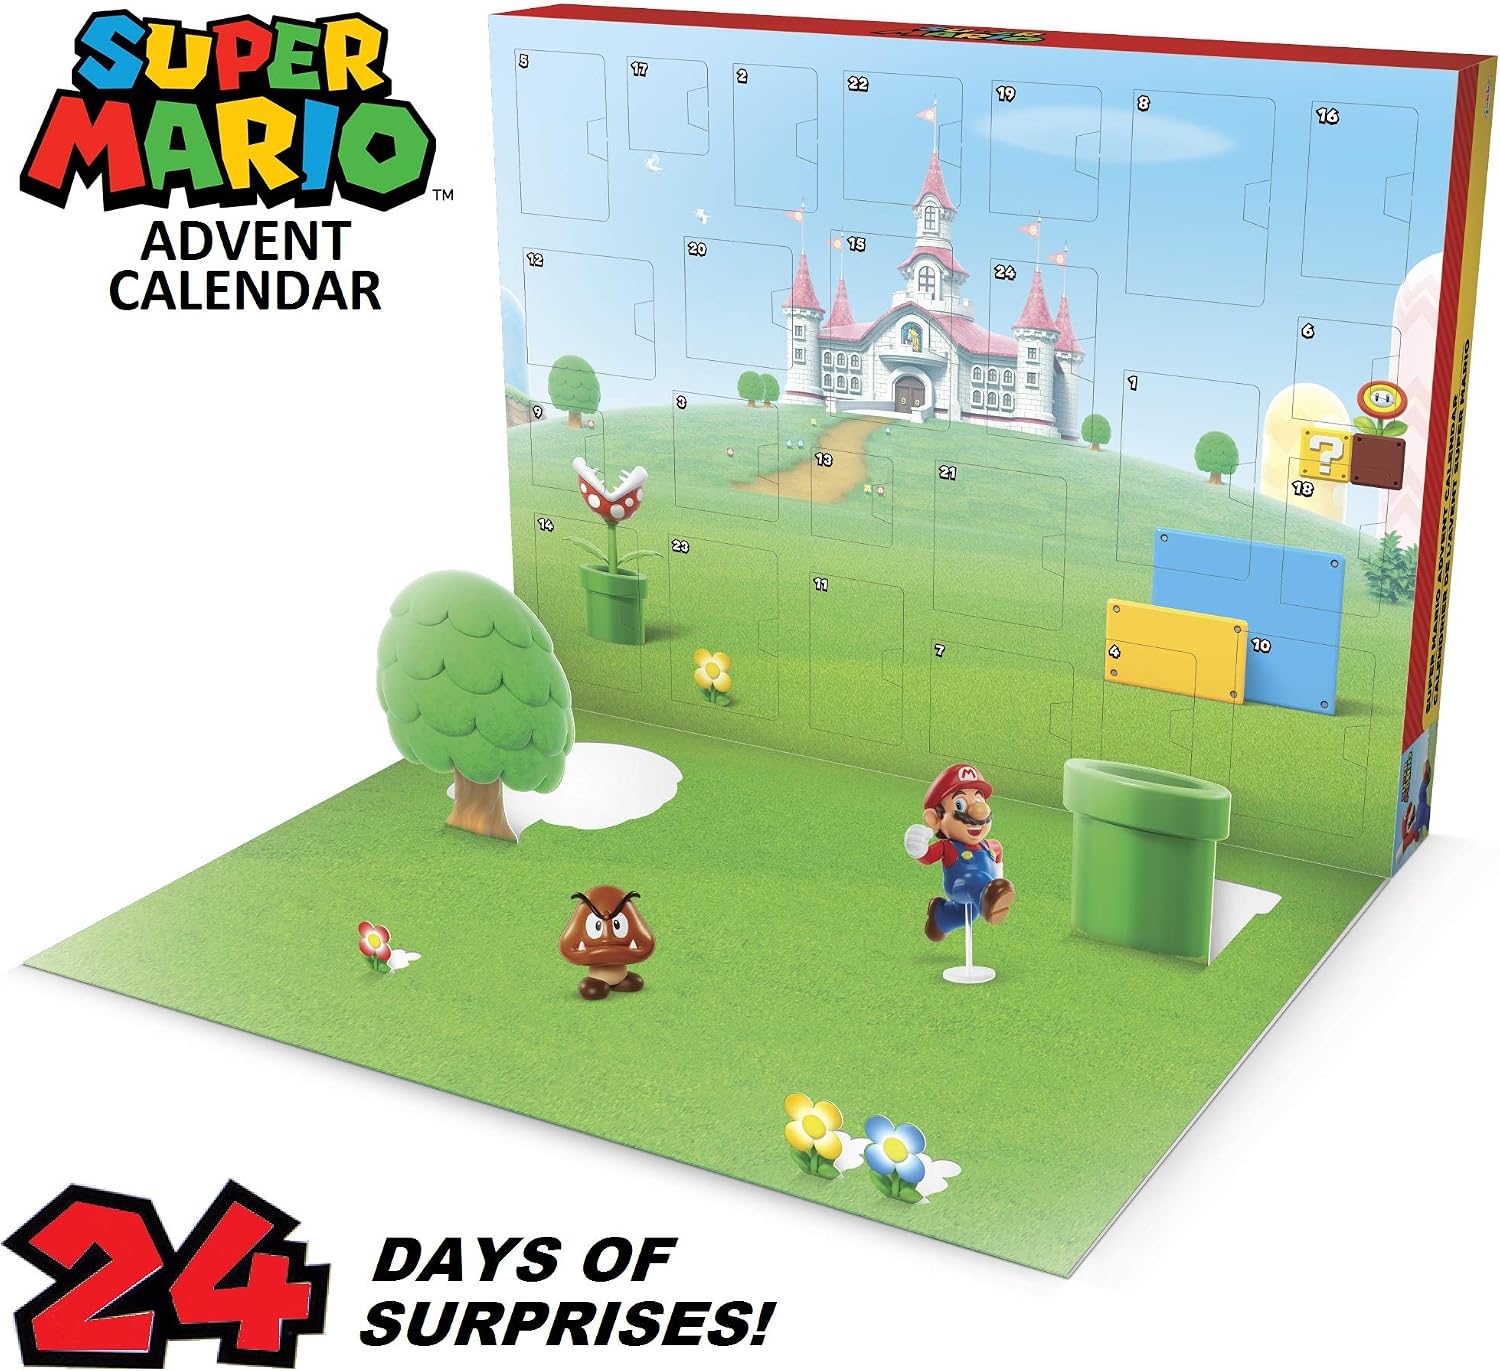
Nintendo Super Mario Advent Calendar – For the kid in all of us, grab this Super Mario calendar. https://amzn.to/2X1LjQ7
RITUALS The Ritual of Advent Calendar – Bath & Body gifts in a beautiful gold tree. https://amzn.to/32xfY94
Harry Potter Candy Advent Calendar – Yes…just take my money now! shorturl.at/aDJUZ
Roger La Borde Northern Lights Pop & Slot Advent Calendar – This calendar would be cute addition to your holiday decorations! https://amzn.to/2WTogac
12 Days of Beauty Advent Calendar Box – Includes 12 sample size items that make trying new cosmetics a fun, holiday experience. https://goto.target.com/jaXja
Dream Big This Christmas Beauty Advent Calendar – If you love the Body Shop, you’ll love this advent calendar. shorturl.at/kwCEQ
Davids Tea 24 Days of Tea Advent Calendar 2019 – Tea lovers, get a new tea to try each day of December! https://amzn.to/2Csc9HK
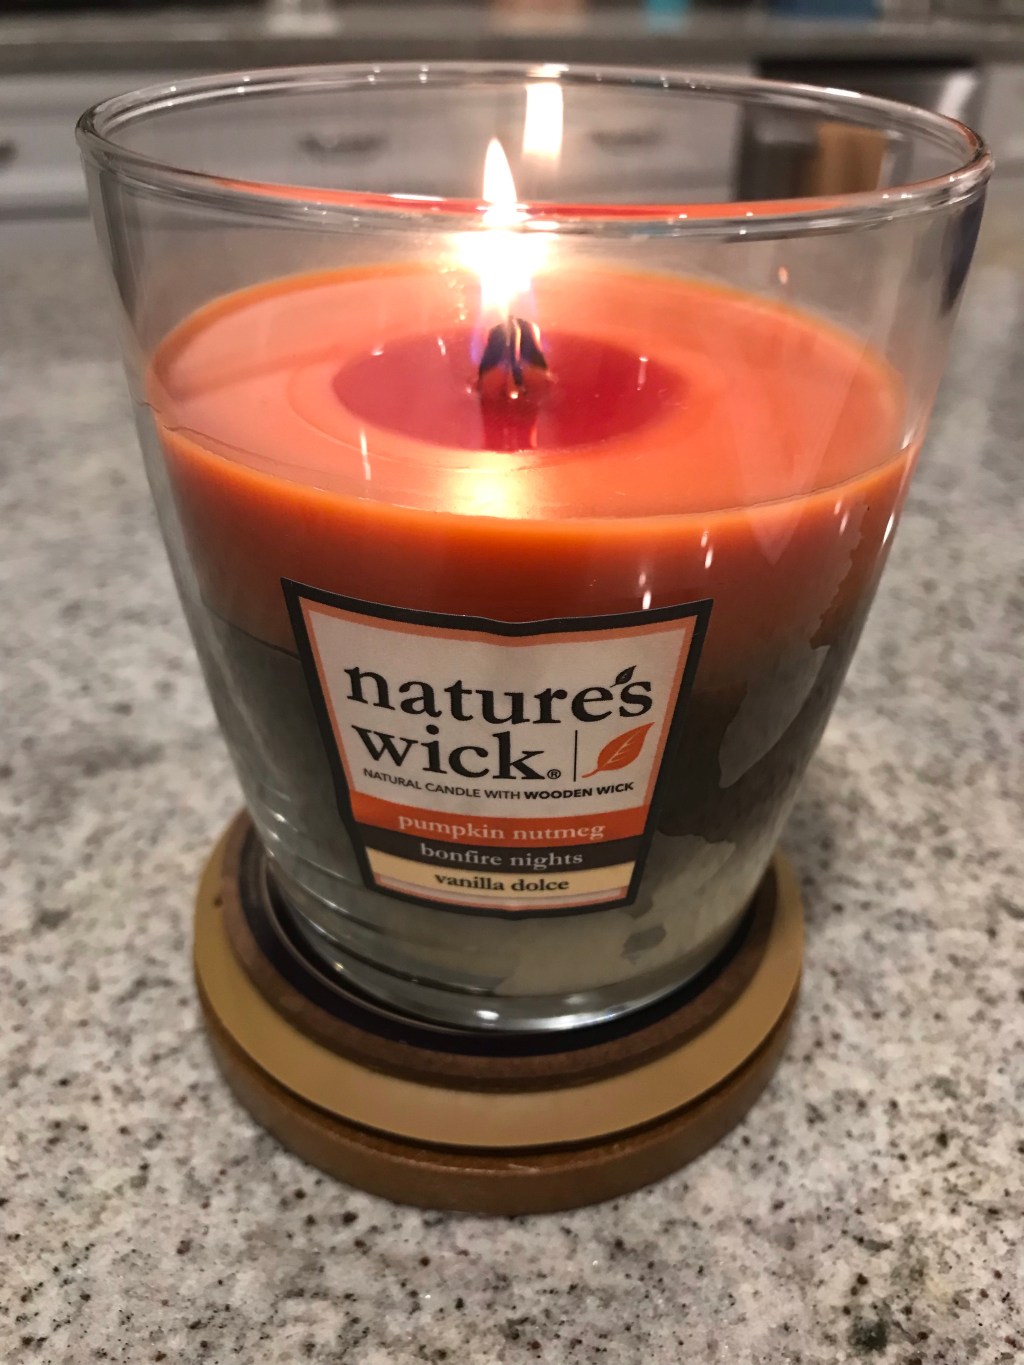
Are you looking for the perfect host gift for your next holiday party? Look no further!! On a whim I picked up this Nature’s Wick Candle at Target, on sale of course, and was pleasantly surprised.
I was shocked at how LOUD it crackles! This candle really sounds like a cozy crackling winter fire and it smells amazing to boot. They offer layered candles so you have different scents to look forward to as the wick burns down.
You can check out Target’s selection using our affiliate link here, goto.target.com/93dAW. Also, the candles start at only $10.79 for a 10 oz. jar and if you are lucky you can catch them on sale!
Are you looking for the perfect host gift for your next holiday party? Look no further!! On a whim I picked up this Nature’s Wick Candle at Target, on sale of course, and was pleasantly surprised.
I was shocked at how LOUD it crackles! It really sounds like a cozy crackling winter fire and it smells amazing to boot. They offer layered candles so you have different scents to look forward to as the wick burns down.
You can check out Target’s selection using our affiliate link here: goto.target.com/93dAW. The candles start at only $10.79 for a 10 oz. jar and if you are lucky you can catch them on sale!
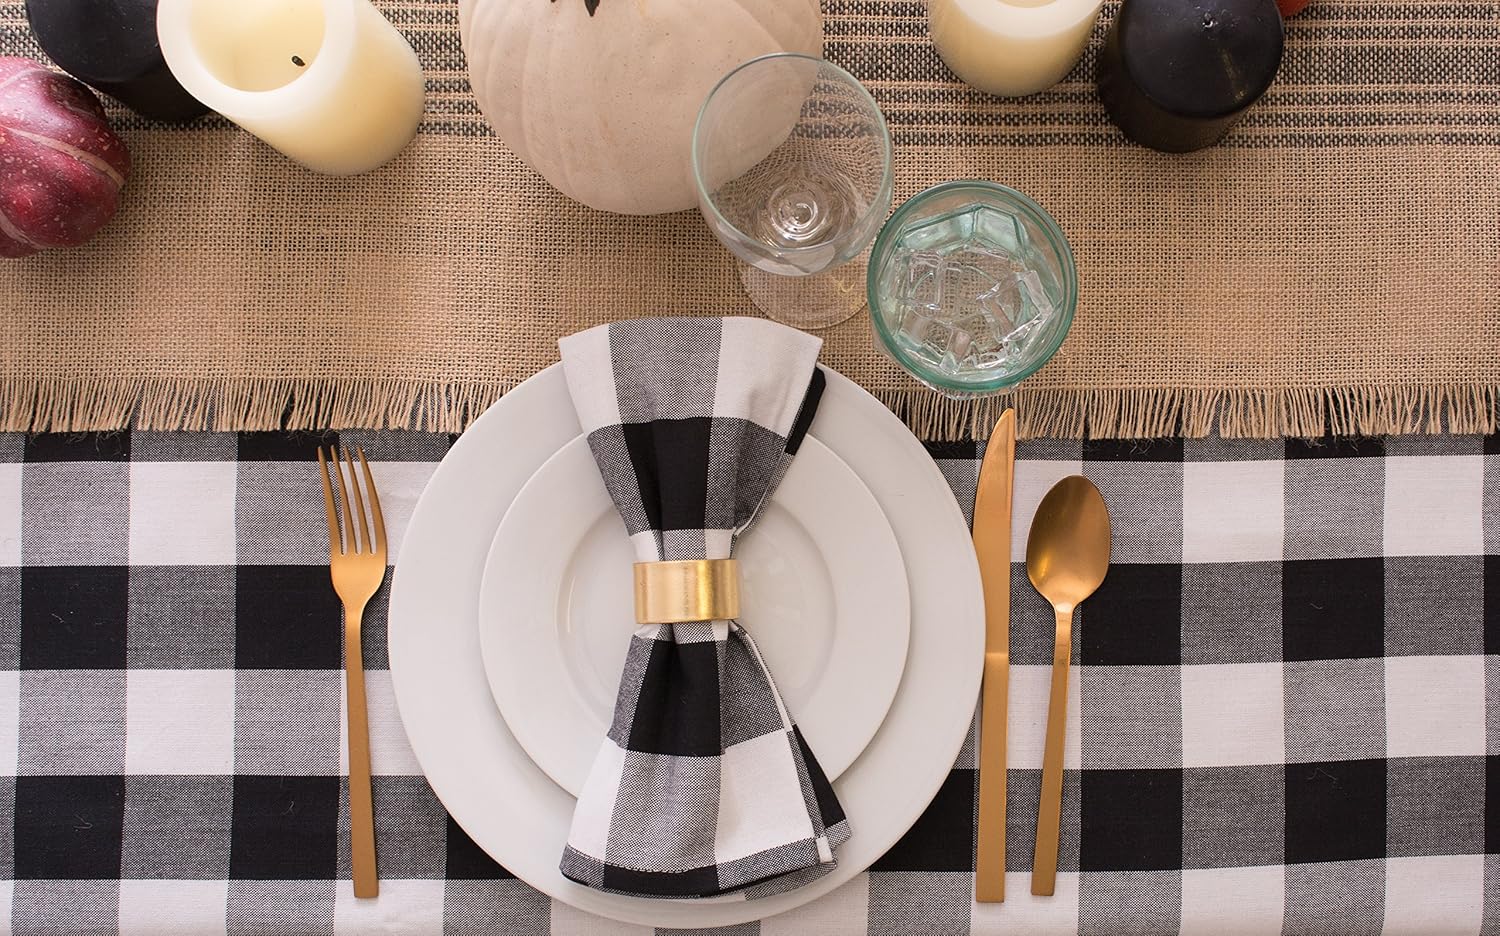
Buffalo Check Table Runner and Napkins – Get that cozy, rustic feeling with a buffalo check tablescape this year. (If you’ve read this blog before, you know how I love my buffalo check.)
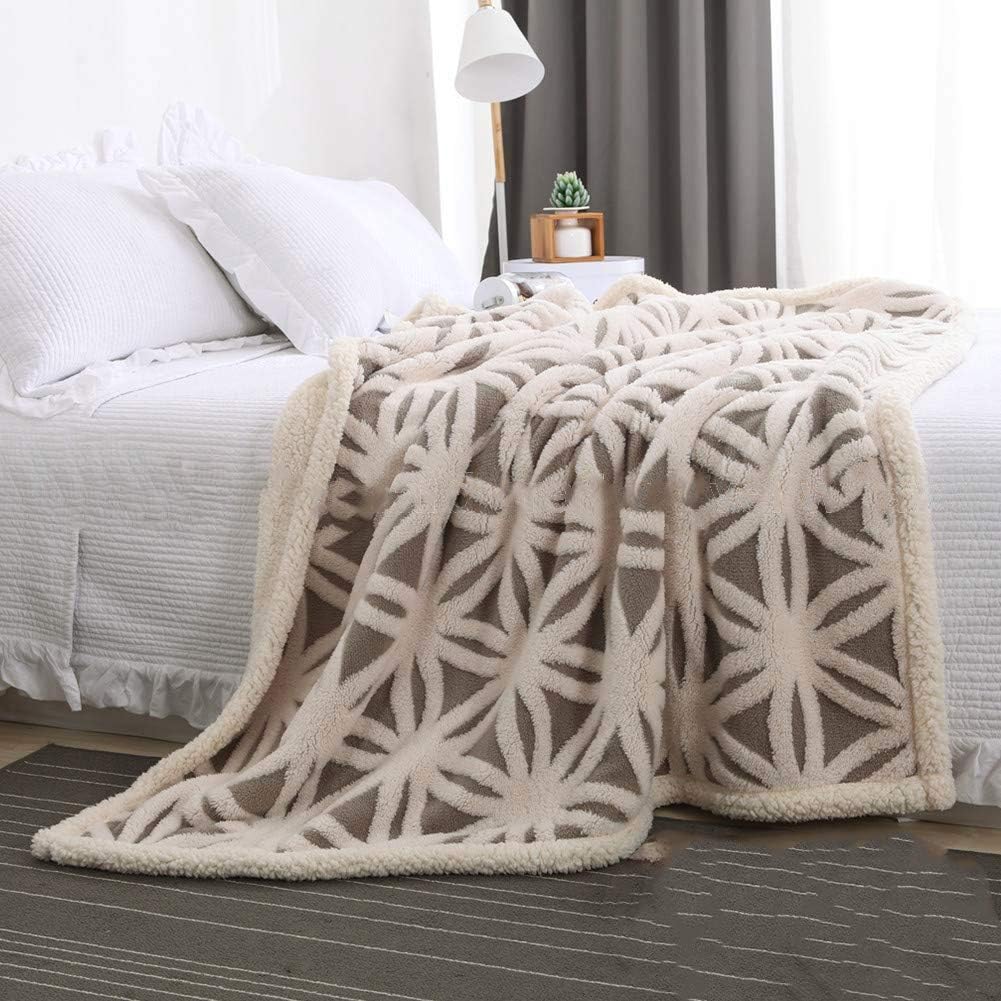
Super Soft Sherpa Fleece Blanket – To keep you warm as you cuddle up on the couch. I kinda want one in every color and with such great reviews I just might grab a few extra for hostess gifts.
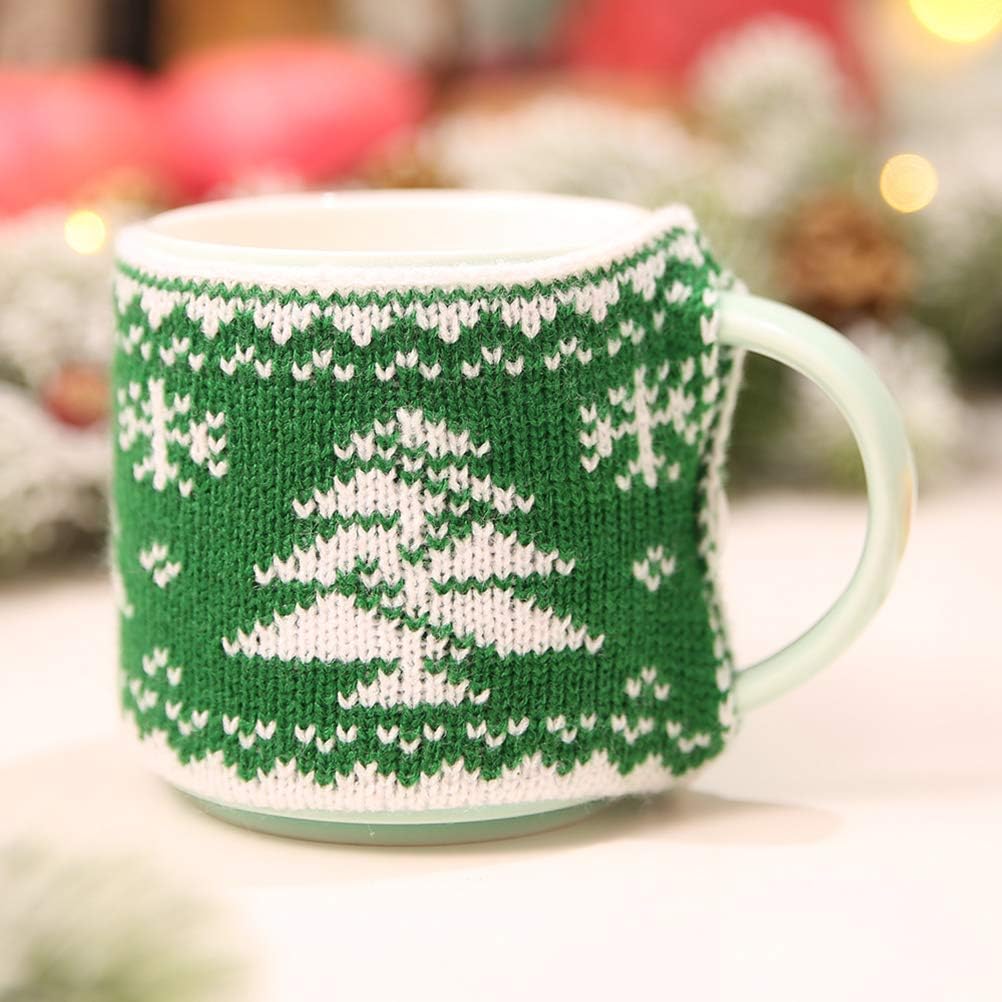
Campfire Mug – Image yourself cuddled up on your couch, with a throw blanket and pillows, drinking hot chocolate out of this cute campfire mug. Soooo cozy. This mug comes in lots of colors, so you can match any decor.
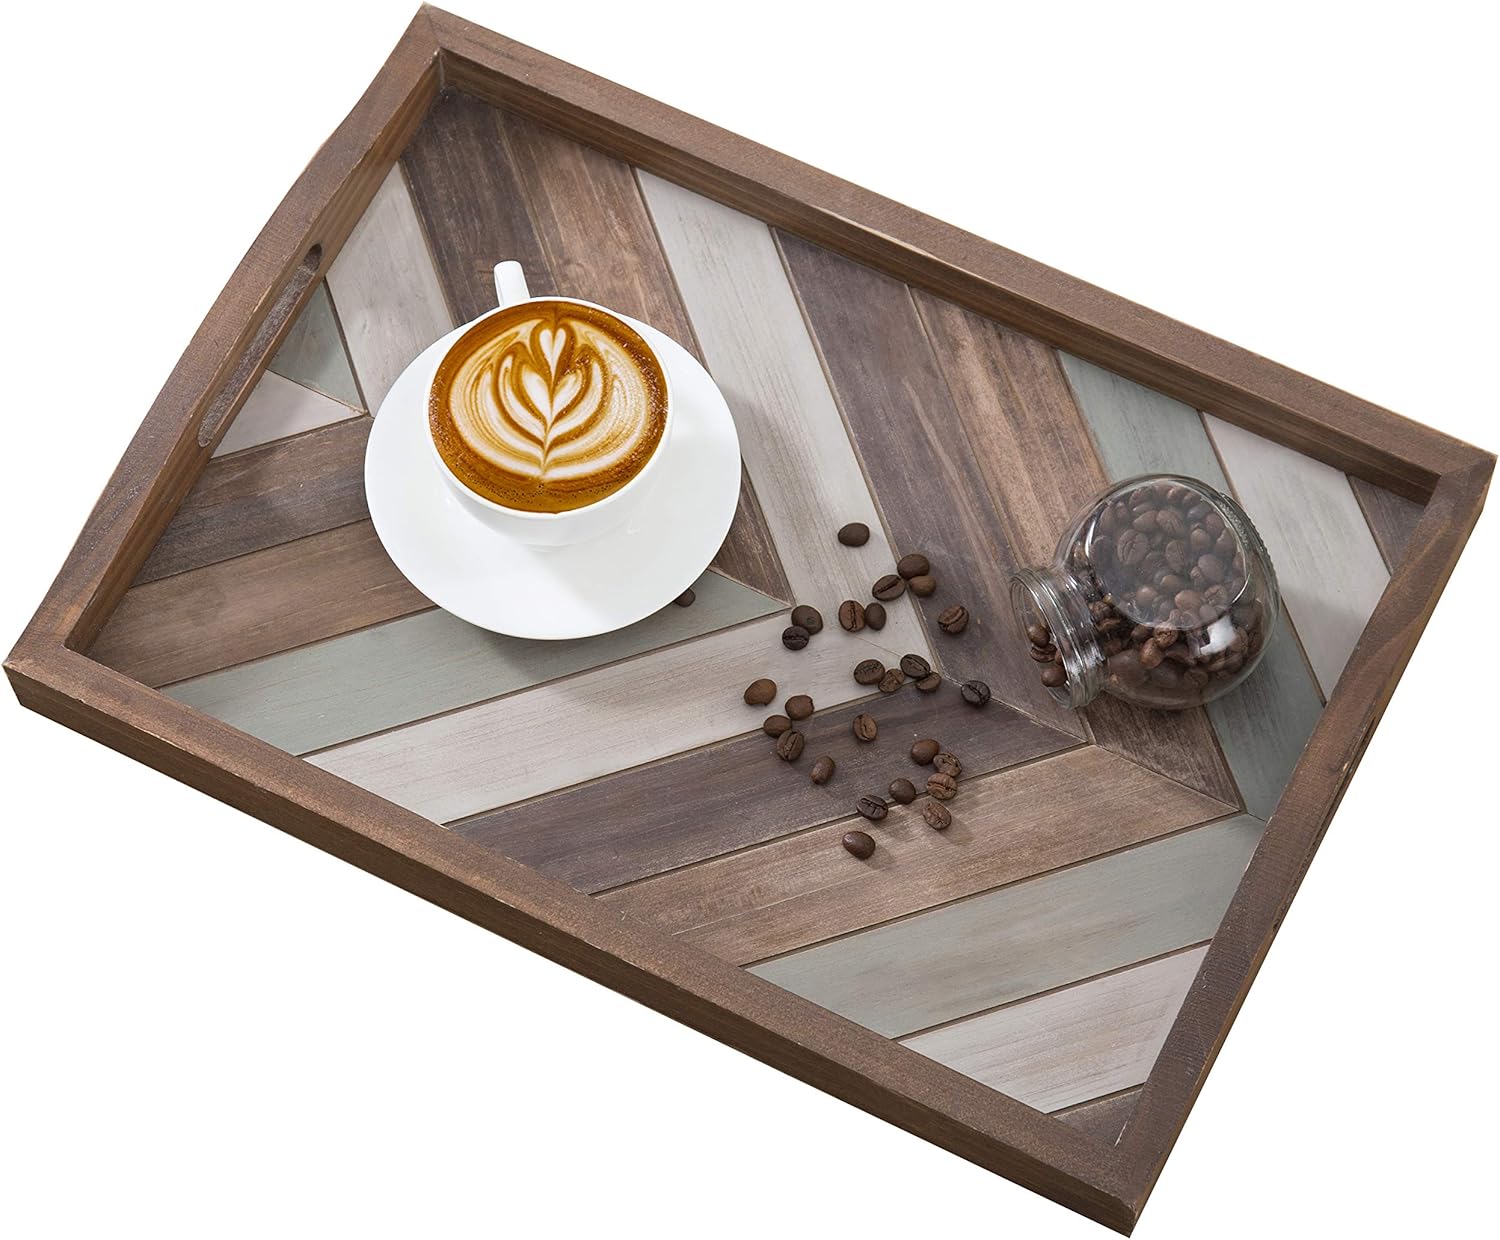
Gorgeous Tufted Ottoman – A cozy fabric ottoman will change the look of your living space, use as a coffee table with a rustic tray.
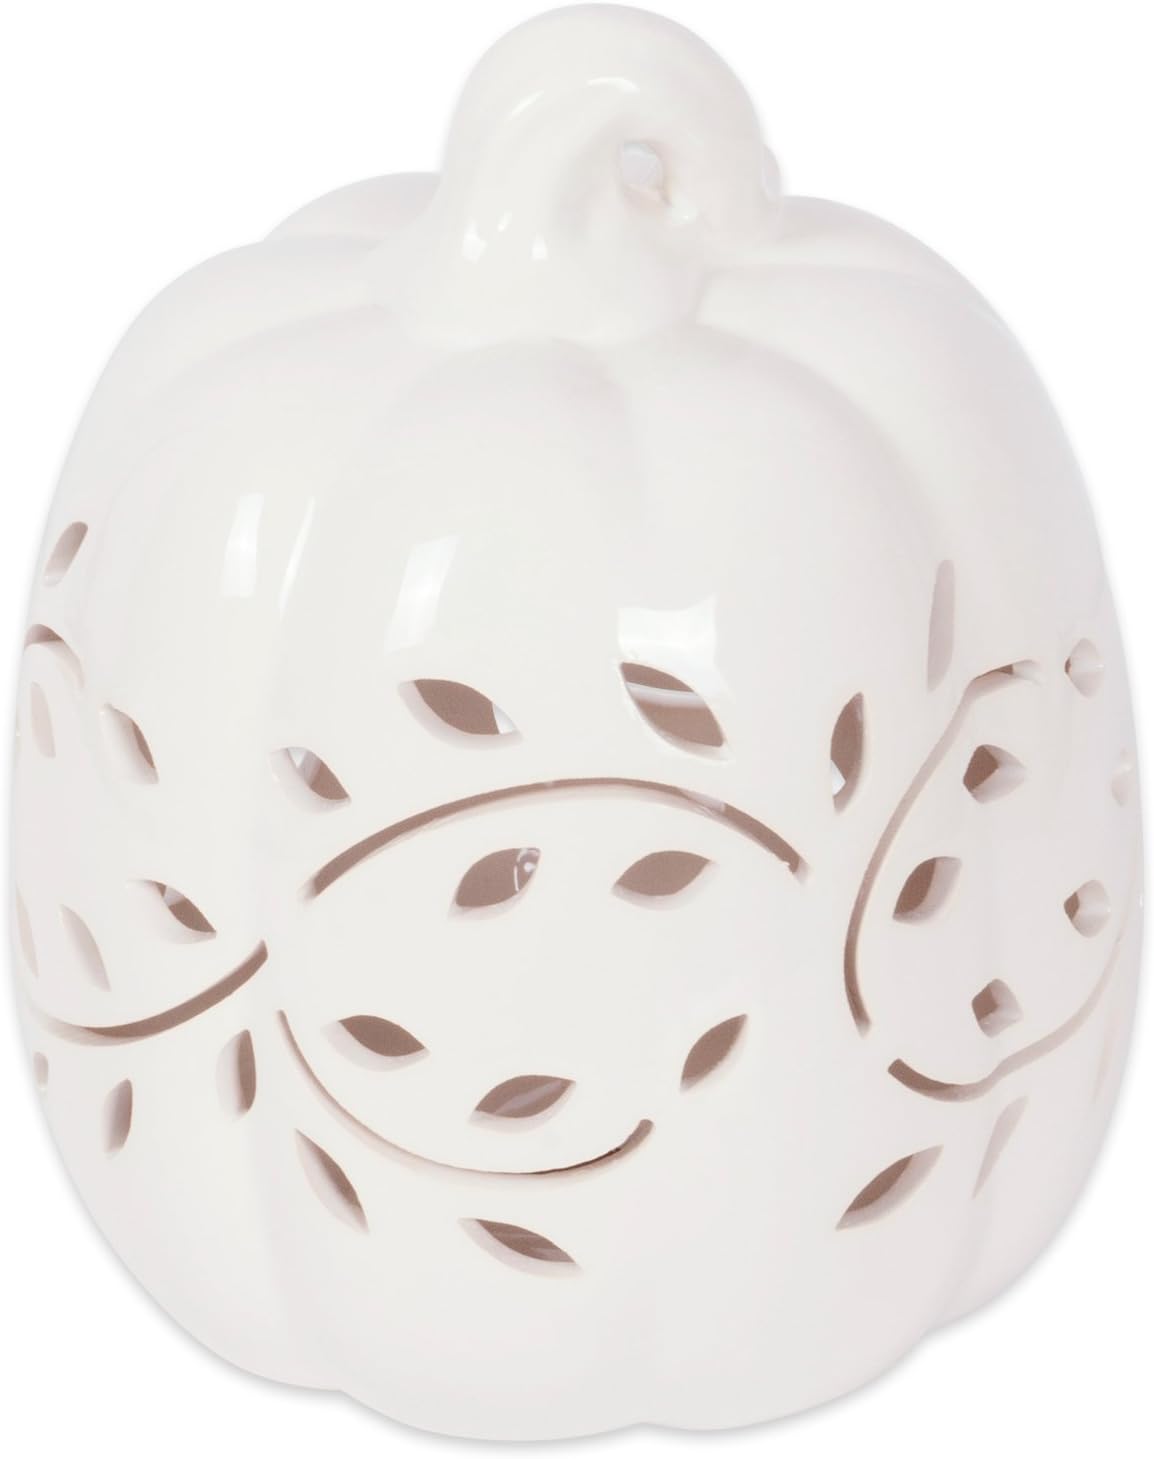
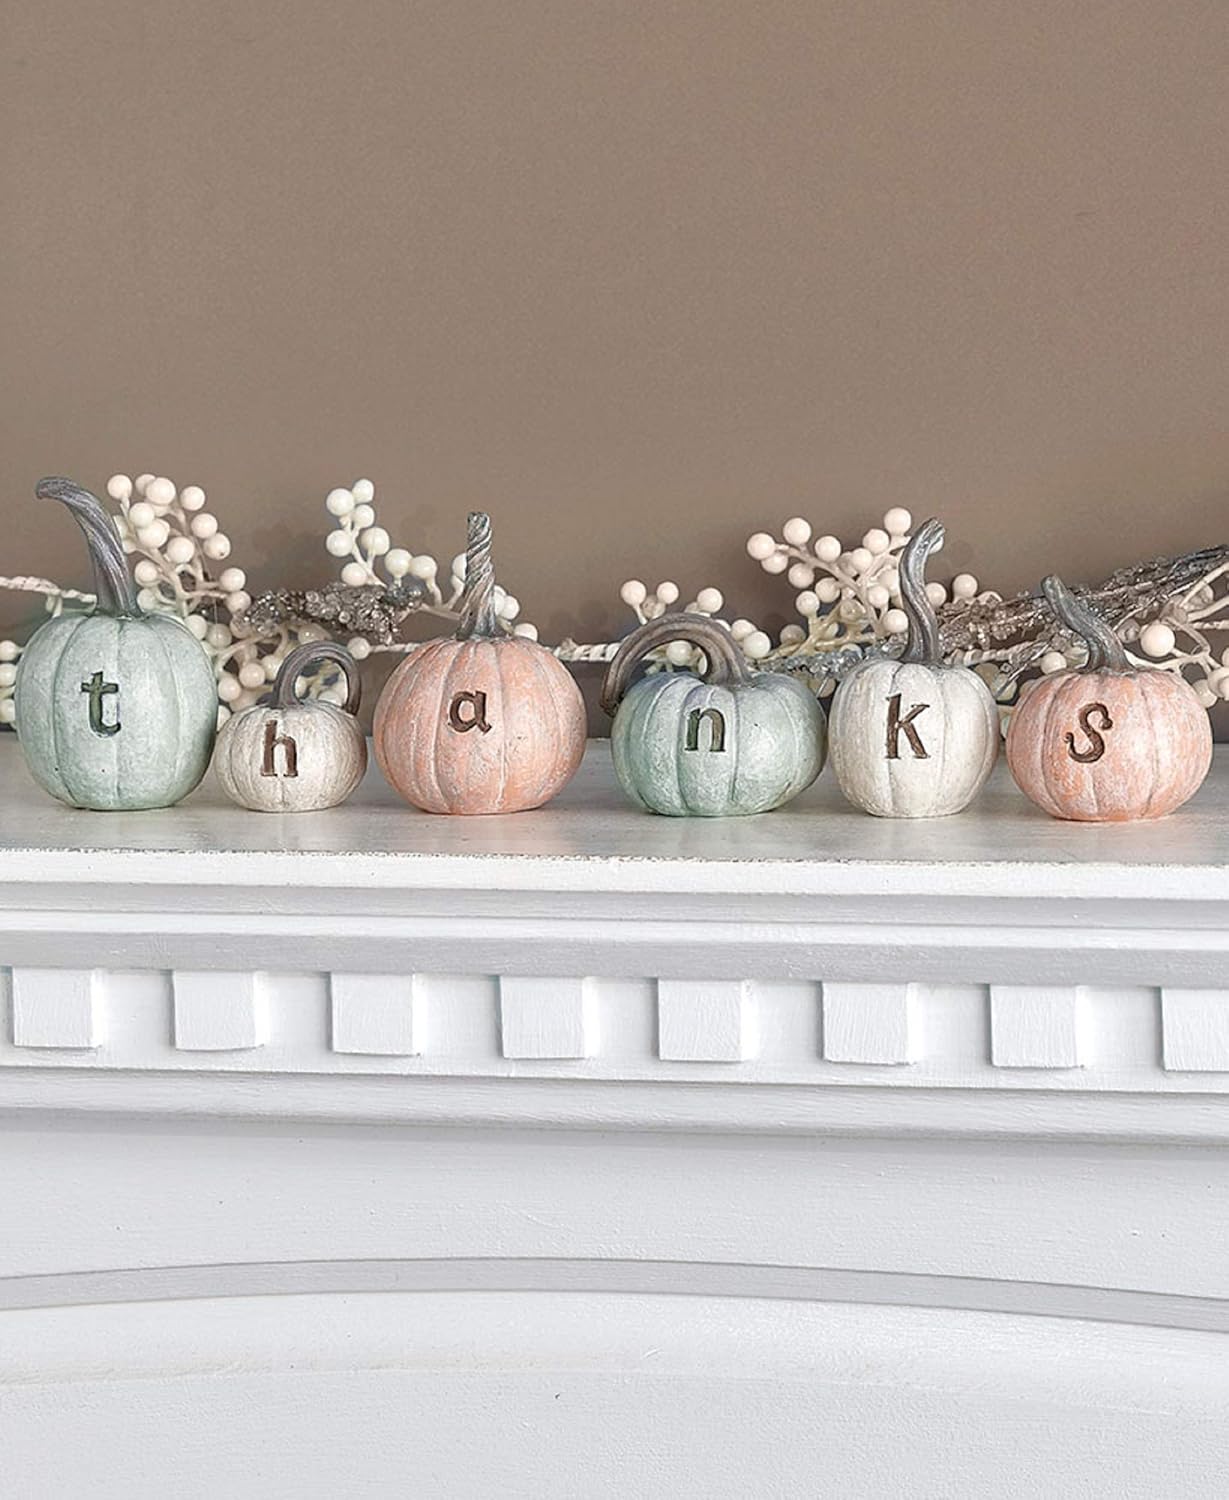
Thanks Pumpkins – Finally, bring a calming pastel color palette to your Thanksgiving decor with these Thanks Pumpkins. They would make a nice addition to your mantel, coffee table or dining table.
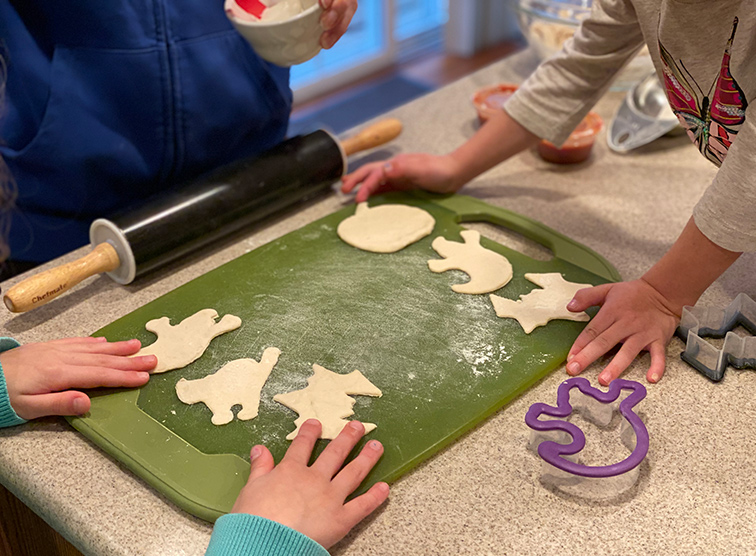
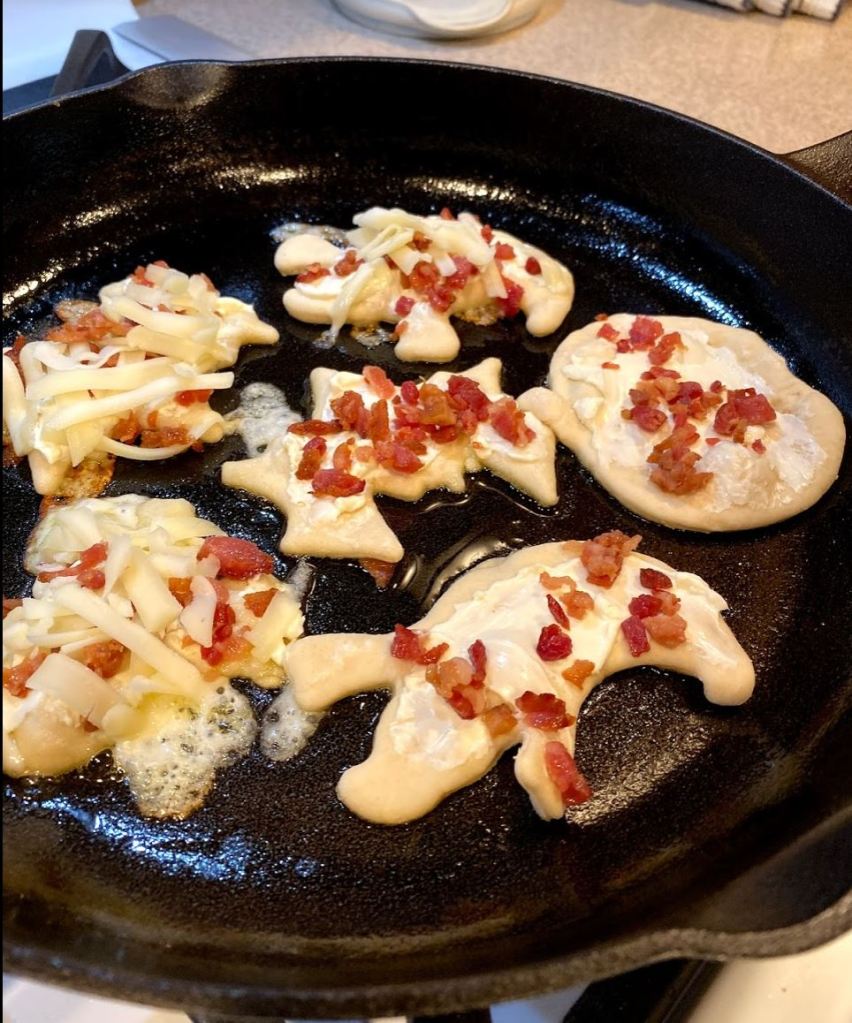
Need something quick and easy to make on Halloween before you trick-or-treat? This is a family favorite and so easy – Cast Iron Cookie Cutter Mini Pizzas! You can make these as easy or fancy as you would like and use any cheese or toppings that you and your kids enjoy. Here’s what we did.
Using either homemade (recipe is at the bottom of the post) or store-bought pizza dough, roll the dough out on a cutting board or clean counter. Each of my kids picked out the Halloween-themed cookie cutters they wanted to use and cut their own mini pizza crusts out.
For toppings, my kiddos chose cream cheese, bacon and a small amount of shredded cheddar-jack on top. You can make any flavor combo you want and tailor it to each person.
Once done adding toppings, preheat your cast-iron on medium heat on the stove. Add your mini pizzas to the pan once it is hot and cook the bottom of the crust for just about a minute (depending on how hot the pan is). This step will get the crust crispy. Then, take it off the heat and put under the broiler in your oven set to high to melt the cheese on top, about 1 – 2 minutes. Again, watch to make sure they don’t burn.
And that’s it! Festive, easy and delicious Halloween dinner is done. Sorry for the bad pictures, it has been rainy and cold these past few days around here. It’s like we went straight from summer to winter with hardly any fall in between. Have a fun and safe Halloween everyone!
Easy Pizza Dough Recipe
This is the recipe I have been using for years and it never disappoints!
Ingredients:
3/4 cup warm water 1 packet instant yeast 2 tablespoons honey 1 tsp salt 2 to 2 1/2 cups all purpose flour
Directions:
Add warm water, yeast and honey to a large bowl. Stir to mix ingredients and let sit for about 15 minutes or until the yeast is frothy.
Next, add 1 cup of flour and salt. Mix until combined, then start kneading with your hands adding more flour a little bit at a time until the dough isn’t sticking to your hands. The more flour you add, the tougher the dough will be so try not to add too much. I usually end up using about 1 1/2 cups of flour total.
Form the dough into a ball and place in the bowl. Cover the bowl with a towel and place in a warm spot for the dough to rise for at least 30 minutes, but 2 hours works best. I use my microwave for this step.
Once your dough has risen it should be ready to go. Lightly flour a cutting board or work surface and you are ready to roll it out with a rolling pin.
I’m so excited to share my Fall Stitch Fix Box! I was looking for some cozy clothing for the Fall that would easily match my current wardrobe and my new stylist hit the nail on the head with this one.
As we have mentioned before, Stitch Fix allows you to write a note to your stylist for each fix. These notes are extremely important in getting a successful fix. Unless you are very easy to please you should never leave them blank. For the stitch below, I asked for comfortable fall clothing, including joggers, that have a Jennifer Aniston Street Style feel. Basic colors only. I also mentioned needing a new pair of shoes – preferably booties. Check out what I received, and loved, below!
Note: Stylist can be restricted by what is in-stock in your size. I’ve asked for new booties before but they haven’t had something that would work until this most recent fix.
Affiliate link: Interested in trying Stitch Fix? Now is the time to do it – click HERE to get $50 off your next first fix!
T4T Carla Burnout Jogger
PINK CLOVER Kaia Textured Curved Cardigan in Burnt Orange
MIX BY 41 HAWTHORN Arnold Raglan Knit Top
RD STYLE Rowca Elbow Patch Pullover
DV8 Cheers Bootie
If you are interested in seeing any of our other Fixes from Stitch Fix, here are some of our previous posts.
We love reading here at Today I Need A… and when I was younger I loved reading scary, spooky stories. I still remember going to the library with my mom and looking to check out one of the R.L. Stein or Goosebumps books that I hadn’t read yet. I was definitely a little older than my kids are now, and I currently have one little 5 year old who does NOT like to be scared like I did. So that is why I put together a list of the books we read with our little ones during this time of year. None of them are too scary, but they are still festive. Happy Reading! 🛍️ This post contains affiliate links– thank you for supporting us.
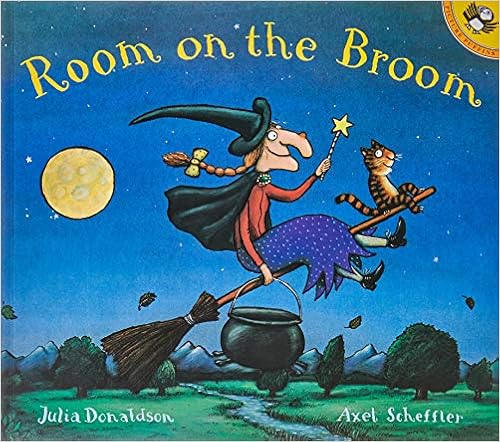
Room on the Broom – Love this book, Netflix has an animated short movie of this book with the same name. Find it here: https://amzn.to/2OXBDEs*Affiliate link
The Little Old Lady Who Was Not Afraid of Anything – We love this book too, we even made up hand movements to go with the repeated phrases! https://amzn.to/2MR4980*Affiliate link
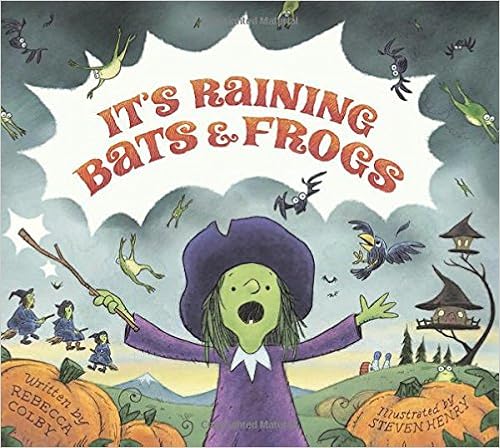
It’s Raining Bats and Frogs – We have had this book for a few years and it is still one of my girls’ favorites! They love the spells and illustrations. https://amzn.to/31nQSsS*Affiliate link
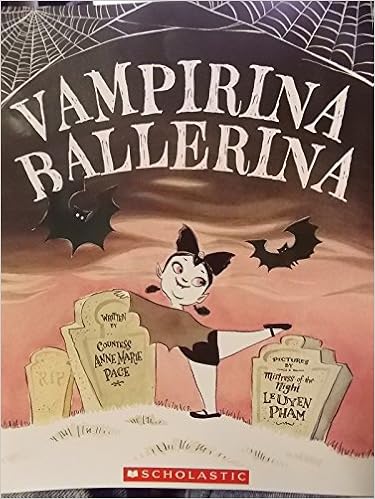
Vampirina Ballerina – Who wouldn’t like to read about a vampire ballerina? https://amzn.to/2oT5brX*Affiliate link
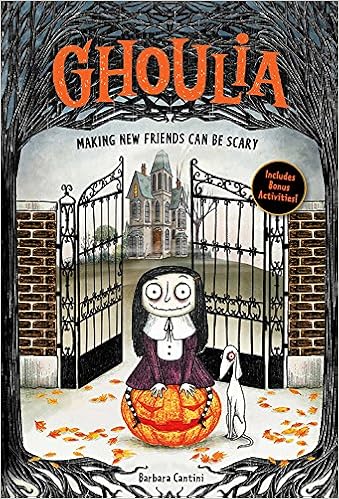
Ghoulia – For the slightly older kid ~ we just read it this week and both of my girls loved it! This is part of a series so there is more to keep the creepy fun going. https://amzn.to/35FicGp*Affiliate link
Hit up your local library!
Below is a list of books that are currently out of print, but you may be able to find at your library. That’s what we did! Happy Reading!
Here They Come – David Costello
Harold & Chester in Scared Silly: A Halloween Treat – James Howe
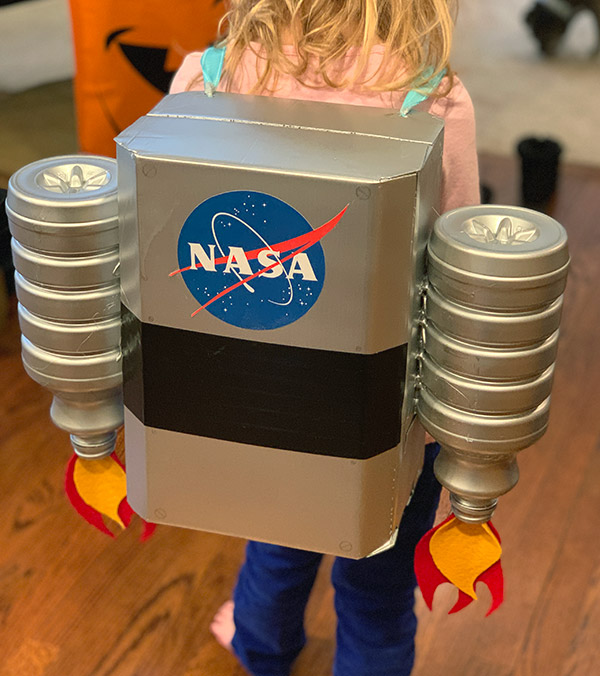
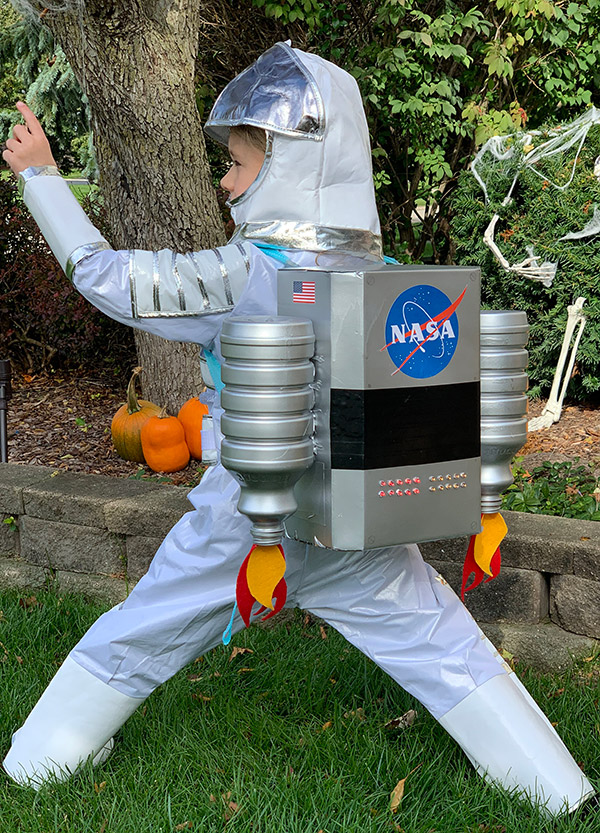
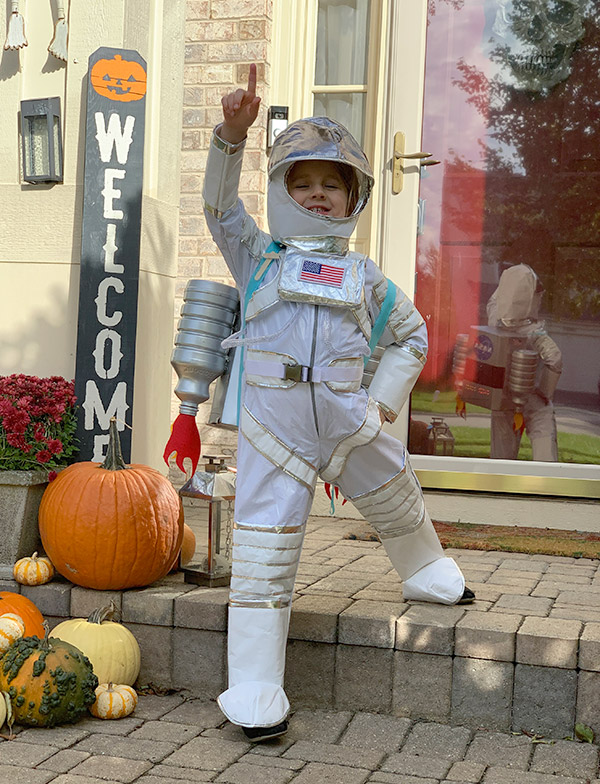
Guys, something amazing happened in female history this past Friday! The FIRST all-female spacewalk took place! I kinda can’t believe it took this long, but it is still an amazing achievement nonetheless. 👏 GO GIRLS! 👏 As it just so happens, my younger daughter is going as an astronaut this Halloween! We saw the costume in the store last month and both instantly thought it looked amazing. In honor of this historic event, I wanted to share how I created a DIY Light-Up Astronaut Jet Pack for her costume. She wanted it to be big, have fire coming out of the jets and light up. Never one to back down from a challenge, I got to work. Here’s what I did:
Jet Pack Materials
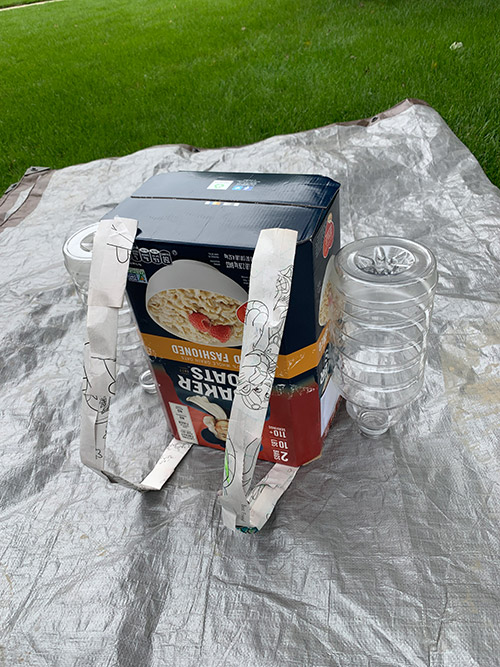
I wanted the jet pack to be light. My daughter is 5 and it needed to be light enough that she wouldn’t hand it to me half-way through trick-or-treating. (You know, like she’s done in years past with various costume accessories.) I found an oatmeal box which was the perfect shape for the middle portion and super light when empty. It had angled corners instead of standard right edges that I thought would make it look more, I don’t know the word for it, space-like. I also used two plastic juice containers for the jets. Below is a list of the materials I used. *affiliate links
First, I added straps made of ribbon to the box by cutting two holes on the top and bottom of the box. Then, I tied the ribbon in knots inside the box. I tied the ribbon to the top two holes first, then measured the strap length on my daughter while she held it to her back. I then used hot glue to connect the juice containers to each side, this formed the basic jet pack shape.
Painting & Design
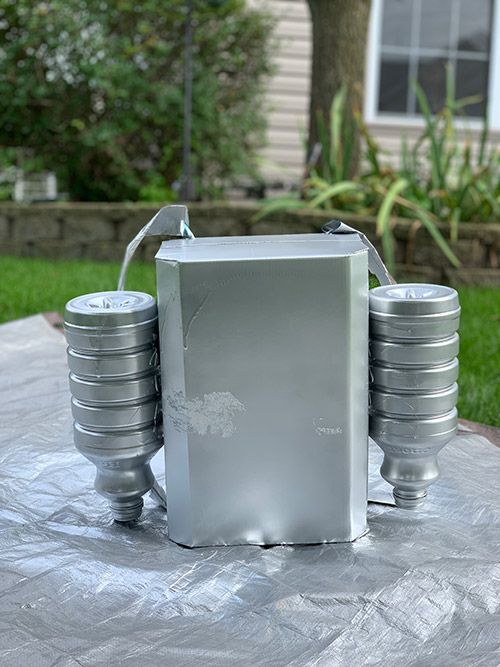
Once the glue cooled, I chose to paint the jet pack silver. To do this I used a silver spray paint + primer similar to this one (affiliate link). I covered the straps with paper before I sprayed anything. It took me two coats to completely cover the writing on the box.
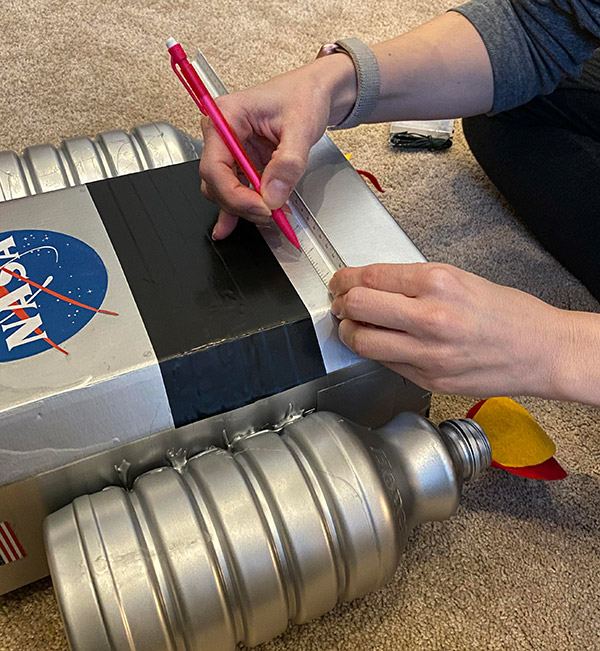
For the flames coming out of the jet pack, I cut out yellow and red pieces of felt in a flame shape. I hot-glued them into the bottle openings. I printed out a NASA logo and glued it to the front of the jet pack and made a black stripe using electrical tape under that. Here is what it looked like before I added the lights.
How I made the Jet Pack light up!
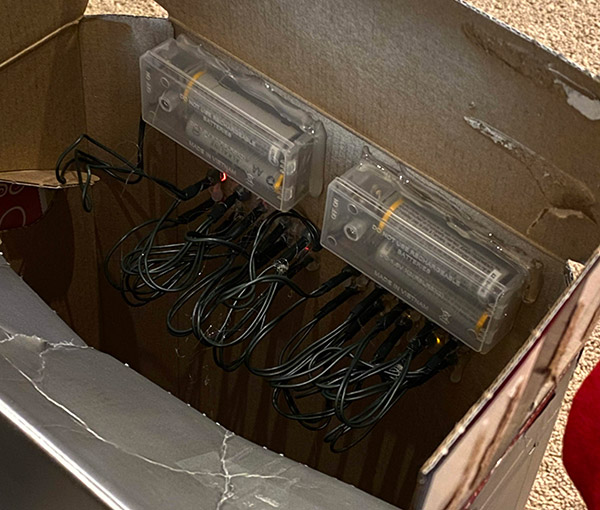
I could have stopped there, the jet pack looked great and fit my daughter well. But, she really, really wanted it to light up in some way so I thought, why not. I got two sets, one red and one yellow, of the battery-powered LED Lights from the dollar store. Yes, they only cost me a dollar! I decided to make two rows of each color lights underneath the black stripe.
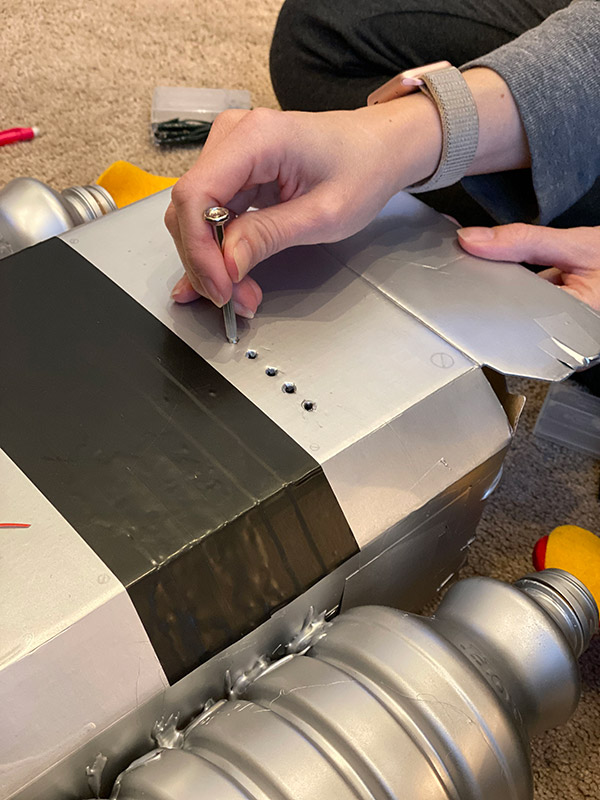
First, I measured out that a light would be placed every half-inch, based on the size of my LEDs. I marked a spot for each light with a ruler. Then I used an x-acto blade to cut x shapes on each spot. Once I had an x cut into the cardboard, I used a small screwdriver to push through the x. This made a hole the perfect size for each light. The holes were just about the exact size of my lights.
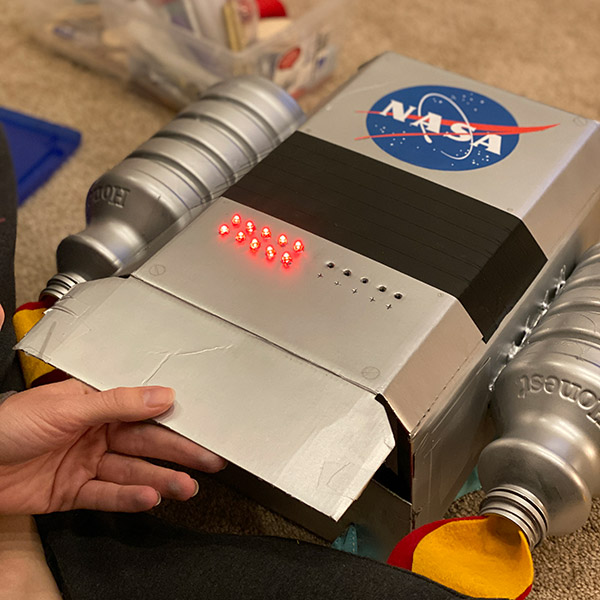
I pushed the lights through each hold, securing with hot glue as I went a light at a time. Then, I secured the battery pack on the inside of the box with hot glue as well.
I left the bottom of the jet pack open for now so I can access the lights and turn them on when needed. I just tape it shut with clear tape when she wears it. She is thrilled how it turned out and I am too!
Note: It’s hard to see the lights in the picture above because I took these pics when the sun was shining brightly. You can see in my other pictures at the top of the post that the lights are surprisingly bright! And there you have it, a DIY Light-Up Astronaut Jet Pack for a little one in your life! Have fun creating!
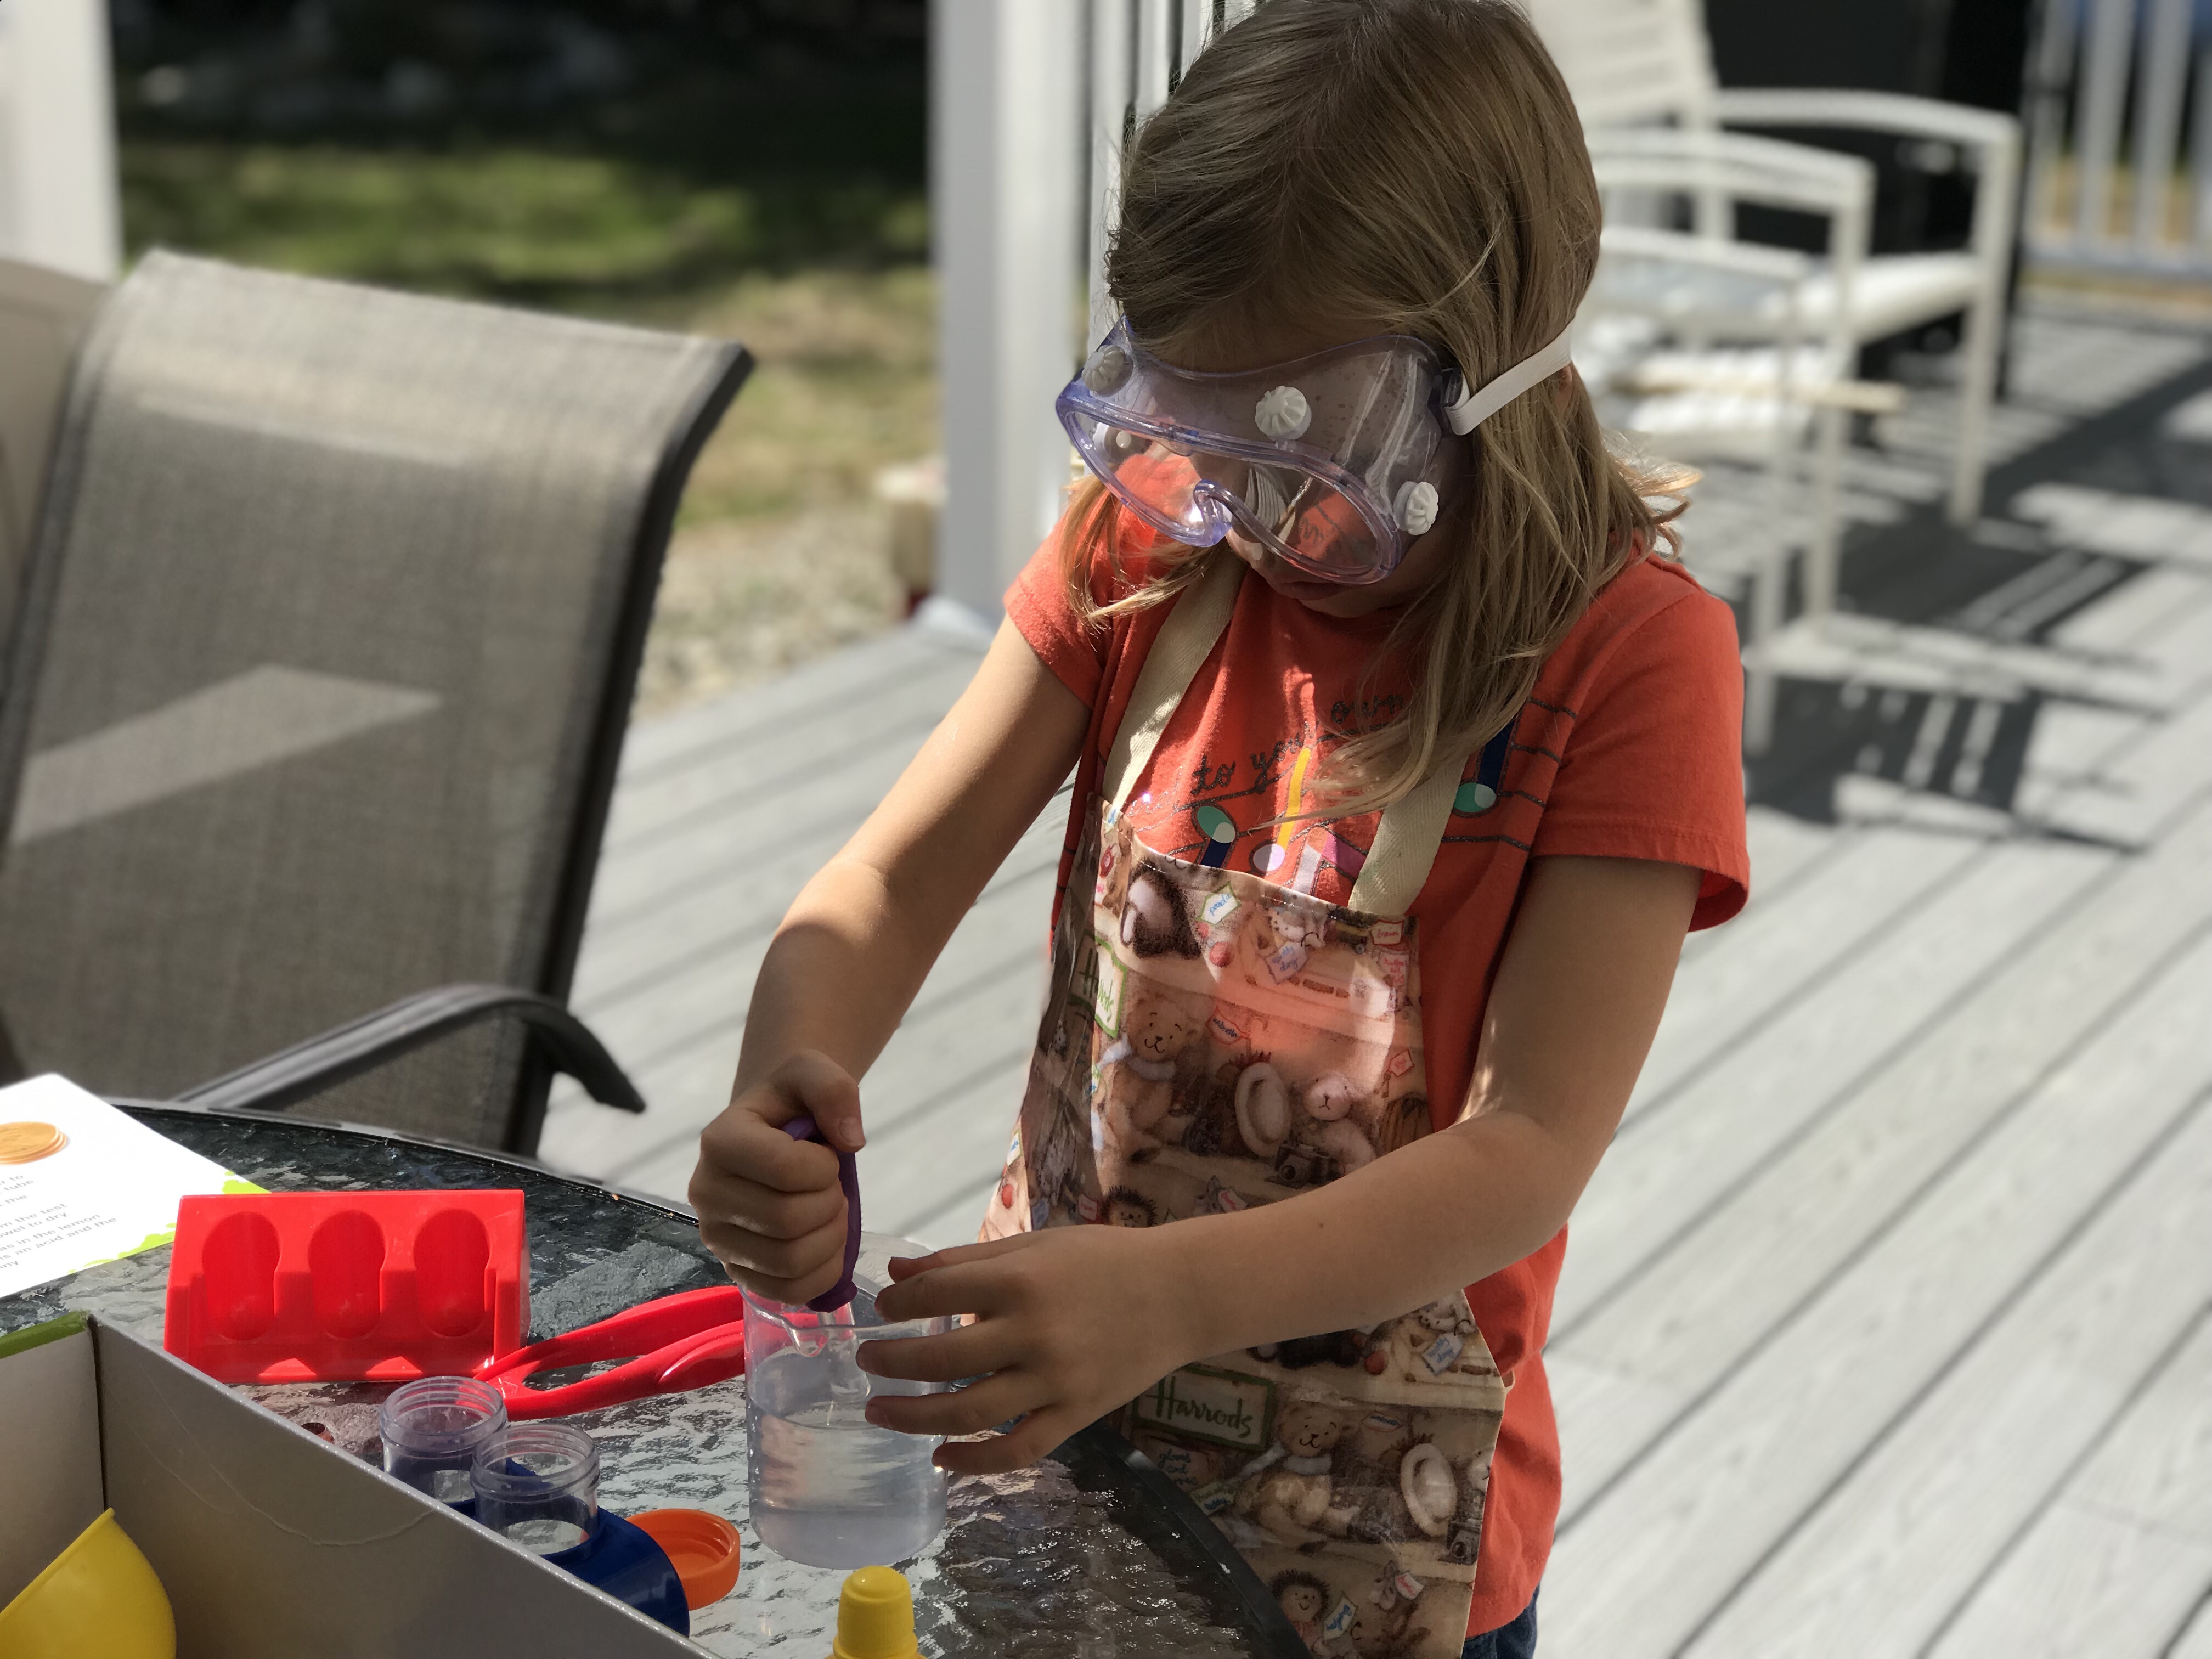
One of my all time favorite gifts to give kids of all ages are science kits, particularly this Primary Science Lab Set by Learning Resources. I purchased it as a holiday gift for my daughter back when she was only 3 years old and, as you can see in the picture above, it still gets plenty of use. 🛍️ This post contains affiliate links– thank you for supporting us.
Both of my daughters enjoy following the simple steps on the experiments cards included with the kit. They also have endless fun using the beaker, magnifying glass, eyedroppers, tweezers, goggles and test tubes with just water, vinegar and baking soda. Add some food coloring and they play for hours! I like this set in particular because the items included are sturdy and hold up over time.
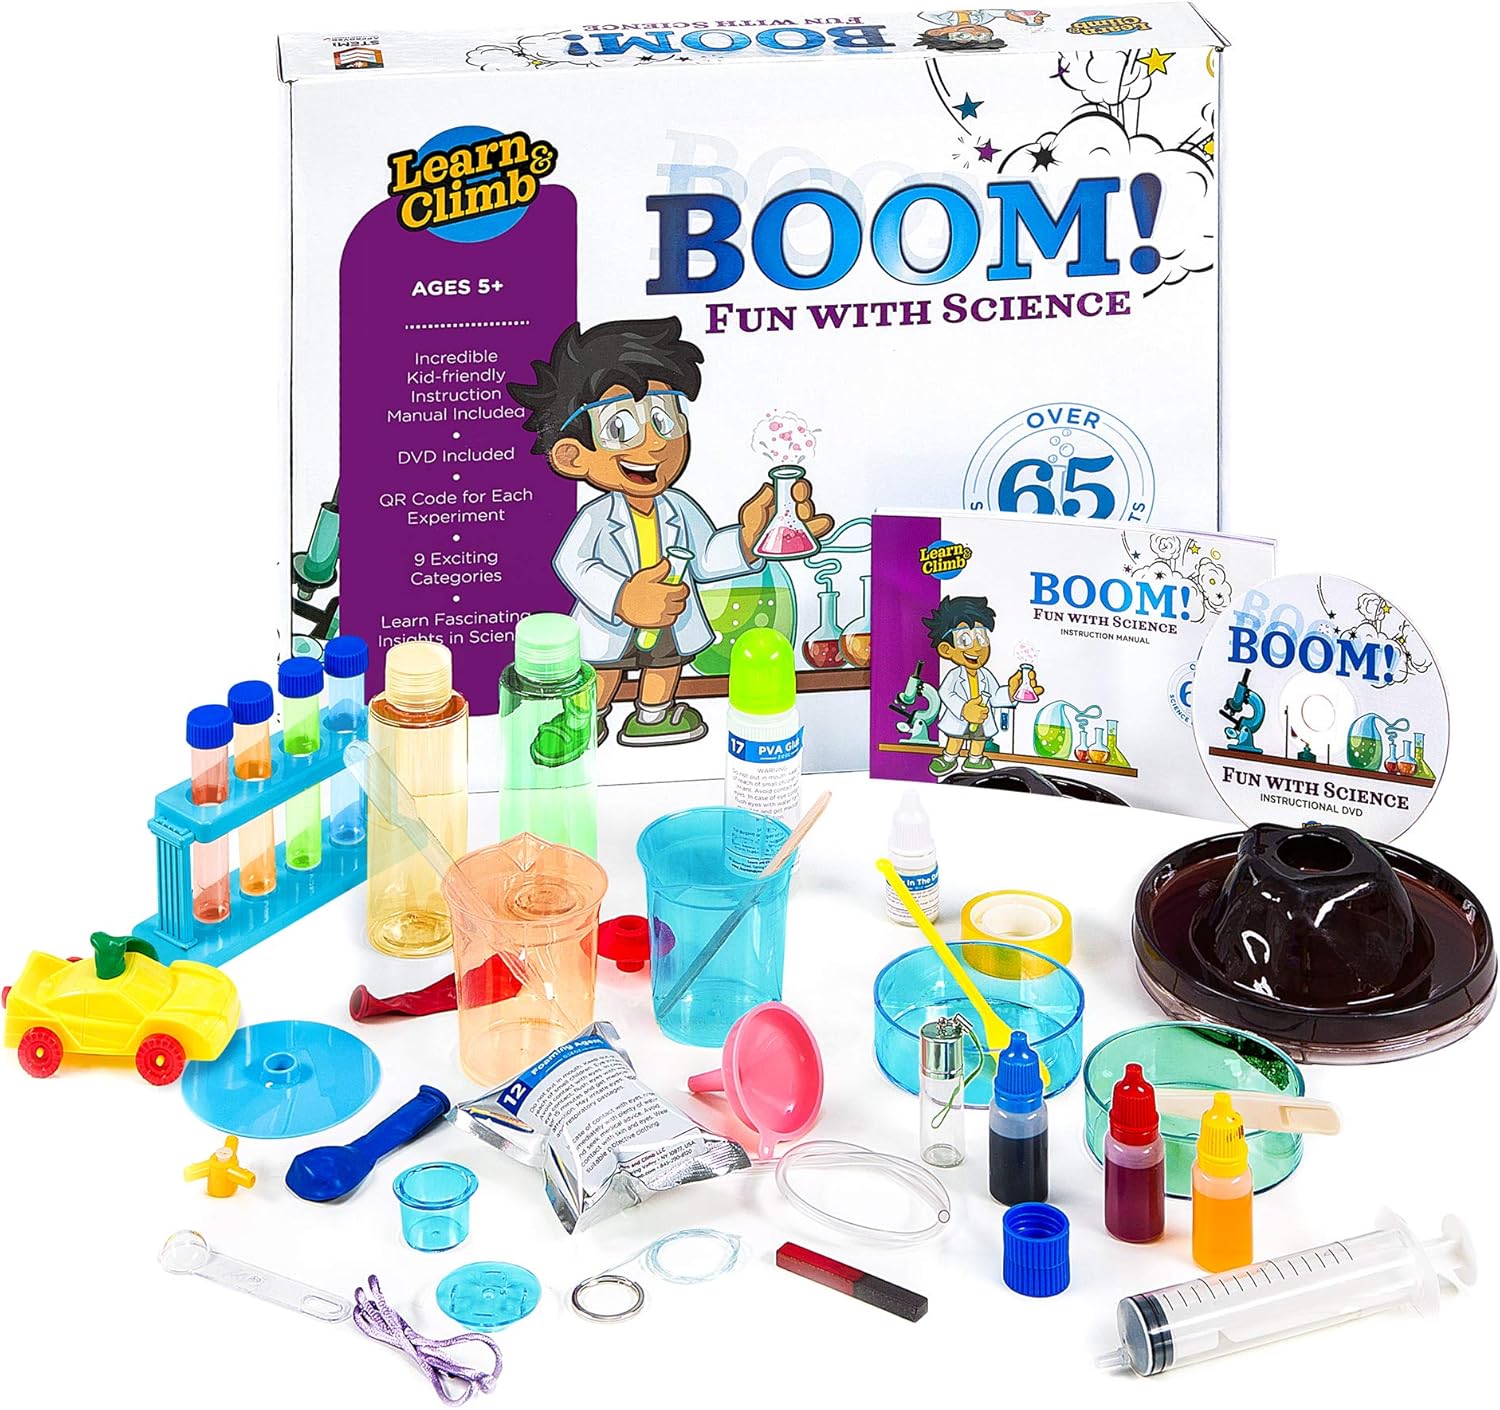
A science kit is a fantastic gift for any age. We have tried others like this My First Mind Blowing Science Kit by Scientific Explorer. This one doesn’t have all of the fancy supplies like the Learning Resources kit but the price is right for 11 different fun experiments. Some experiments in this kit may need adult assistance; it makes for a fun family activity.
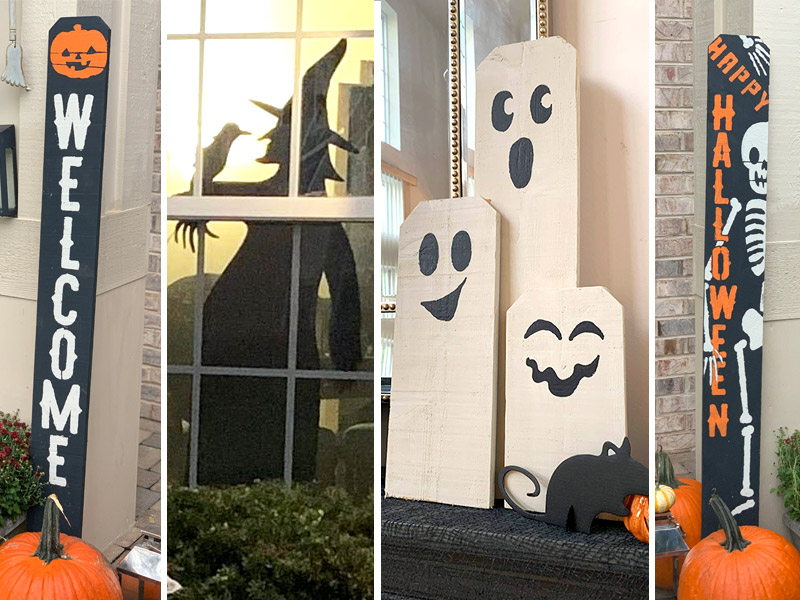
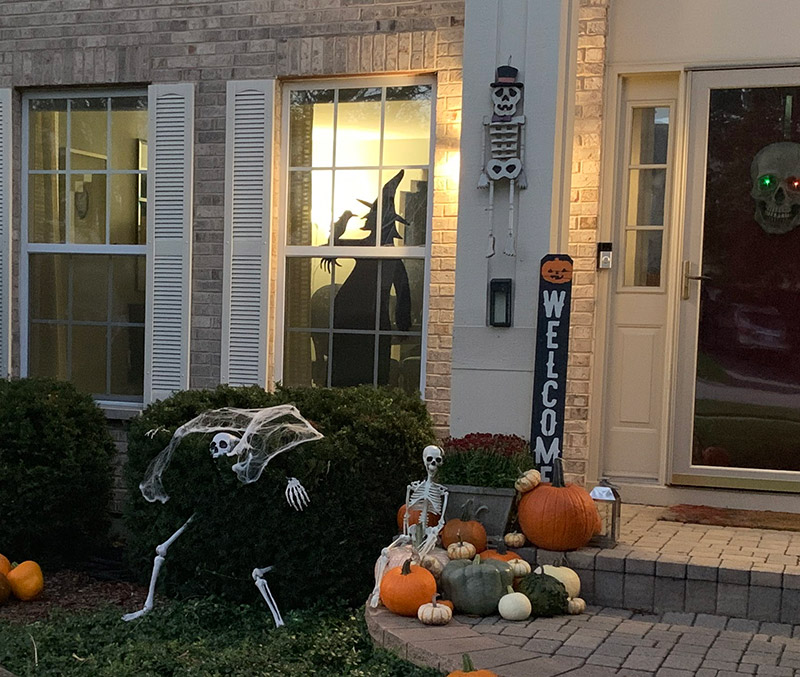
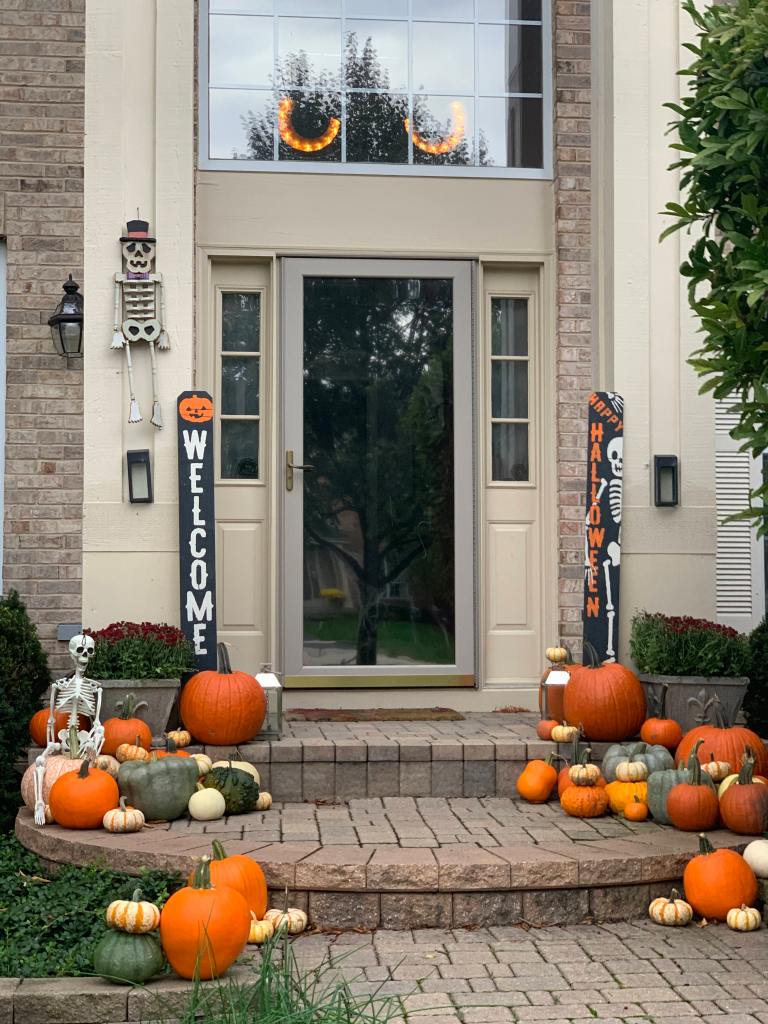
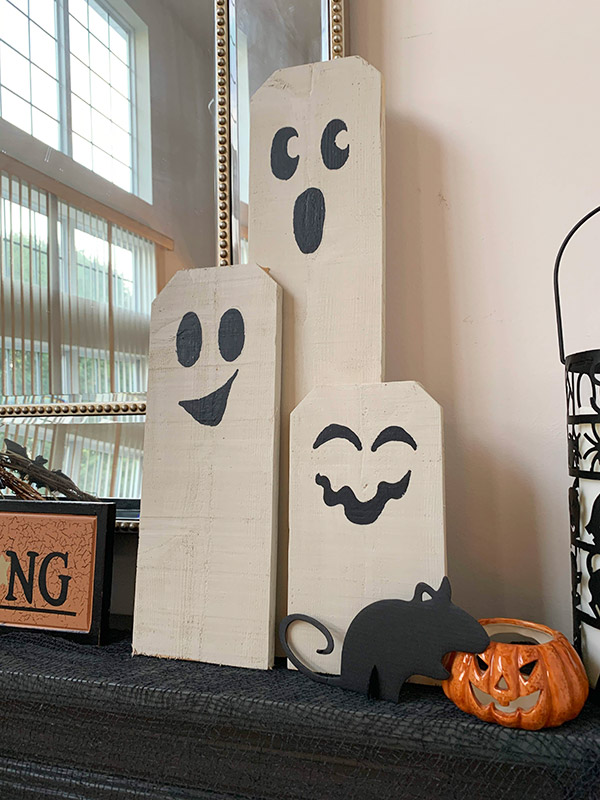
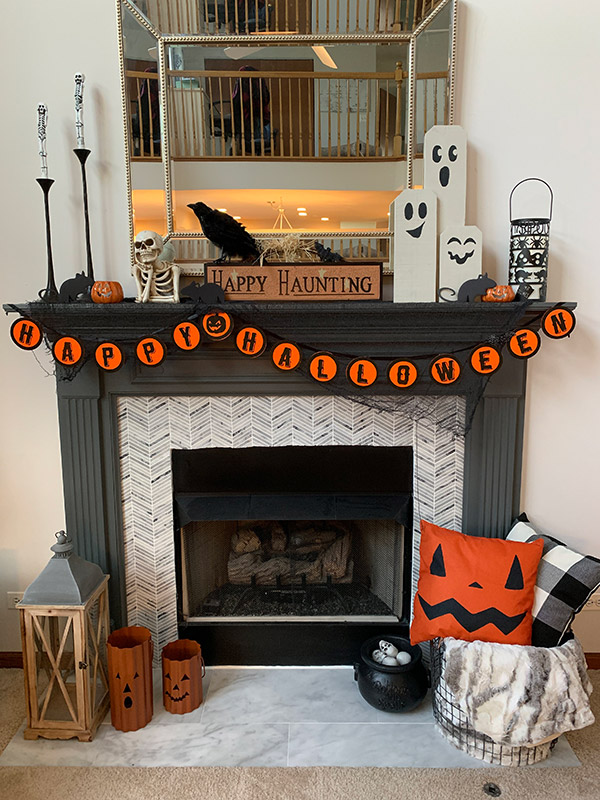
Halloween is so much fun to decorate for. Whether you like making your house super spooky or you like keeping it cute and rustic, there are so many ways to add a little pop of Halloween to your home. I love setting up my mantle every year along with spooky and fun accents in every room. Usually, I add one or two new decorations to my collection each year and I have so much fun shopping for them, but this year I decided to make them instead! Below I’ll walk you through what I made, I hope it inspires you to create something fun for your own home! 🛍️ This post contains affiliate links– thank you for supporting us.
Halloween Window Silhouette
This is such an easy project. You literally just need cardboard and black paint. I just free-hand drew the outline of a witch on the cardboard and cut it out, you could project an outline to trace if you have a projector or even trace around your child in a fun position! Get creative! I drew a witch, but you can do any silhouette that is Halloween themed. Try a stack of jack-o-lanterns and cut out their eyes and mouths, or cauldron, ghost or skeleton! *TIP: This knife – the CANARY Corrugated Cardboard Cutter -makes cutting cardboard SO MUCH EASIER!
Then I painted the whole cut-out black. Once dry, all you have to do is fix the silhouette to your window – I used clear packaging tape. When it’s dark outside, any light from behind the silhouette will make it stand out in your window.
Painted Fence Picket Signs and Decorations
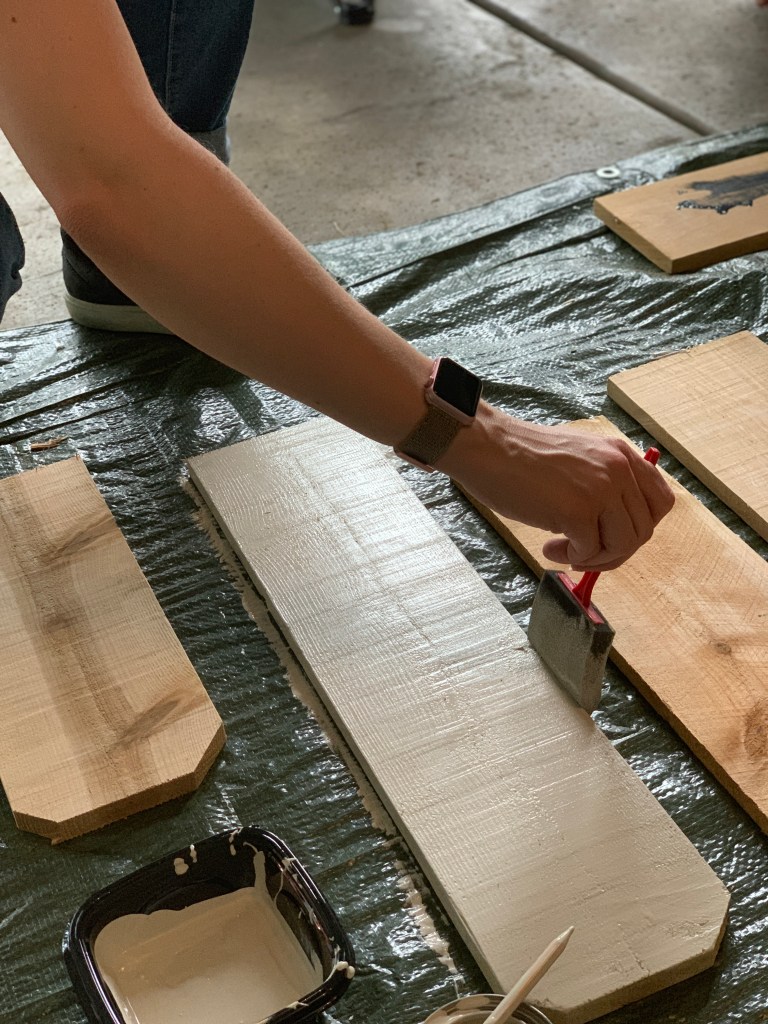
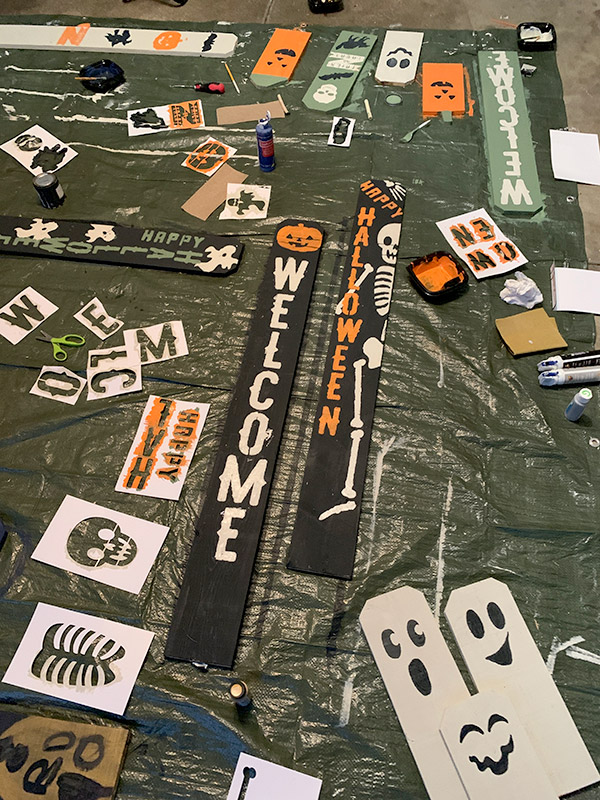
My second project for this year were these Painted Fence Pickets – a set that says Welcome and Happy Halloween for outside my door and a smaller set painted as ghosts for my mantle. First, you will need wooden fence pickets. We went to our local hardware store and bought 3 cedar pickets that are 5 feet tall. They cost about $1.60 each making this a really cheap project! I left two of them their original size for the front door signs and cut one into 3 different, but smaller, sizes for the ghosts with a miter saw. Use whatever saw you have and are comfortable using. If you have sandpaper, you can sand them a bit to get rid of the rough edges.
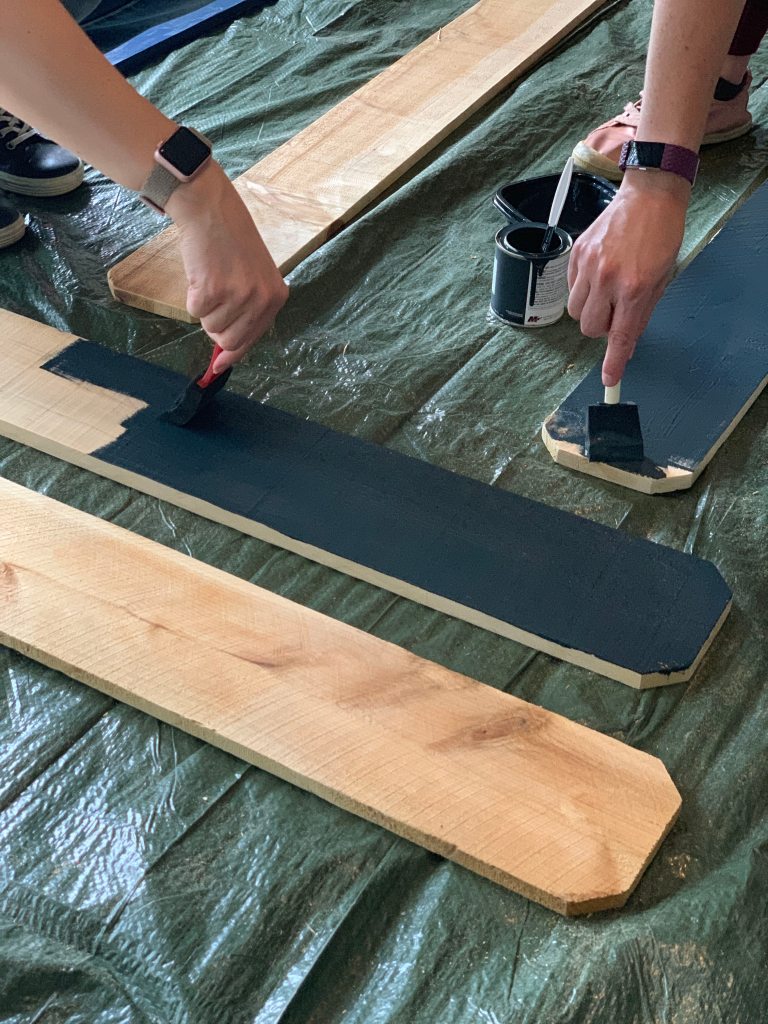
Next you’ll need stencils and paint brushes/sponges. I bought stencils from Joann Fabric, but you can find some that say Trick or Treat on Amazon here: https://amzn.to/2qi9xt9. You’ll also need paint. Pretty much any acrylic or house paint will work fine, I used KILZ brand interior chalk paint that I got free samples of in small pots. I used black, orange, white and some of the kids (we let each of our daughters make their own – they LOVED it and are already asking if we can do it again for Christmas) used green and blue.
Once you have all of your supplies, choose the colors you want to use and paint the pickets all over the front and sides. I painted my welcome signs black and the ghosts white. Let those dry. Have some wine, dinner, watch a movie! You could even make it a paint party with your friends or neighbors. Then come back to the dry pickets and get to stenciling! Lay the stencil on the picket. With the stencils that took more than one sheet, I traced them with a pencil onto my picket to make sure they would fit first. To stencil, you want to make sure to press the brush/sponge up and down instead of brushing it back and forth. That way the paint doesn’t get under the edges of the stencil. It can also help to have someone hold all the edges of the stencil for you so they stay flat again the wood. Remove the stencil and you’re done!
For the ghosts, I hand painted the faces with black paint. I didn’t do much research or stencil those, I just drew them with a pencil first, then filled in with a paintbrush. And that’s it! Super easy. I let everything dry and placed them in my house. So far the signs outside have held up to a few minor rain storms without any issues, but I may seal them with a clear outdoor sealer eventually.
If you are going to reuse the stencils, make sure there is no paint underneath them when you lay it back down on the board after the first time you use it.
You may need a few coats of paint depending on how thick your paint is and how light of a color you are putting over a dark background color. I used one coat of paint, but filled in a few small areas of the orange after it dried with a paintbrush.