As someone who loves ramen but knows it’s not the most healthy lunch option, I was so excited to see high protein ramen on the shelves of my local grocery store. Chef Woo High Protein Ramen has a whopping 20 grams of plant-based protein and it’s VEGAN! It looked like a filling and cozy option for lunches at the office or home, so I threw a few different flavors in my cart and decided to give it a try.
I was pleasantly surprised to discover that I loved it! A little different than your typical ramen, these noodles are made with pea protein. They are slightly tougher than traditional noodles but just as satisfying. Chef Woo High Protein Ramen comes in 4 flavors: Braised Beef, Roasted Chicken, Sweet Chili Togarashi, and Thai Lemongrass and cooks in only 3 minutes in the microwave! With such a short cooking time this ramen instantly became one of my quick, high-protein go-to lunches!
Some of the flavors have a slight touch of spice, like my favorite the Braised Beef, but it’s just the right amount of heat for me. The only thing to watch out for is the sodium in this soup. Like regular ramen, Chef Woo High Protein Ramen is high in sodium which most likely comes from the broth. Because of this I generally don’t drink all of the broth which is exactly how I eat standard ramen as well.
How to make your ramen even more nutritious
If you are not vegan you can up the protein by adding some leftover grilled or rotisserie chicken. This makes for a super-filling lunch. To increase the nutrient and fiber content, I also routinely add leftover vegetables to my ramen.
Note: Affiliate links below. If you click on and purchase any item from this list, we may receive a small commission at no cost to you. We thank you for supporting us and keeping our website running!
Try out Chef Woo Ramen Noodles yourself and let us know what you think!
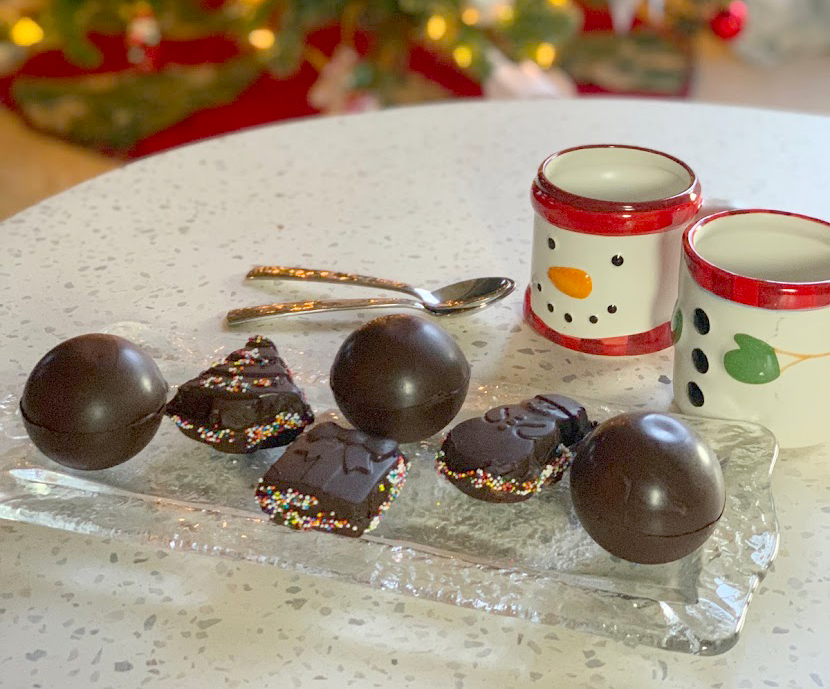
Valentine’s Day is just around the corner! While we don’t celebrate with anything big and showy, I do try to do a little something fun. This year calls for Homemade Valentine’s Day Hot Cocoa Bombs! Easy to make and fun to decorate, hot cocoa bombs make great homemade gifts or a fun activity for kids and adults alike. A warm sip of delicious hot cocoa in a heart shaped mug is just the kind of Valentine’s Day I am hoping for.
This post contains affiliate links– thank you for supporting us.
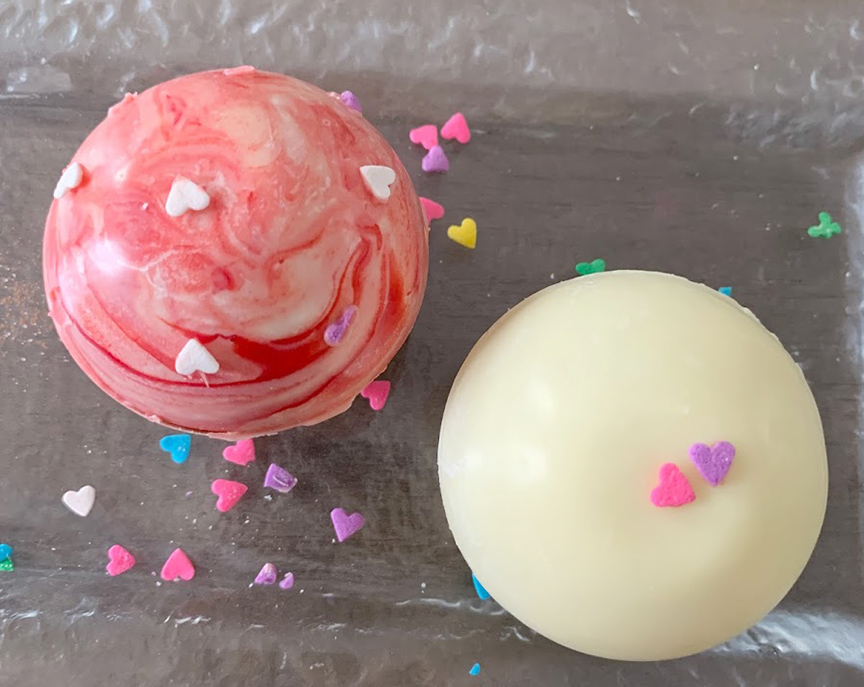
To make these hot cocoa bombs Valentine’s Day themed, I used white chocolate, red food coloring and heart sprinkles.
Melt the white chocolate (white chocolate chips, candy melts, etc.). Put in a microwave safe dish and heat for 30 seconds at a time stirring between each heating. Do not overheat!
Once melted, if you want to keep them white, spread the melted white chocolate up the sides of your mold.
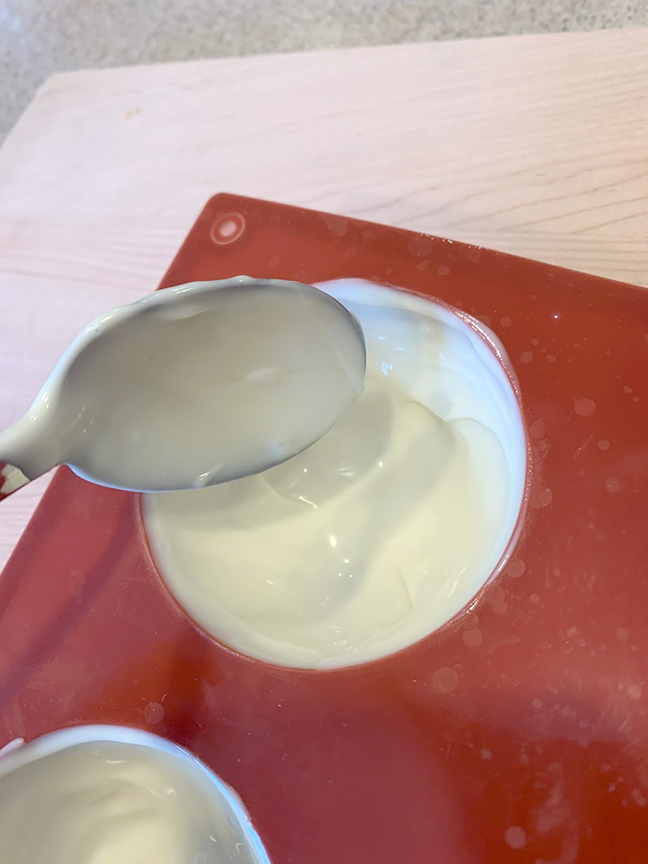
If you want to make them marbled with red and pink like in the picture below, put some red food coloring into the melted white chocolate and stir just a little bit so you see both white and red streaks. Then spread the mixture up the sides of the mold. Try not to keep smoothing and spreading because the more you mess with it, the more it will mix into a plain pink and you will lose the marble effect.
Refrigerate for 30 minutes or until the white chocolate has hardened and gently pop them out of the mold.
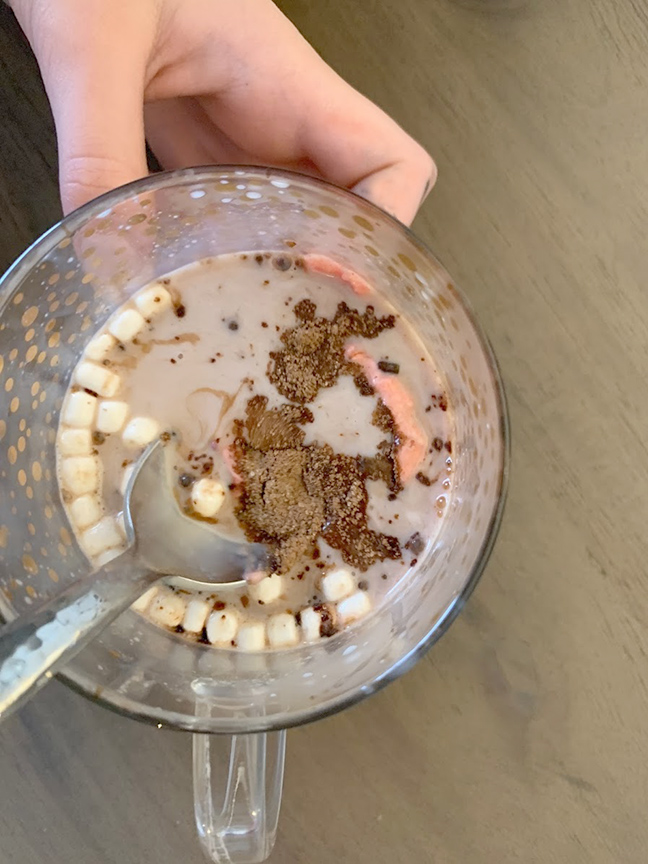
Fill one half of your bomb with hot cocoa mix, sprinkles, mini marshmallows, mini chocolate chips and whatever you would like to include.
Once the bottom half is filled, melt the edges of the top half just enough so there is some softened chocolate and stick it onto the bottom closing the bomb. (To melt the edges, I microwaved a plate until warm and placed the top-half of my bomb on the plate, edge side down. The warmth from the plate was enough to slowly melt the edges of the half circle.) Smooth any melted chocolate around the seam to make a better seal.
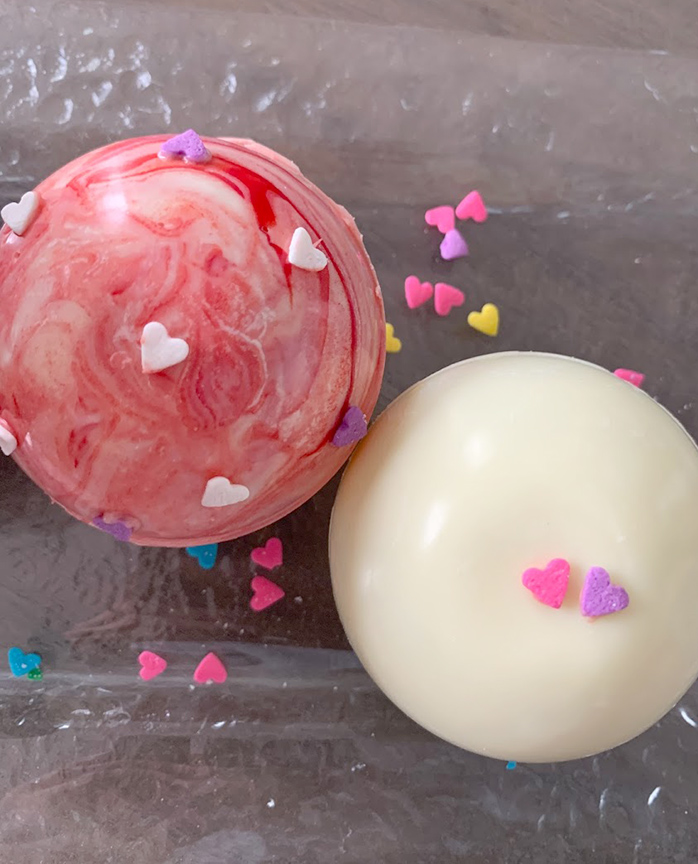
Finally, it’s time to decorate! I used some of the melted chocolate to stick heart sprinkles to the outside of my hot cocoa bombs. You could also LIGHTLY drizzle melted chocolate over them or even stick a candy heart on the top. Refrigerate for a few minutes to harden the edges and decorations before using or gifting!
Hot Cocoa Bombs are super popular right now and that means they are VERY hard to find in stores. But, no worries because they are very easy to make! They are also a GREAT homemade gift. So, without further ado here is our DIY Hot Cocoa Bombs recipe.
Note: In the picture above, I have a holiday themed non-stick mini cake pan. While this technically works for cocoa bombs, you will see some pictured with sprinkles around the edges because they are MUCH harder to get out of the pan. I prefer using the silicone round mold.
Instructions
Step One: Melt Chocolate
This really is a simple process. First, you need to melt your chocolate. For my round mold, I use roughly 1 1/2 rounded tablespoons of chocolate chips for each half circle. You will have to judge for yourself how much chocolate you will need depending on the size of your shape/mold.
I melt my chocolate in the microwave. You can use the double-boiler method, but for me it’s faster and easier to use a microwave. Put all of your chocolate in a microwave safe bowl and heat on high for 30 seconds. Then mix the chocolate and put back in the microwave at 15 second increments stirring between each one until the chocolate is melted. It is very important NOT to overheat your chocolate in the microwave. It will burn quickly if you are not paying attention!
Step Two: Add Chocolate to Mold
Next, put a spoonful of chocolate into each mold and spread up around all the sides. Make sure to get good coverage. When all sections are full, put the mold in the refrigerator for about one hour or until the chocolate has hardened.
Step Three: Remove Hardened Chocolate
Once hardened, remove chocolate from the mold. With the silicone molds this is incredibly easy. You just gently push from the back and it peels right out. With the non-stick mini cake pan, I had to use the edge of a knife or offset spatula to pop the chocolate out of the mold. (This made the edges really uneven which is why I don’t recommend using the mini cake pan unless you have no other option, but I was able to make it work.)
Step Four: Fill with Cocoa Mix & Add-ins
Next, fill half of your chocolate shells with an appropriate amount of hot cocoa mix and mini marshmallows or add-ins.
Step Five: Attach Top Shell & Enjoy
The last step is to attach the top shell. To do this, I heated water in a bowl in the microwave until hot. I poured the water out and turned the bowl upside down and used it to melt the edge of the empty shell. Once the edges were nice a melty, I just placed them on top of the filled shells and gently turned them to seal the bomb.
Finally, put them in the fridge one last time to set the chocolate seam and you’re done! Viola, you have DIY Hot Cocoa Bombs!
There are so many fun ideas you could do with this. Add crushed candy canes, caramel candies or even a larger marshmallow in a fun shape if it fits! My kids go crazy for these and I have given them as gifts multiple times – they always impress. Most importantly, have fun!
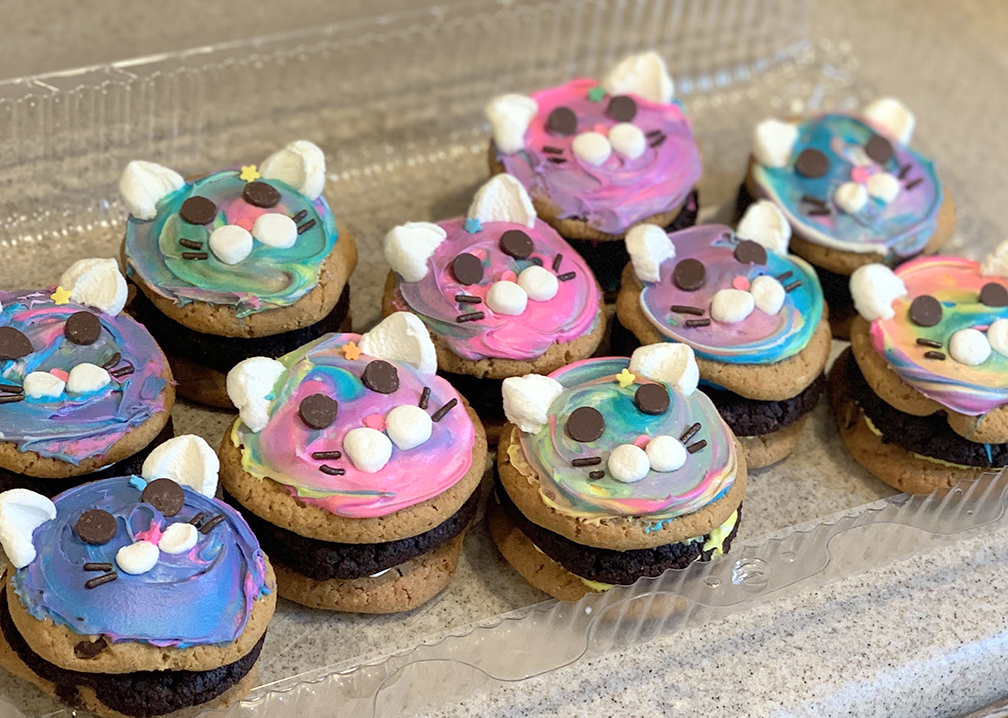
I’m going to admit something a little crazy about my daughter…she doesn’t like cake. I know, what kid doesn’t like cake? Don’t get me wrong, she’ll “suffer” through eating it at birthday parties and celebrations, but she definitely doesn’t prefer it. Last year for her birthday I made her a large Triple-Layer Cookie Cake with a chocolate whipped cream frosting which she absolutely loved. Well, now that she’s turning 9, she loves all things miniature. And cats. And tie-dye. So I decided to combine all three and make her these adorable Cat Mini Cookie Cakes!
The good news is they’re super easy to make and use easy to find ingredients. They were a big hit with family and friends and most importantly my daughter. She LOVED these mini cookie cakes and already asked for me to make them again for her next year. Read on for instructions and ingredient list.
Ingredients
-Cookies – you need 3 for each cake (One of the best things about these cookie cakes is how versatile they are. You can make them smaller, larger, two layer, etc. – choose any cookie size and flavor you want!) -Frosting – simple buttercream or can of white frosting – I used this kind Buy at Target -Mini Marshmallows -Chocolate Chips -Chocolate sprinkles – Buy on Amazon -Pink round sprinkles – similar to these Buy on Amazon -Any fun shaped sprinkles
Tools
-Cake Icing Tool, like this Wilton Dessert Decorator – Buy on Amazon -Small Offset Spatula, we like this reasonably priced one from Ateco – Buy on Amazon
Mini Cookie Cake Instructions
To make this year’s celebration easier, I decided to buy cookies instead of make them. My local grocery store has a bakery and I figured they would be more uniform in size than homemade cookies. I purchased three different flavors for a bit of added fun and because I made each mini cookie cake with three “layers”. I bought standard chocolate chip cookies, M&M candy cookies and chocolate chocolate chip cookies. You could make your own of course, it’s up to you!
Next up was frosting. I never use canned frosting, but due to time constraints and some home construction I decided to make my life easier. Canned frosting can be very oily which is one of the reasons I usually don’t use it. To make it more of a stiff piping consistency you can add powdered sugar and mix. I then divided it into different bowls and mixed in pink, blue, and yellow food coloring.
Once you have the frosting ready, assembling your mini cookies cakes is easy. All you need to do is pipe or spread some frosting on one cookie, place the second cookie on top. Then add another layer of frosting and finally the third cookie on top of that. You will have a stack of three cookies with a layer of frosting in between them.
Decorating your Mini Cookie Cakes
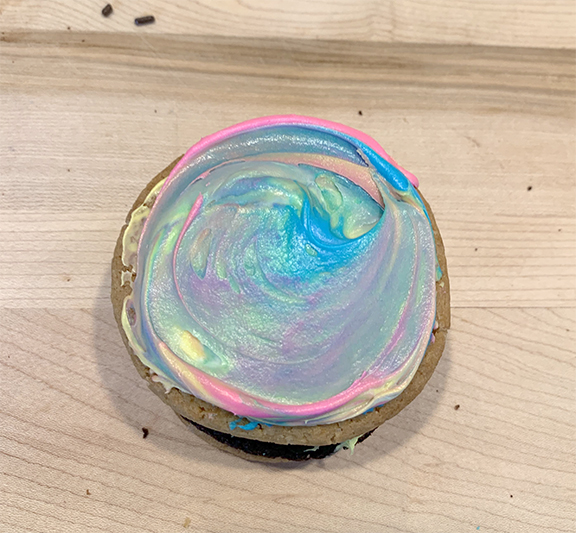
Once all of your cookie cakes are assembled, it is time to decorate. To get the swirled color effect, I placed a blob of pink, a blob of blue and a blob of yellow frosting on the top cookie. Then, I used my offset spatula in a swirling motion to spread it around the cookie. Sometimes I only used two colors to get different shades and sometimes I swirled more than others just to get a variation in color. NOTE: the more you swirl, the more the colors will start to blend so try to only move your spatula once or twice if possible.
Next, I added the cat details. For the ears, I cut a mini marshmallow in half and pressed the tops together to make the point of the ears. I also used mini marshmallows for the white mouth parts by cutting them in half and keeping them more rounded. For the eyes, I placed two chocolate chips upside down in the frosting. For the nose I used a pink, flat sprinkle. And finally, for the whiskers I used two long chocolate sprinkles. Extra: For a girly touch, I added a flower sprinkle by an ear on each one.
And that’s it! Have fun assembling these adorable cats for a special cat lover you know. Then, wait for everyone to gush over how cute they are!
We have discovered a quick way to get your coffee frappé fix! Humblemaker, a craft coffee company out of California, sent us some of their new cold brew coffee shots to test and we are big fans. These shots are not only convenient, they are also packed with multi-vitamins for an extra boost. They make it easy to whip up a quick coffee drink as well. Check out our Fast Coffee Frappé Recipe below.
Stay tuned for our full Humblemaker cold brew coffee shots review. Right now you can save 15% with a subscription by using our affiliate link HERE.
Note: Affiliate links below. If you click on and purchase any item from this list, we may receive a small commission at no cost to you. We thank you for supporting us and keeping our website running!
Add ice, half & half, agave and cold brew shot into your blender and blend until combined. Note: You can add more ice if you like a thicker Frappe or more half & half if you prefer a thinner Frappe. Pour in glass and top with whipped cream. Drink before it melts!
*You can also use an espresso shot or make a concentrate with instant coffee
Tips: ~ Half the recipe but use a full Humblemaker Shot for a stronger drink! ~ If you are looking for a versatile blender we love the Ninja Mega Kitchen System (BL770) pictured above
This quick and easy German Pancake recipe is one of our all-time favorites! It reminds us of Walker Brothers and our Dad every time we make it! We would go to Walker Brothers, a breakfast restaurant in the Chicago suburbs, and could hardly wait the 20 or so minutes it would take to bake. The imagery of this huge, pillowy pancake dusted in powdered sugar, smelling of vanilla and slight steam wafting from the top as it is carried across the restaurant to our table is a memory that instantly brings me back to my childhood. I can literally smell it in my mind as I am typing this.
Carolyn gave the recipe to me back in April of 2006, see below for the actual recipe card. She loved it so much she had to be able to make it for herself. We make it at least once a month, it is especially perfect for those “breakfast for dinner” nights. This recipe comes together quickly and bakes in the oven so you can prepare a side dish while it bakes. Pair it with some sausage, hash browns, and fresh fruit and you have a meal.
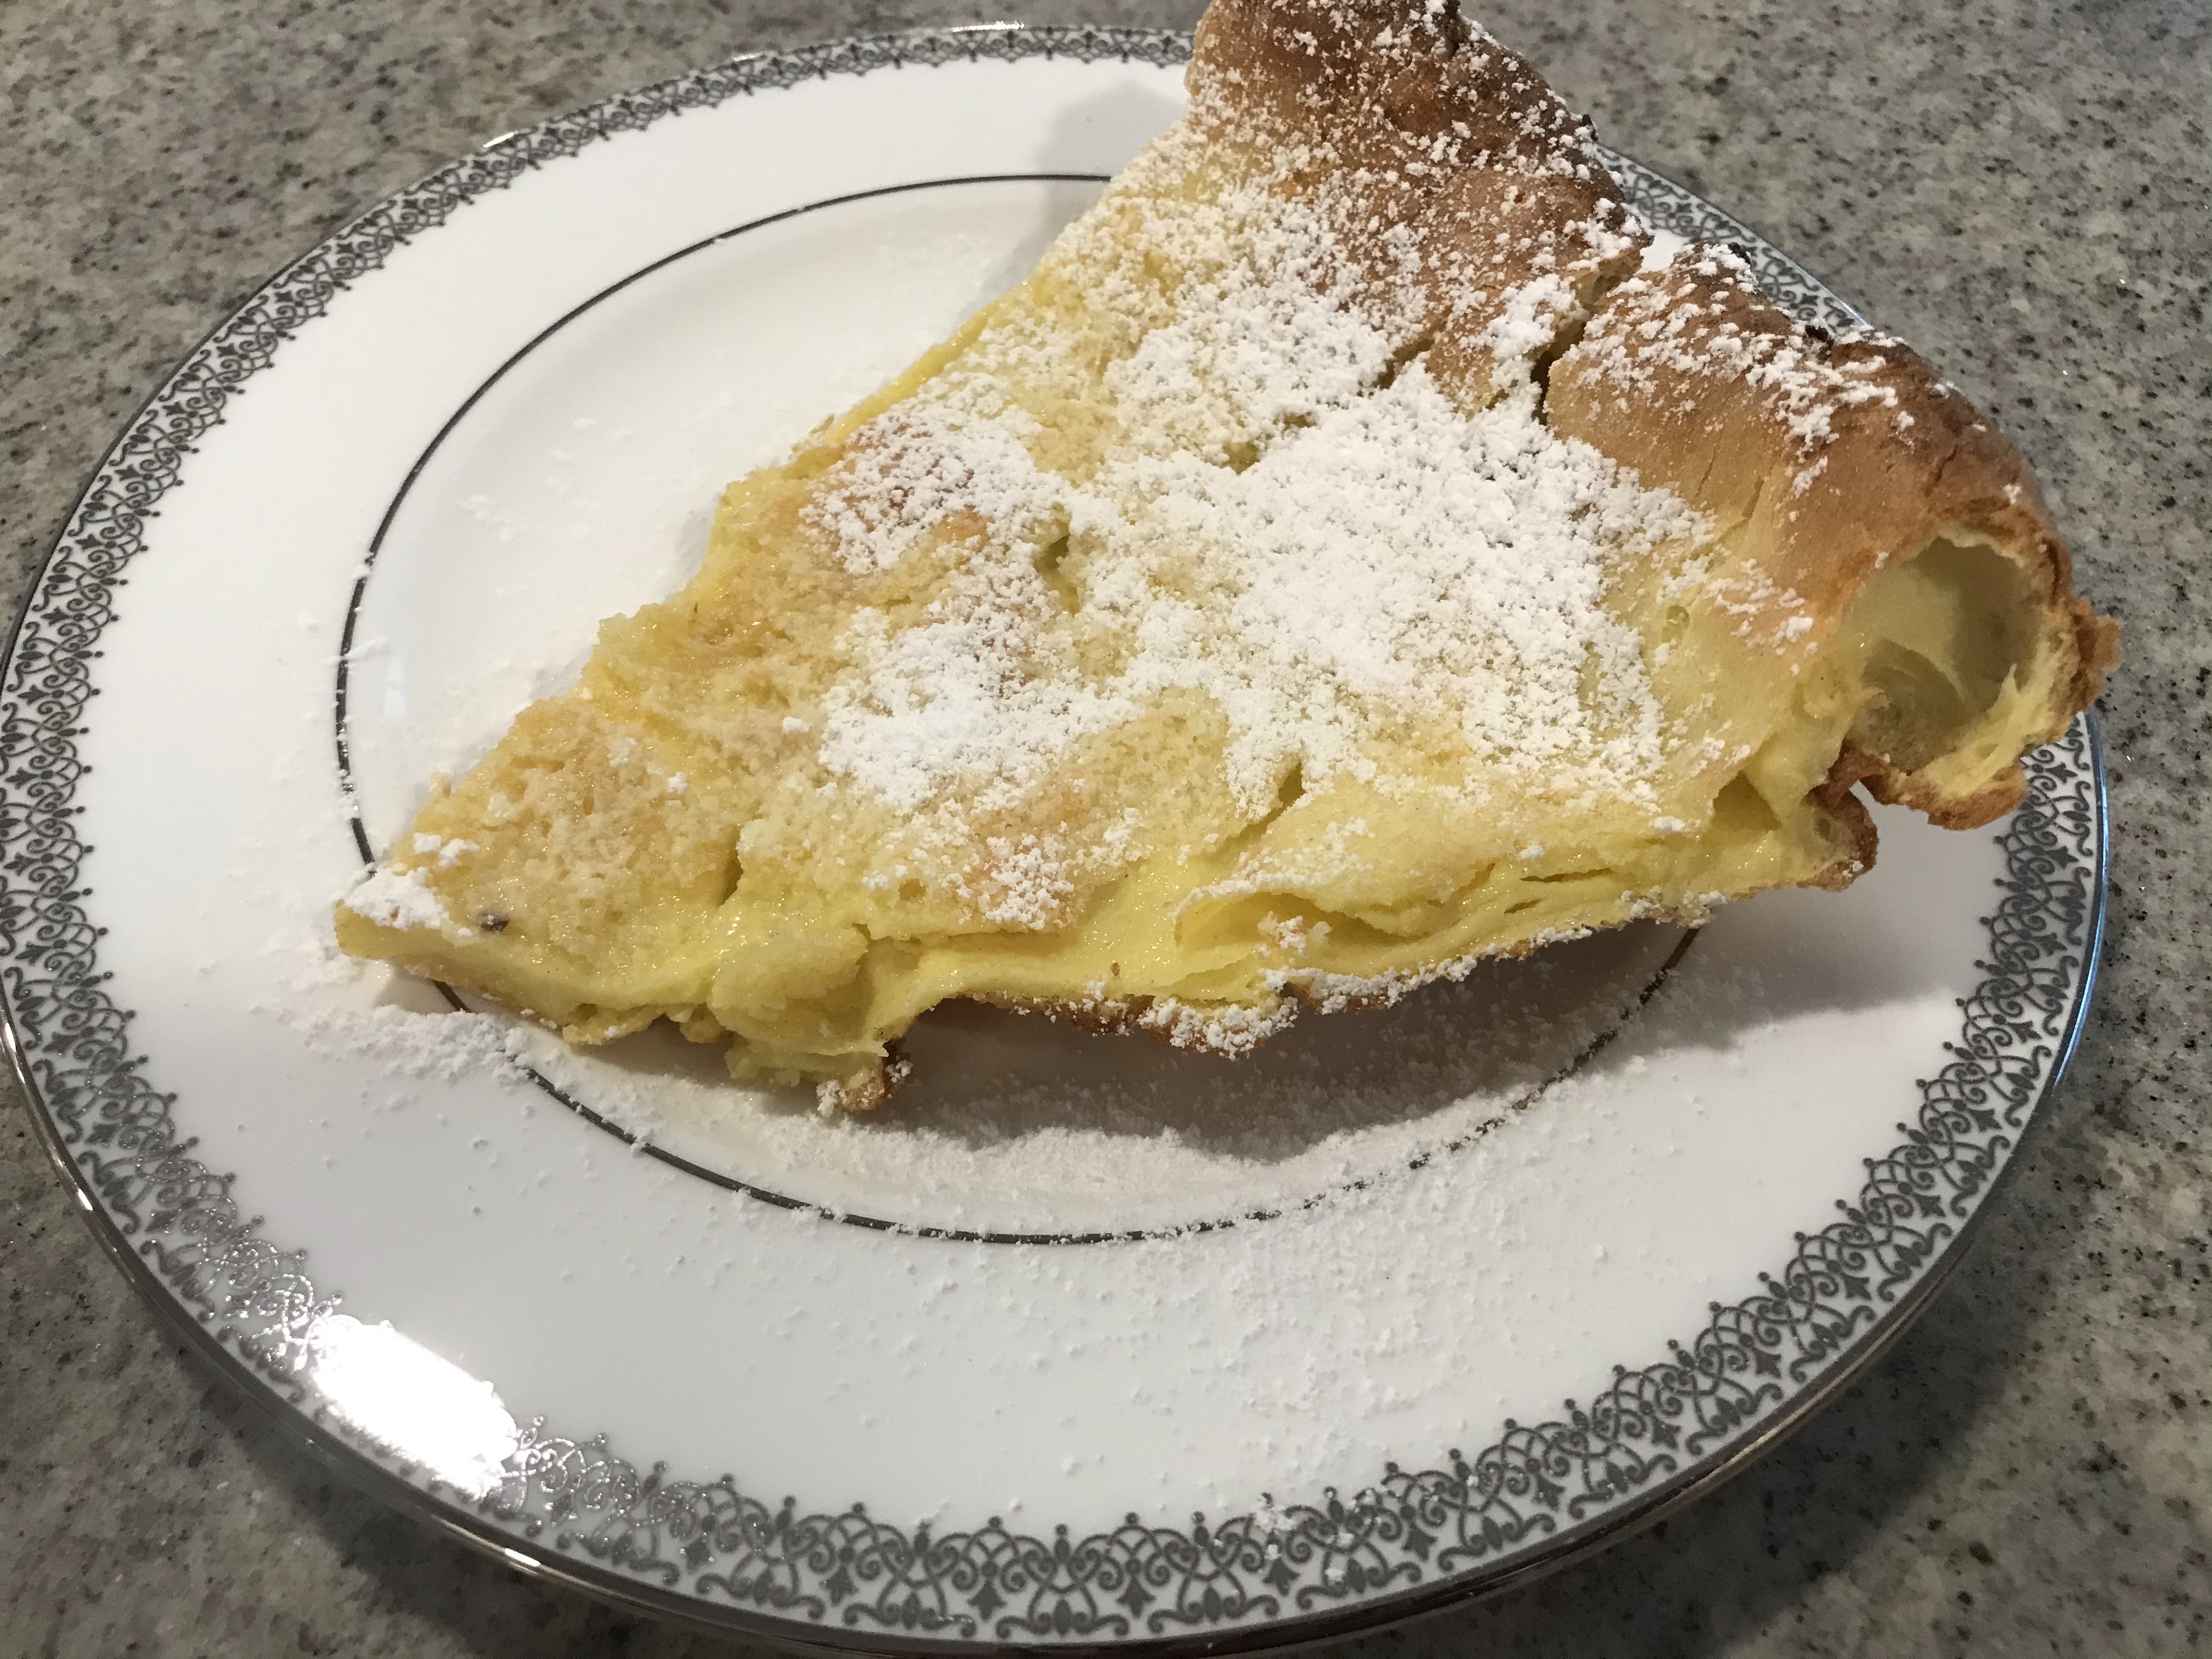
A little crispy but it has height! (Nanette’s version)
This pancake starts as a loose batter, but will really puff up in as it bakes in the oven! My kids love to see how tall and pillowy it gets. You can use a variety of different pans, in the photo above I used a traditional pie pan. In the photo below, Carolyn chose a larger oval baking dish, however she most often uses a cast iron pan.
Perfectly prepared (Carolyn’s Version) Yes, that is mouthwatering butter gleaming in the middle of the pancake!The original recipe
Quick and Easy German Pancake Recipe
Ingredients (Makes 2)
6 Eggs
1 Cup Flour
1 Cup Milk
1/4 tsp. Salt
4 Tbsp. Butter
Optional: 1 tsp Vanilla extract
Directions
Preheat Oven to 450°
Mix eggs, flour, milk and salt (and vanilla if using) together in large bowl
Add 2 Tbsp of butter to each pie pan and melt in oven
Once melted take out pie pans and pour batter into the 2 pans evenly
Put back in oven and cook for 20 min.
Add Powdered Sugar and Lemon
Tip: You can add a number of different toppings including maple syrup and fruit, but our favorite is the classic powdered sugar and lemon.
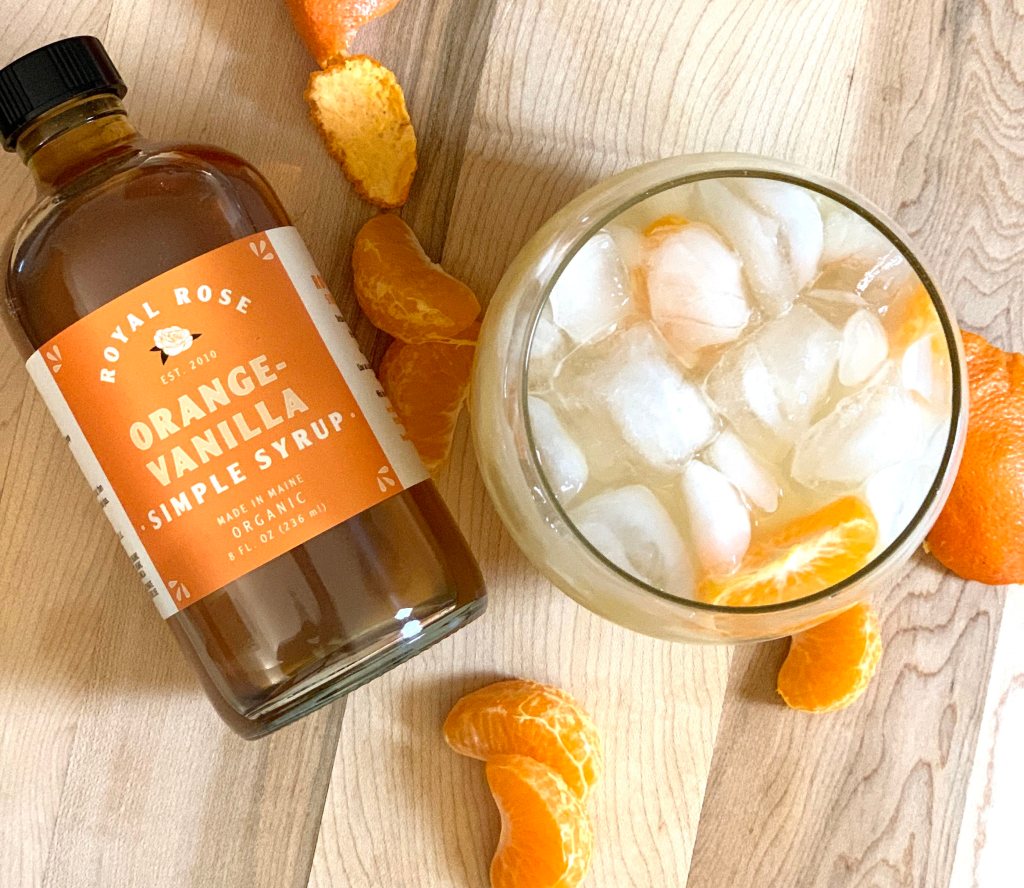
If you need a drink during all this social distancing, I do NOT BLAME YOU! I have taken a minute (or two) after homeschooling my two kids for the past few days to have a margarita. So, I thought why not add some lemon juice for extra Vitamin C, you can never be too careful, right? I hope you enjoy this Orange Lemon Margarita Recipe as much as I did!
Orange Lemon Margarita Recipe
Ingredients: 2 oz tequila 2 oz Royal Rose Organic Simple Syrup – Orange Vanilla Flavor (or sub a simple syrup of your choice, even make your own) 1 Tablespoon Lemon Juice 1 Tablespoon Lime Juice 1 Tablespoon Orange Juice Orange slices, lime slices or lemon slices for garnish
Method: Combine all ingredients in a cocktail shaker with ice and shake, then pour into your favorite glass and enjoy! If you like a sweeter drink you can add a little more simple syrup or a little less lemon juice. This combination worked for me. For a little extra fun, muddle in some orange slices for a kick of flavor!
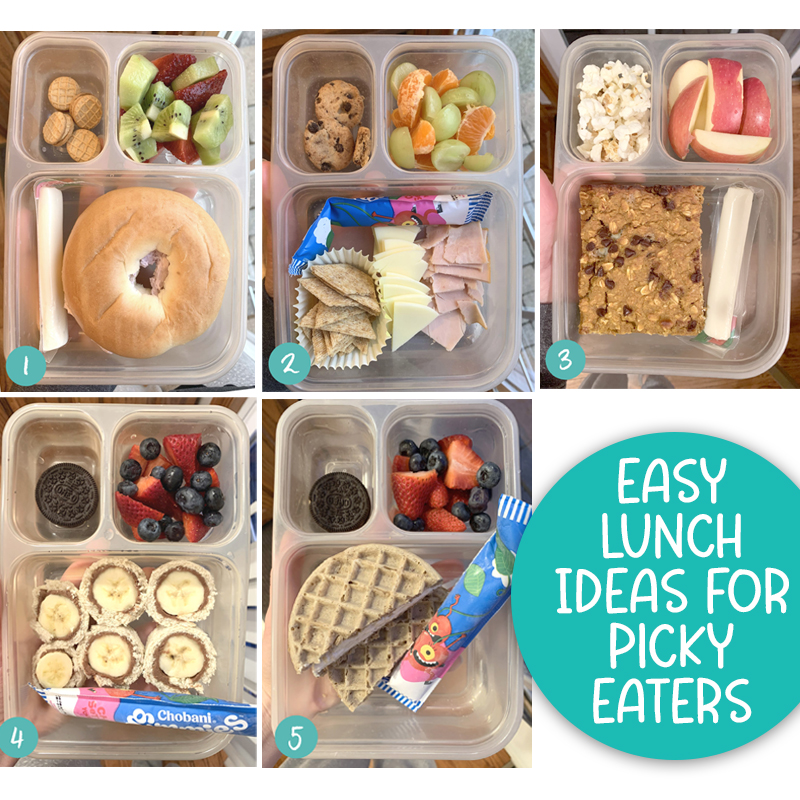
Packing lunches for kids who are on the pickier side can be HARD. I am always looking for easy lunch ideas for picky eaters. I know how difficult that can be from experience, I have two kids who used to love a variety of foods, but now tell me a new food they don’t like almost daily. Their recent “hate” food – peanut butter. I mean, PEANUT BUTTER! What? Yes, crazy I know.
Because of this, I have struggled to make them what I will call *semi-healthy lunches every day. And I know what you’re thinking, just let them get a hot lunch at school. See, that’s what I offered at first. I knew it wouldn’t be as healthy as what I would be providing, but it would save me some time and allow the kids to choose their own food. Do you know what they said? They don’t want hot lunch because they don’t like the choices! 🤦🏼♀️ Seriously, my kids don’t even like pizza or mac and cheese with bread crumbs.
So, here I am posting photos of the lunches I found my kids will actually eat. The lunches below are just some simple, fast ideas that work for us. If you’re here reading this post, chances are you have a picky eater at home too. Hopefully, this post gives you some ideas for yours!
*I say “semi-healthy” because I usually don’t include vegetables. The kids will just not eat the veggies and I end up throwing them out. I try to stick to whole grains, high-protein and organic products when possible. But, it’s not always possible.
Easy Lunch Ideas for Picky Eaters
Bagel with berry cream cheese, organic string cheese, kiwi, strawberries and nutter butter cookies.
Homemade “Lunchables” Organic Triscuit crackers, organic provolone cheese, all natural turkey breast, clementine, grapes and mini chocolate chip cookies.
Homemade Healthy Pumpkin Baked Oatmeal (Recipe from Fit Foodie Finds here: https://fitfoodiefinds.com/pumpkin-baked-oatmeal/), organic string cheese, apple slices (Pink Lady, our favorite) and Skinny Pop Popcorn.
“Chocolate Peanut butter” banana roll-ups (I mix peanut butter with small amount of honey and chocolate plant-based Orgain Protein Powder), berry mix, frozen Chobani Yogurt tube (the LOVE when I freeze the tubes and feel like they’re eating a popsicle for lunch, and an Oreo.
High protein Kodiak Waffles with maple cream cheese (I mix a small amount of maple syrup with cream cheese), frozen yogurt tube, berry mix and an Oreo.
Our Favorite Lunch Containers
These are the containers in the pictures – Ziploc Divided Rectangle Containers These are great because my kindergartner can open them easily, they are cheap enough that I don’t get mad if a piece gets lost, and they are recyclable.
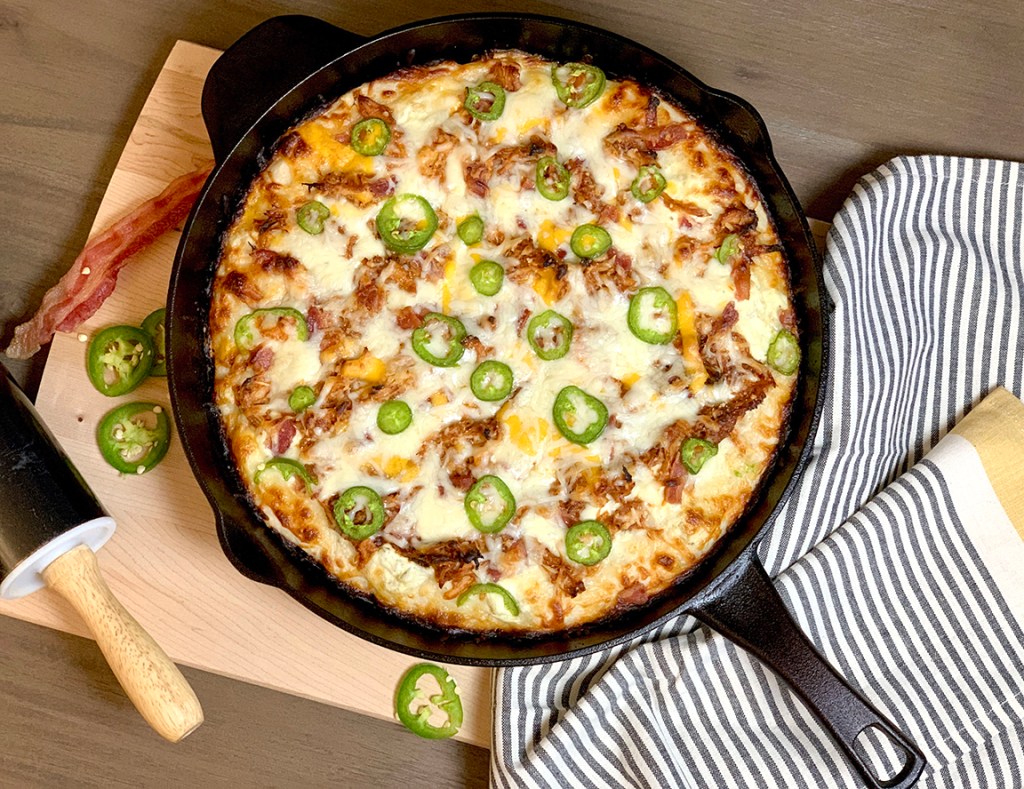
For the past few weeks, I have been seeing photo after photo of mouthwatering pan pizzas all over my social media. This is because like years past, King Arthur Flour announced their recipe of the year. This year did not disappoint. The King Arthur Flour’s 2020 Recipe of the Year is Crispy Cheesy Pan Pizza. Read on for our King Arthur Flour’s Crispy Cheesy Pan Pizza Review!
I posted the link to King Arthur Flour’s recipe above (we are not affiliated with or sponsored by King Arthur Flour in any way, we’re just fans). Read on for the different choices I made and what I thought of the recipe.
My Notes and Review
This isn’t a recipe for a quick weeknight dinner, the dough needs to sit for at least 12 hours. Mine sat overnight. But, it is worth it! I would recommend making this on the weekend or when you are having guests, it really is a showstopper. Note: You will need a cast iron pan.
I chose to make a version of my Cast Iron Jalapeno Popper Pizza with the pan crust from the King Arthur Flour recipe. I followed all the instructions to a T, prepped the dough the day before, dimpled it with my fingers and let it sit out in my cast iron pan for 2 hours before baking. Let me tell you – it came out magnificent! The bottom of the crust was crisp, the inside springy, and the edges were a crunchy, cheesy deliciousness.
In the pan before baking. Notice the layers of cheese and toppings. Is your mouth watering yet?
Now, for what I did differently. I used a 12 inch cast iron pan, which is bigger than the recommended size in the recipe. Because of this, the first 1 cup cheese layer didn’t quite cover all of the crust. I just added an extra 1/4 cup of cheese at this step. Then I layered with my cream cheese/salsa verde “sauce”, some bbq chicken, crumbled bacon, more cheese, and sliced jalapeños.
Look at the gooey cheesiness!
Final Thoughts
This pizza turned out mouthwatering. So amazing that my husband couldn’t stop raving about it. Like him, I kept going back for a little bit more. Needless to say, I highly recommend this recipe and will be making many different versions of it in the months to come.
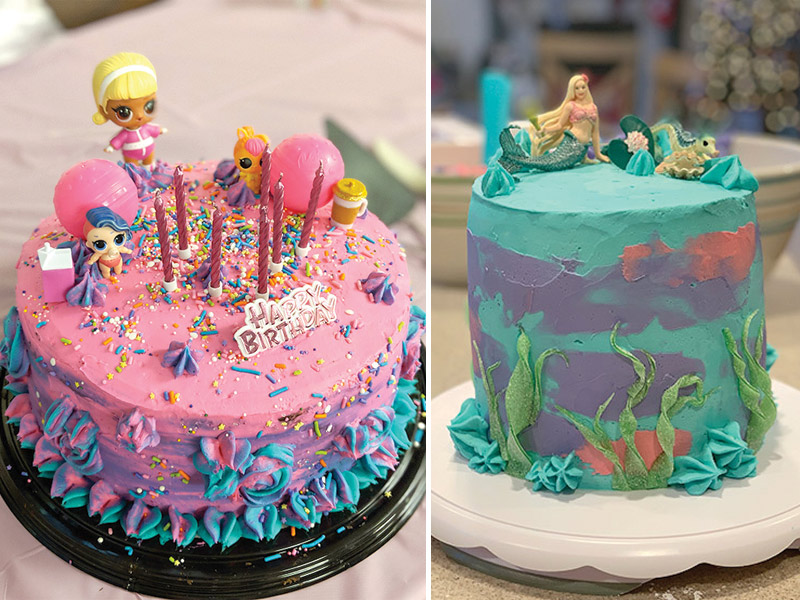
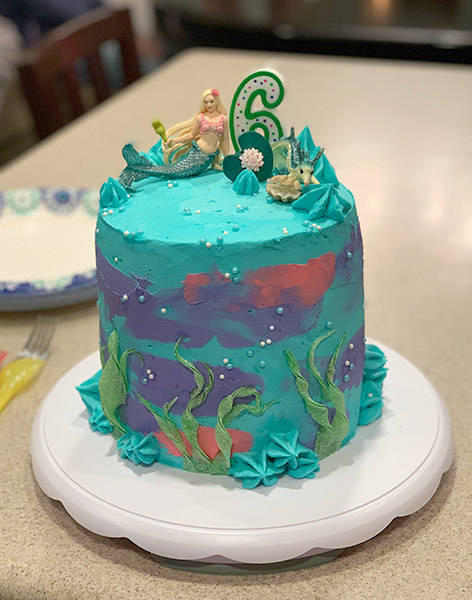
I love creating fun, themed parties for my daughter’s birthdays. A big part of the party theme is the cake, but with all the other planning that goes into a party, I stopped actually baking the cakes and starting buying cakes from Costco and re-decorating them. By doing it this way I know the cake will taste delicious, but I still get to be a part of decorating something more personalized for my kids. Below is the basic idea of how I do it. There are affiliate links at the bottom of the post to most of the items I used.
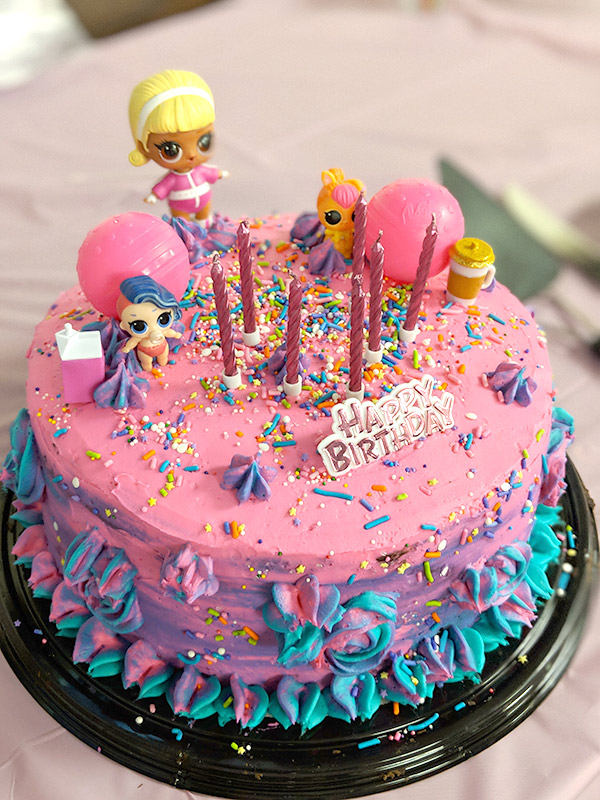
Usually, I gently scrape the excess frosting off the cake and redecorate with my own frosting and party-themed style. In the picture below, I bought the round chocolate fudge cake (the one with all the chocolate shavings on the top) and added my own bright frosting, sprinkles, and LOL Doll decorations to the top. Pro tip: when you buy a cake with chocolate shavings on top, you get to eat them while removing them from the cake. Yum!
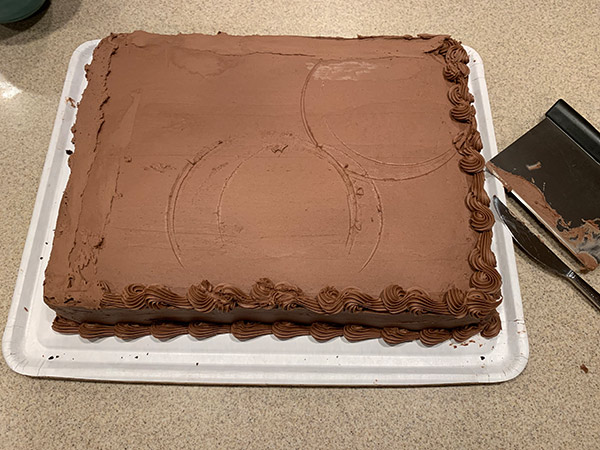
This year, however, the round fudge cake was not available. So I decided to buy a plain sheet cake and try to wing it. It worked out surprisingly well! Everyone around here loves Costco’s chocolate sheet cake and it wasn’t as difficult for me to rework as I thought it would be. Take a look at how I did it below for my daughter’s mermaid cake!
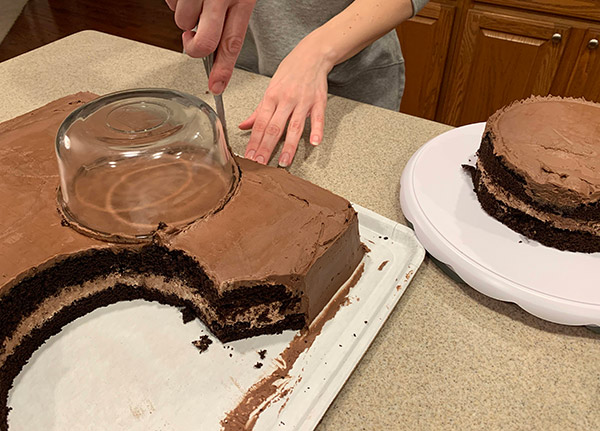
I started with this plain chocolate sheet cake. I used a bench scraper to gently scrape off the excess frosting. Then, because I wanted to make a round cake, I needed to cut my cake into circles. (I know, I could have made my life easier and just decorated the cake as is, but where’s the challenge in that? Also, my daughter had seen some baking shows and really wanted a tall layer cake.) I experimented with a few different sized round bowls to see which size would get me three layers. You can see in the picture above the outlines of the bowl on the frosting.
Next, I cut three circles out of the cake. I used my bowl as my guide so they would all be perfectly round and the same size. This did leave a bit of leftover cake which I served to some of my guests who didn’t want as much frosting and I also froze some to bring out one cold February night when we all want a treat at home.
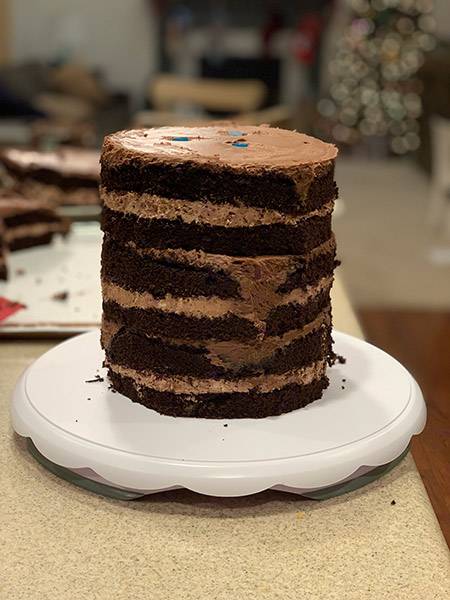
I gently stacked the layers as I cut them out. I didn’t put anything in between them, but I did use large straws as dowels for stability. I pushed three straws down through all three layers. I needed to cut the tops of the straws so they didn’t show.
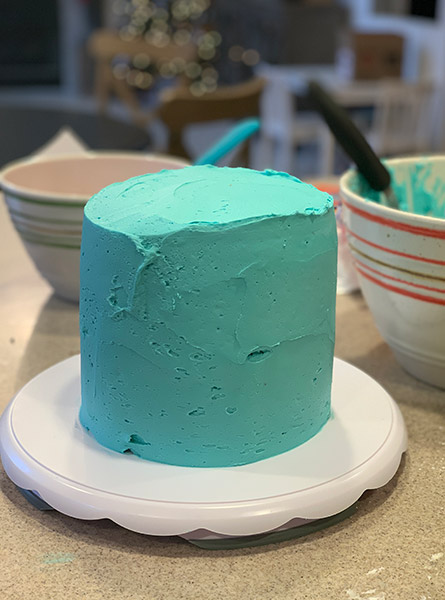
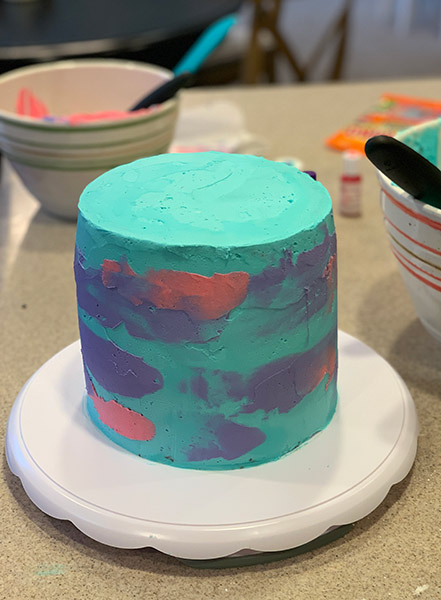
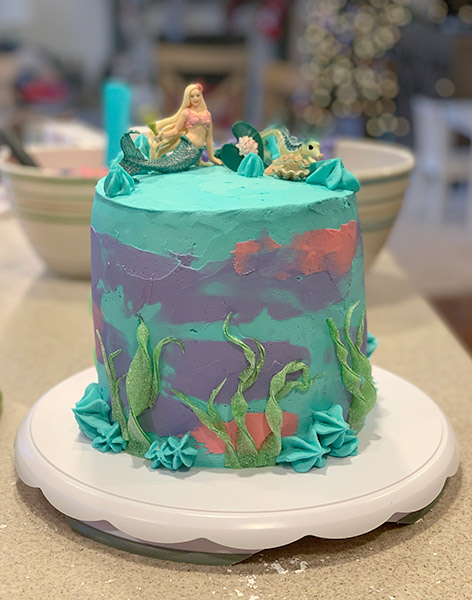
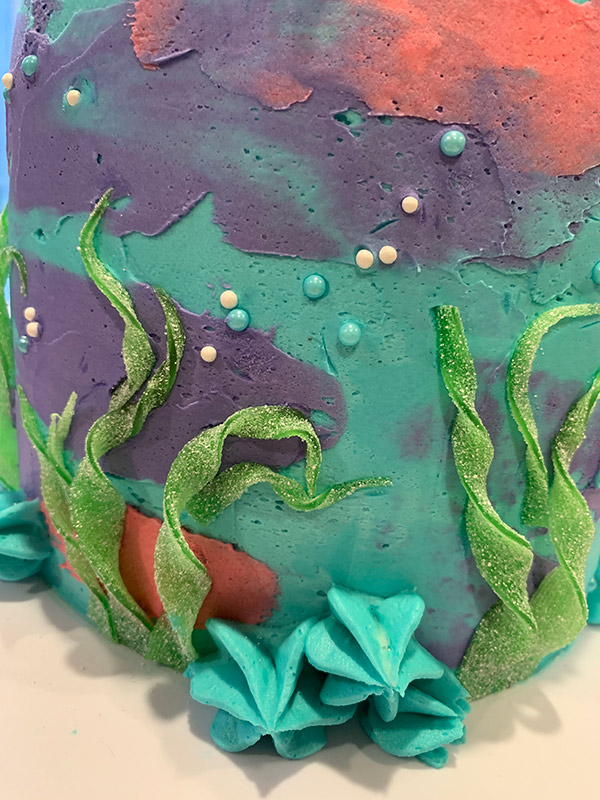
Finally, I added a quick crumb coat from the frosting I scraped off at the beginning before putting the cake into the refrigerator until the next morning. This step was the hardest, I really needed to be careful to not pull off any of the cake. On the morning of the party, I quickly whipped up a batch of buttercream frosting and tinted it teal, pink and purple. Decorated my cake in a fun Mermaid theme and had a great party!
For the cake details, I bought white and blue pearlized sprinkles to be water bubbles. For the seaweed, I bought Haribo Sour Streamers and cut the green ones into long pointed strips, then pushed them into the frosting on the bottom. I then twisted them and pushed them into the frosting on the top. They held very well and of course, all the kids wanted a piece with seaweed on it!
And what mermaid cake would be complete without a mermaid? I bought this Schleich Mermaid figure from Amazon and placed it on top with some extra frosting details and a candle. While obviously not a professional cake, it was perfect for my six year old and perfect for me because I didn’t have to bake anything!