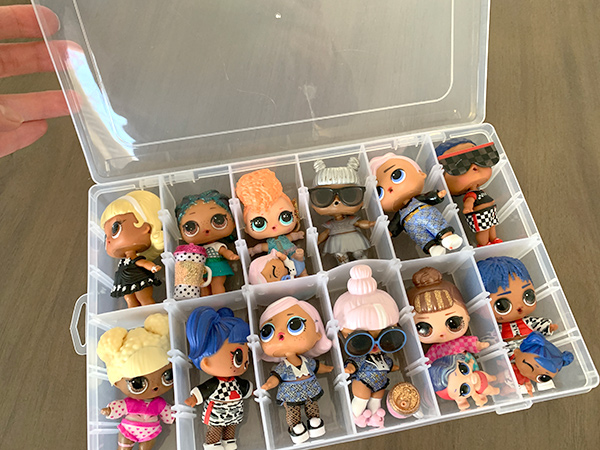
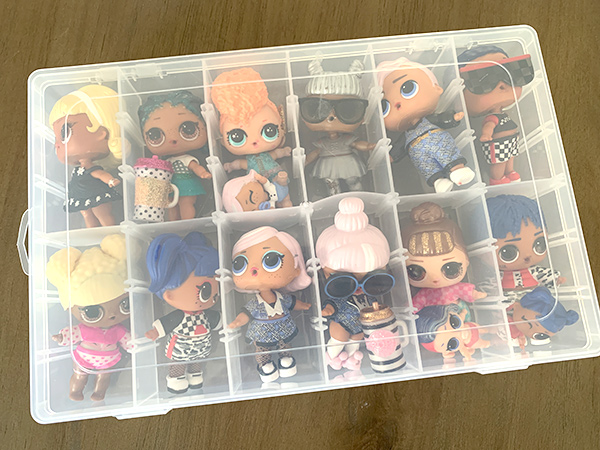
LOL Doll Storage is something I have been searching for for a long time. Are you are a parent of a kid who loves LOL Surprise Dolls? Then you have at some point in time lost it after vacuuming up yet another tiny doll shoe left on the floor. Or, if your kids are like mine, you can’t even step in their room without slippers for fear of being mortally injured when twisting an ankle on the LOL Dolls that have now formed a new carpet in front of their bed. Hey, at least they aren’t as sharp as Legos, am I right? I still shudder at the pain of a bare foot on a sharp lego corner.
But seriously, this post is just a quick tip on some divided containers I found. Much to my surprise, they help my kids keep their LOL Dolls organized. They actually really love to take the dolls out, put outfits on each one, and then choose a spot for each doll in the containers. I found them on Amazon here: https://amzn.to/2REtzsT. (affiliate link) I ordered the 36 grid option and then removed two dividers for each section to fit a full-sized LOL doll. You can leave the dividers in for shoes and other accessories if you want.
Organization is life
These containers really do make the perfect LOL Doll storage, but can be used for other items later on. I have a few more that my girls use to store their rock and crystal collections. I like that I can remove the dividers to make them custom to what I am storing. It’s a small item that can really make a big difference. Now, if I could find fun containers for everything on my kids’ floors I’d really be happy.
If your kids love LOL Dolls, check out our LOL Themed Birthday Cake here.
Valentine’s Day is just around the corner! At our house, with my craft-loving kids we love making homemade classroom valentines to hand out! This year my 8-year-old decided she wanted to hand out Harry Potter Howler Valentines, but the only Harry Potter related valentines we could find in the stores had pencils. Which, if I’m being honest, are not the most exciting. I have so many pencils from every school function over the past few years that they just keep piling up. And I don’t know about you guys, but my kids aren’t allowed to bring anything edible so candy is a no-go.
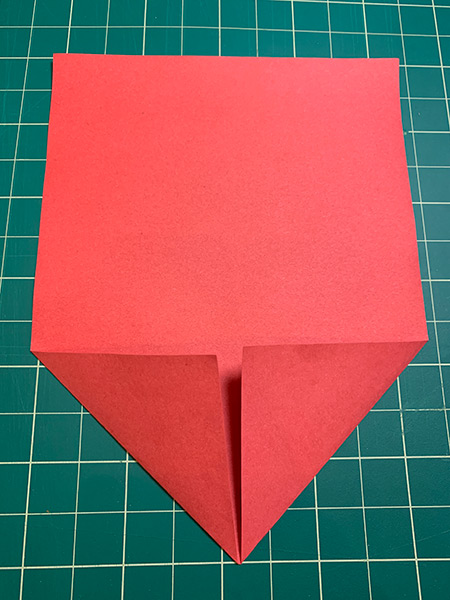
For those reasons, we decided to make some Howler letters and include Harry Potter Stickers inside. See the stickers we used at our affiliate link here: https://amzn.to/38MYERa. My daughter loves them and helped throughout the entire process! A little paper folding and tape made her valentines come to life. Below I have pictures and instructions. Hopefully, they inspire you to make your own.
Fold two corners of the red piece of paper so they come to a point in the middle like the first picture above. Then, fold each long side in towards the middle. Fold the straight end in about an inch and a half and tape in place. This step is simply to make the paper a little shorter so it is totally optional.
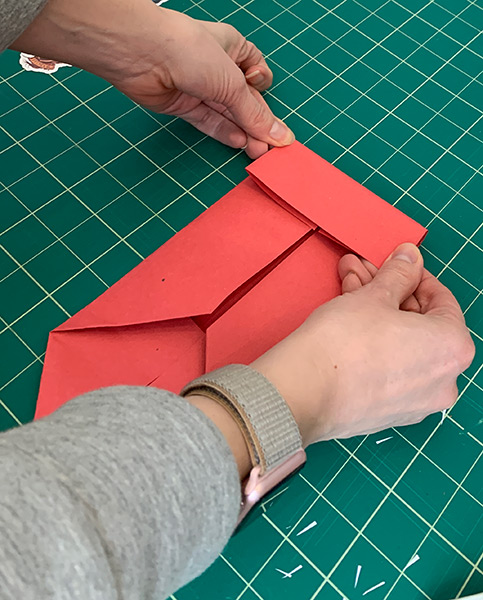
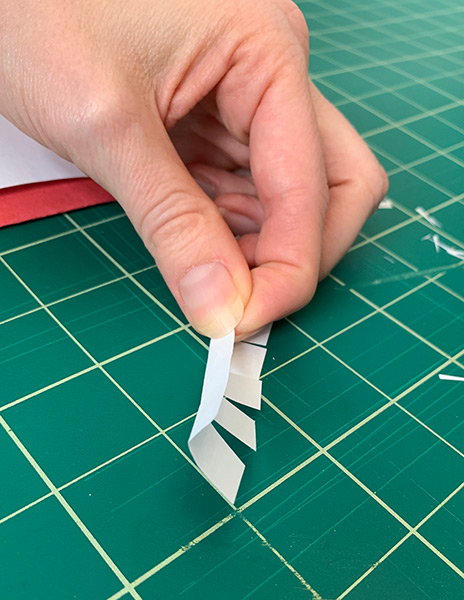
Next, fold the whole paper in thirds. Print the valentine template and cut evenly into 3 pieces. On each piece, cut an inch of the white paper off the top and bottom. We will be using these cut pieces for the teeth. Cut slits along each inch wide piece making sure not to cut all the way through. Fold the teeth along the edge of your cuts like the picture above on the right.
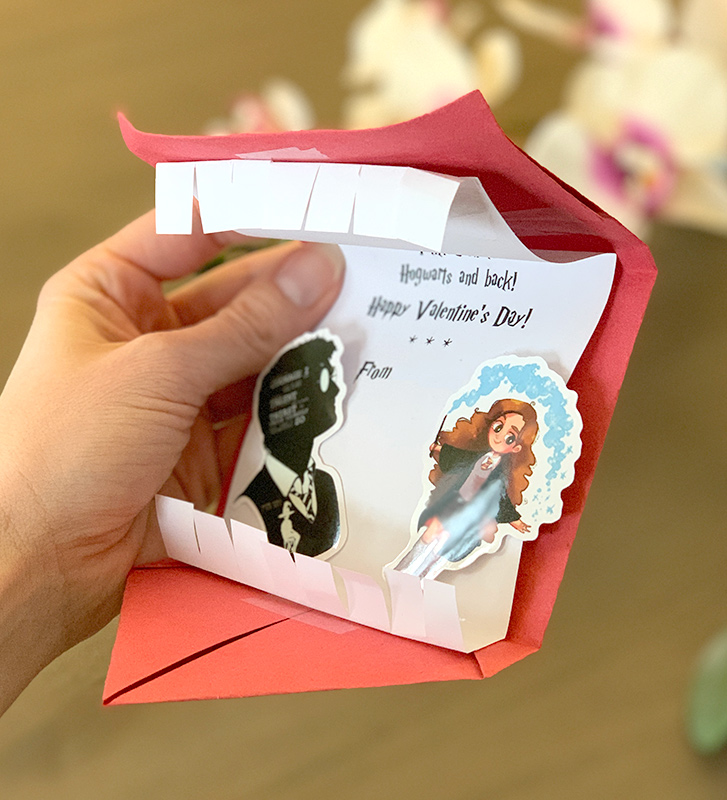
Finally, assemble your valentines. I used tape because it is so much faster than waiting for glue to dry, but you could use that too. Tape the valentine template to the folded red paper, on the side with all the paper folds. After that, tape the teeth on the top and bottom and then use a pencil to curl the edges of the top corners of the valentine. Lastly, tape the Harry Potter stickers inside, have your child sign their name and voila you have your own Harry Potter Howler Valentines!
I used heart stickers to keep the valentines closed, but wouldn’t these faux wax seals be so cute! You could also add a little giveaway other than stickers, just get creative. I found some cute bracelets, broom pens, or temporary tattoos as options (affiliate links). Happy Valentine’s Day everyone!
I love creating fun, themed parties for my daughter’s birthdays. A big part of the party theme is the cake, but with all the other planning that goes into a party, I stopped actually baking the cakes and starting buying cakes from Costco and re-decorating them. By doing it this way I know the cake will taste delicious, but I still get to be a part of decorating something more personalized for my kids. Below is the basic idea of how I do it. There are affiliate links at the bottom of the post to most of the items I used.
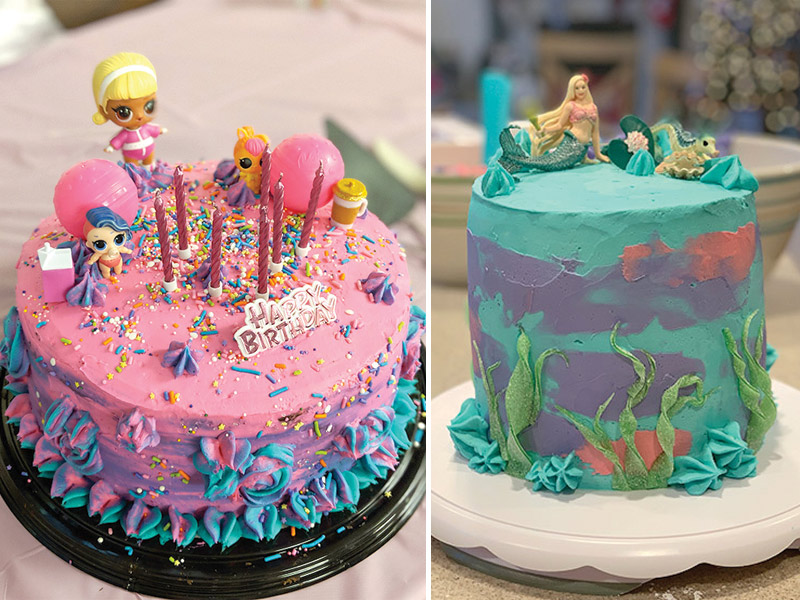
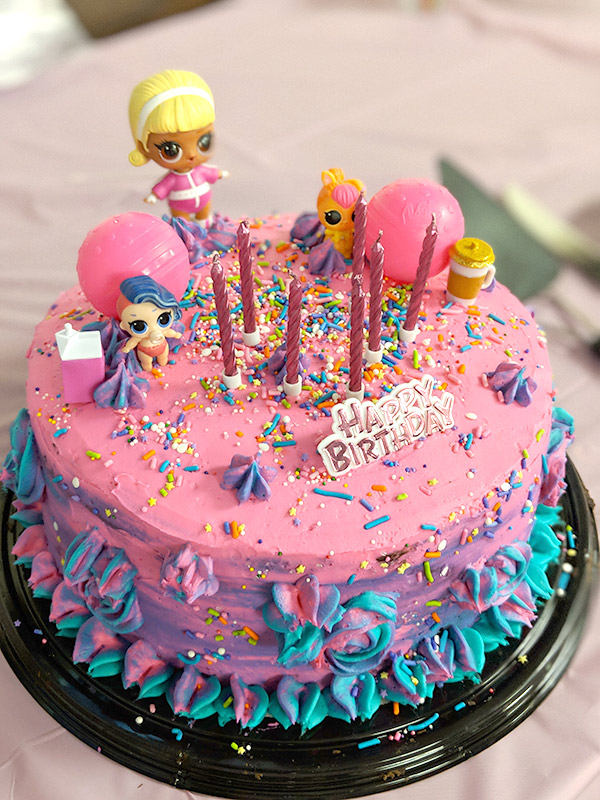
Usually, I gently scrape the excess frosting off the cake and redecorate with my own frosting and party-themed style. In the picture below, I bought the round chocolate fudge cake (the one with all the chocolate shavings on the top) and added my own bright frosting, sprinkles, and LOL Doll decorations to the top. Pro tip: when you buy a cake with chocolate shavings on top, you get to eat them while removing them from the cake. Yum!
This year, however, the round fudge cake was not available. So I decided to buy a plain sheet cake and try to wing it. It worked out surprisingly well! Everyone around here loves Costco’s chocolate sheet cake and it wasn’t as difficult for me to rework as I thought it would be. Take a look at how I did it below for my daughter’s mermaid cake!
I started with this plain chocolate sheet cake. I used a bench scraper to gently scrape off the excess frosting. Then, because I wanted to make a round cake, I needed to cut my cake into circles. (I know, I could have made my life easier and just decorated the cake as is, but where’s the challenge in that? Also, my daughter had seen some baking shows and really wanted a tall layer cake.) I experimented with a few different sized round bowls to see which size would get me three layers. You can see in the picture above the outlines of the bowl on the frosting.
Next, I cut three circles out of the cake. I used my bowl as my guide so they would all be perfectly round and the same size. This did leave a bit of leftover cake which I served to some of my guests who didn’t want as much frosting and I also froze some to bring out one cold February night when we all want a treat at home.
I gently stacked the layers as I cut them out. I didn’t put anything in between them, but I did use large straws as dowels for stability. I pushed three straws down through all three layers. I needed to cut the tops of the straws so they didn’t show.
Finally, I added a quick crumb coat from the frosting I scraped off at the beginning before putting the cake into the refrigerator until the next morning. This step was the hardest, I really needed to be careful to not pull off any of the cake. On the morning of the party, I quickly whipped up a batch of buttercream frosting and tinted it teal, pink and purple. Decorated my cake in a fun Mermaid theme and had a great party!
For the cake details, I bought white and blue pearlized sprinkles to be water bubbles. For the seaweed, I bought Haribo Sour Streamers and cut the green ones into long pointed strips, then pushed them into the frosting on the bottom. I then twisted them and pushed them into the frosting on the top. They held very well and of course, all the kids wanted a piece with seaweed on it!
And what mermaid cake would be complete without a mermaid? I bought this Schleich Mermaid figure from Amazon and placed it on top with some extra frosting details and a candle. While obviously not a professional cake, it was perfect for my six year old and perfect for me because I didn’t have to bake anything!
I love creating fun, themed parties for my daughter’s birthdays. A big part of the party theme is the cake, but with all the other planning that goes into a party, I stopped actually baking the cakes and starting buying cakes from Costco and re-decorating them. By doing it this way I know the cake will taste delicious, but I still get to be a part of decorating something more personalized for my kids. Below is the basic idea of how I do it. There are affiliate links at the bottom of the post to most of the items I used.
Usually, I gently scrape the excess frosting off the cake and redecorate with my own frosting and party-themed style. In the picture below, I bought the round chocolate fudge cake (the one with all the chocolate shavings on the top) and added my own bright frosting, sprinkles, and LOL Doll decorations to the top. Pro tip: when you buy a cake with chocolate shavings on top, you get to eat them while removing them from the cake. Yum!
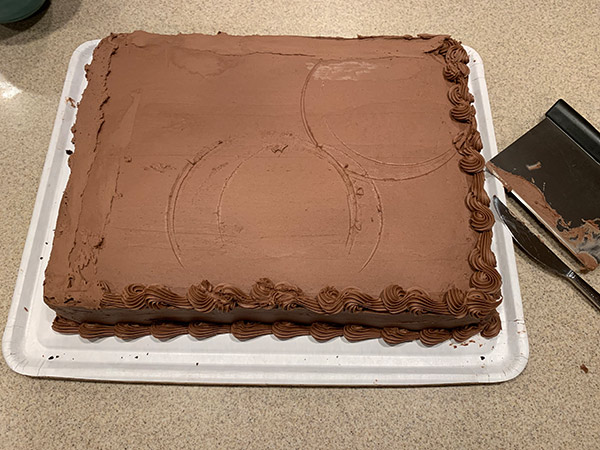
This year, however, the round fudge cake was not available. So I decided to buy a plain sheet cake and try to wing it. It worked out surprisingly well! Everyone around here loves Costco’s chocolate sheet cake and it wasn’t as difficult for me to rework as I thought it would be. Take a look at how I did it below for my daughter’s mermaid cake!
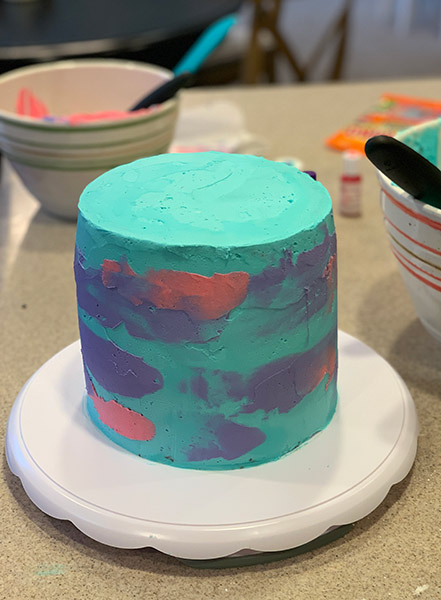
I started with this plain chocolate sheet cake. I used a bench scraper to gently scrape off the excess frosting. Then, because I wanted to make a round cake, I needed to cut my cake into circles. (I know, I could have made my life easier and just decorated the cake as is, but where’s the challenge in that? Also, my daughter had seen some baking shows and really wanted a tall layer cake.) I experimented with a few different sized round bowls to see which size would get me three layers. You can see in the picture above the outlines of the bowl on the frosting.
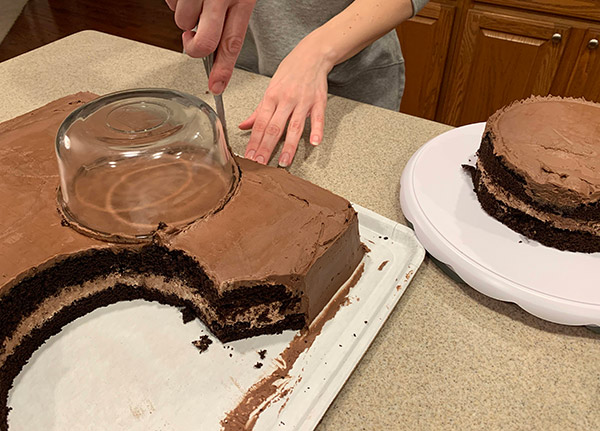
Next, I cut three circles out of the cake. I used my bowl as my guide so they would all be perfectly round and the same size. This did leave a bit of leftover cake which I served to some of my guests who didn’t want as much frosting and I also froze some to bring out one cold February night when we all want a treat at home.
I gently stacked the layers as I cut them out. I didn’t put anything in between them, but I did use large straws as dowels for stability. I pushed three straws down through all three layers. I needed to cut the tops of the straws so they didn’t show.
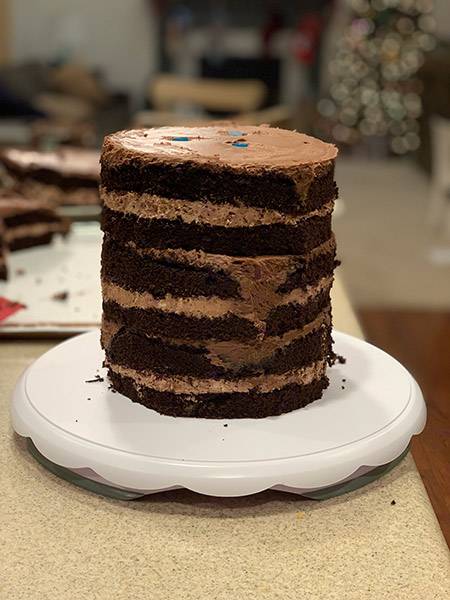
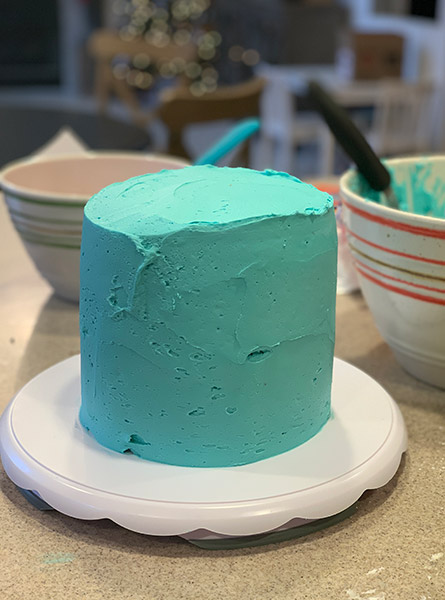
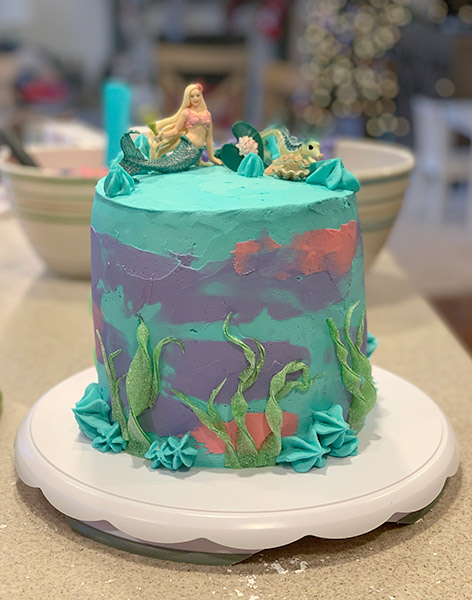
Finally, I added a quick crumb coat from the frosting I scraped off at the beginning before putting the cake into the refrigerator until the next morning. This step was the hardest, I really needed to be careful to not pull off any of the cake. On the morning of the party, I quickly whipped up a batch of buttercream frosting and tinted it teal, pink and purple. Decorated my cake in a fun Mermaid theme and had a great party!
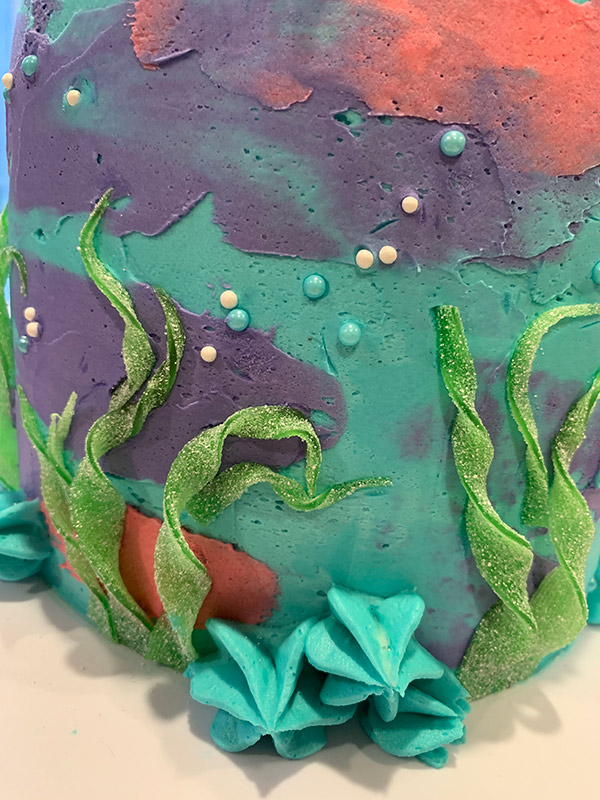
For the cake details, I bought white and blue pearlized sprinkles to be water bubbles. For the seaweed, I bought Haribo Sour Streamers and cut the green ones into long pointed strips, then pushed them into the frosting on the bottom. I then twisted them and pushed them into the frosting on the top. They held very well and of course, all the kids wanted a piece with seaweed on it!
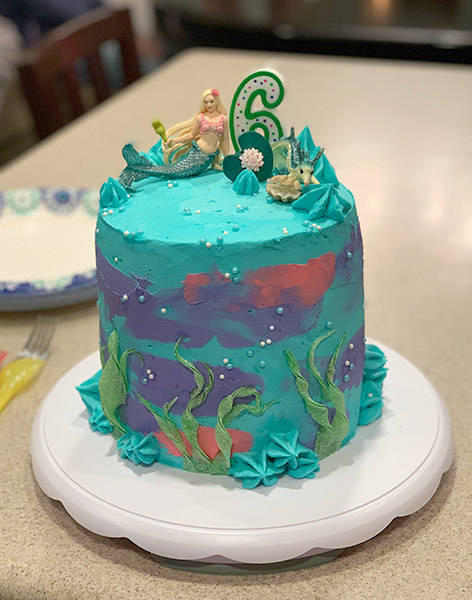
And what mermaid cake would be complete without a mermaid? I bought this Schleich Mermaid figure from Amazon and placed it on top with some extra frosting details and a candle. While obviously not a professional cake, it was perfect for my six year old and perfect for me because I didn’t have to bake anything!
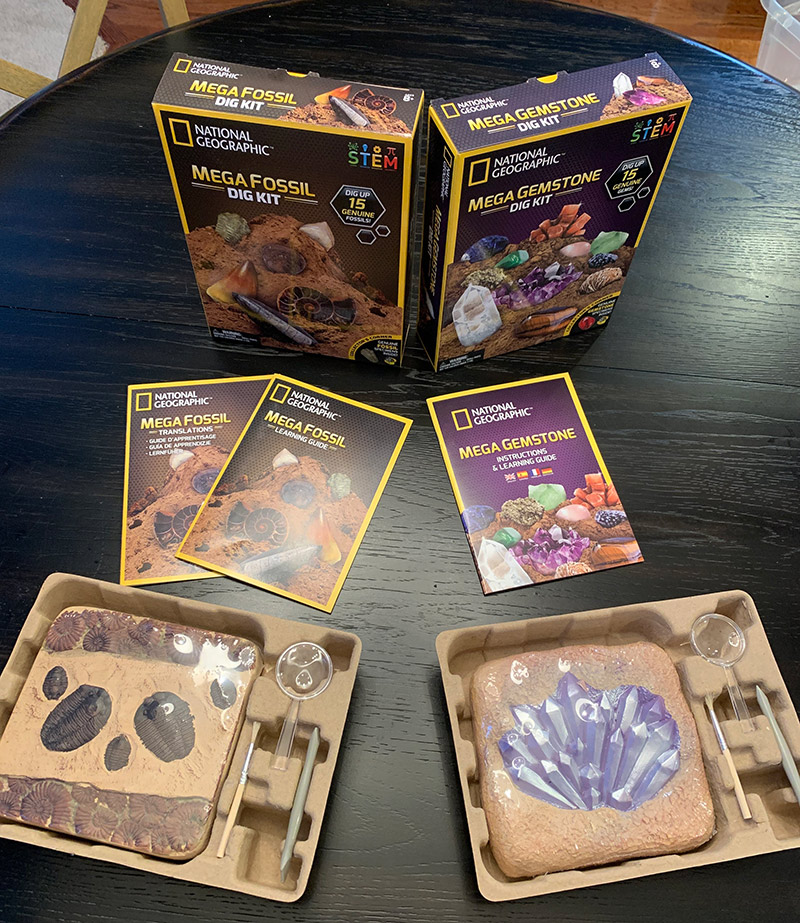
This year for Christmas my girls received Dig Kits (National Geographic Mega Gemstone Dig Kit and National Geographic Mega Fossil Dig Kit*affiliate links) from their lovely aunt. This was the perfect gift for them as my 8 year old is currently in love with everything crystal and gemstone related and my 6 year old wants to be a paleontologist when she grows up. I’ll start off by saying they LOVED this gift and are proudly displaying their “specimens” on their dressers as I write this. I love that they got to have an experience with this gift and it is not just another plastic toy that they will play with for a week and eventually end up in a landfill. Good job, Auntie! Ok, let’s get to the details.
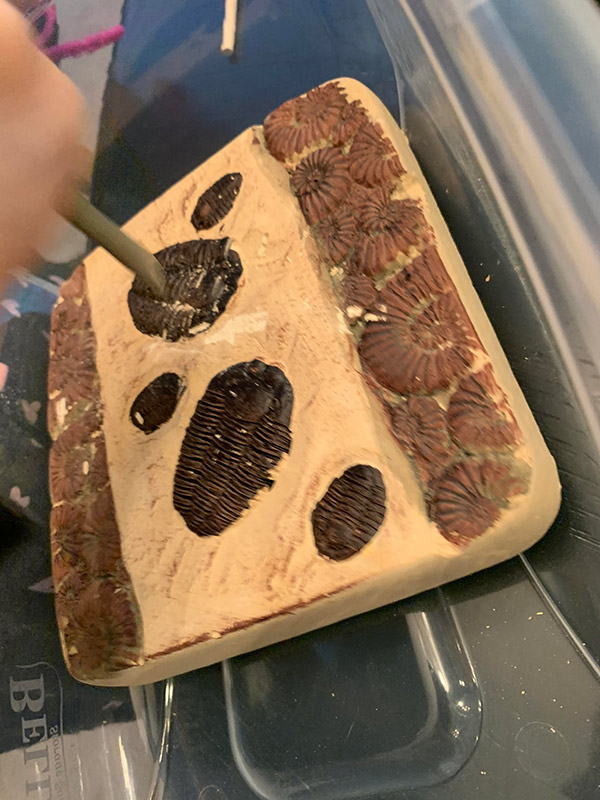
How these kits work: There are many different types and brands on the market. They start as blocks of hardened, plaster-like material. The kit comes with a plastic digging tool as well as a small brush to brush away dust. The child digs and chips away at the “dirt” on the block until they find a gem/fossil and continue to excavate it. In the pictures above, you can see how the block starts out and if you look closely you can see the rose quartz gem in the middle of the right picture as my daughter brushes away dust.
Details: These blocks can be hard at times to dig into. If you add some water and let it sit for a moment, it does get easier. I had to help my 6 year old along, but my 8 year old excavated all 15 gems on her own. With these particular sets from National Geographic, my daughters found quite a bit of specimens as they worked. The box states the kit includes 15 different gems/fossils, however my 6 year old only found 14 fossils in her kit.
As you can see in the picture above, this process does get quite messy. I placed them inside plastic bins which helped to contain the dust, but we still needed to clean the table and vacuum afterward. This would be a great outdoor activity!
Below are the final fossils and gems that my daughters excavated. They were so proud when they finally finished. The fossils still have a little bit of the dirt/plaster still stuck to them that we need to wash off, but you get the idea. The kits came with booklets that had information about each item they excavated so not only was this a fun gift, but it was educational as well.
I ended up buying my girls these small plastic divided containers to hold their fossils and gems in. They are great, have dividers that can be removed for larger items and are affordable. I have a link to these exact boxes below.
Target is offering $25 off when you spend $100 on toys & games or save $10 when you spend $50 + more savings when stacked with other toy offers! (Legos excluded) Get those toys checked off your holiday shopping lists. But hurry before the most wanted toys sell out. See the deal here: goto.target.com/P9PJz(affiliate link)
🔥 HOT DEAL! Amazon Deal of the Day – Save up to 40% on select L.O.L Surprise!, Poopsie and More. See all the deals at our affiliate link here: https://amzn.to/2QVeiE3
🛍️ This post contains affiliate links– thank you for supporting us.
Need Kids Holiday Gift Ideas?
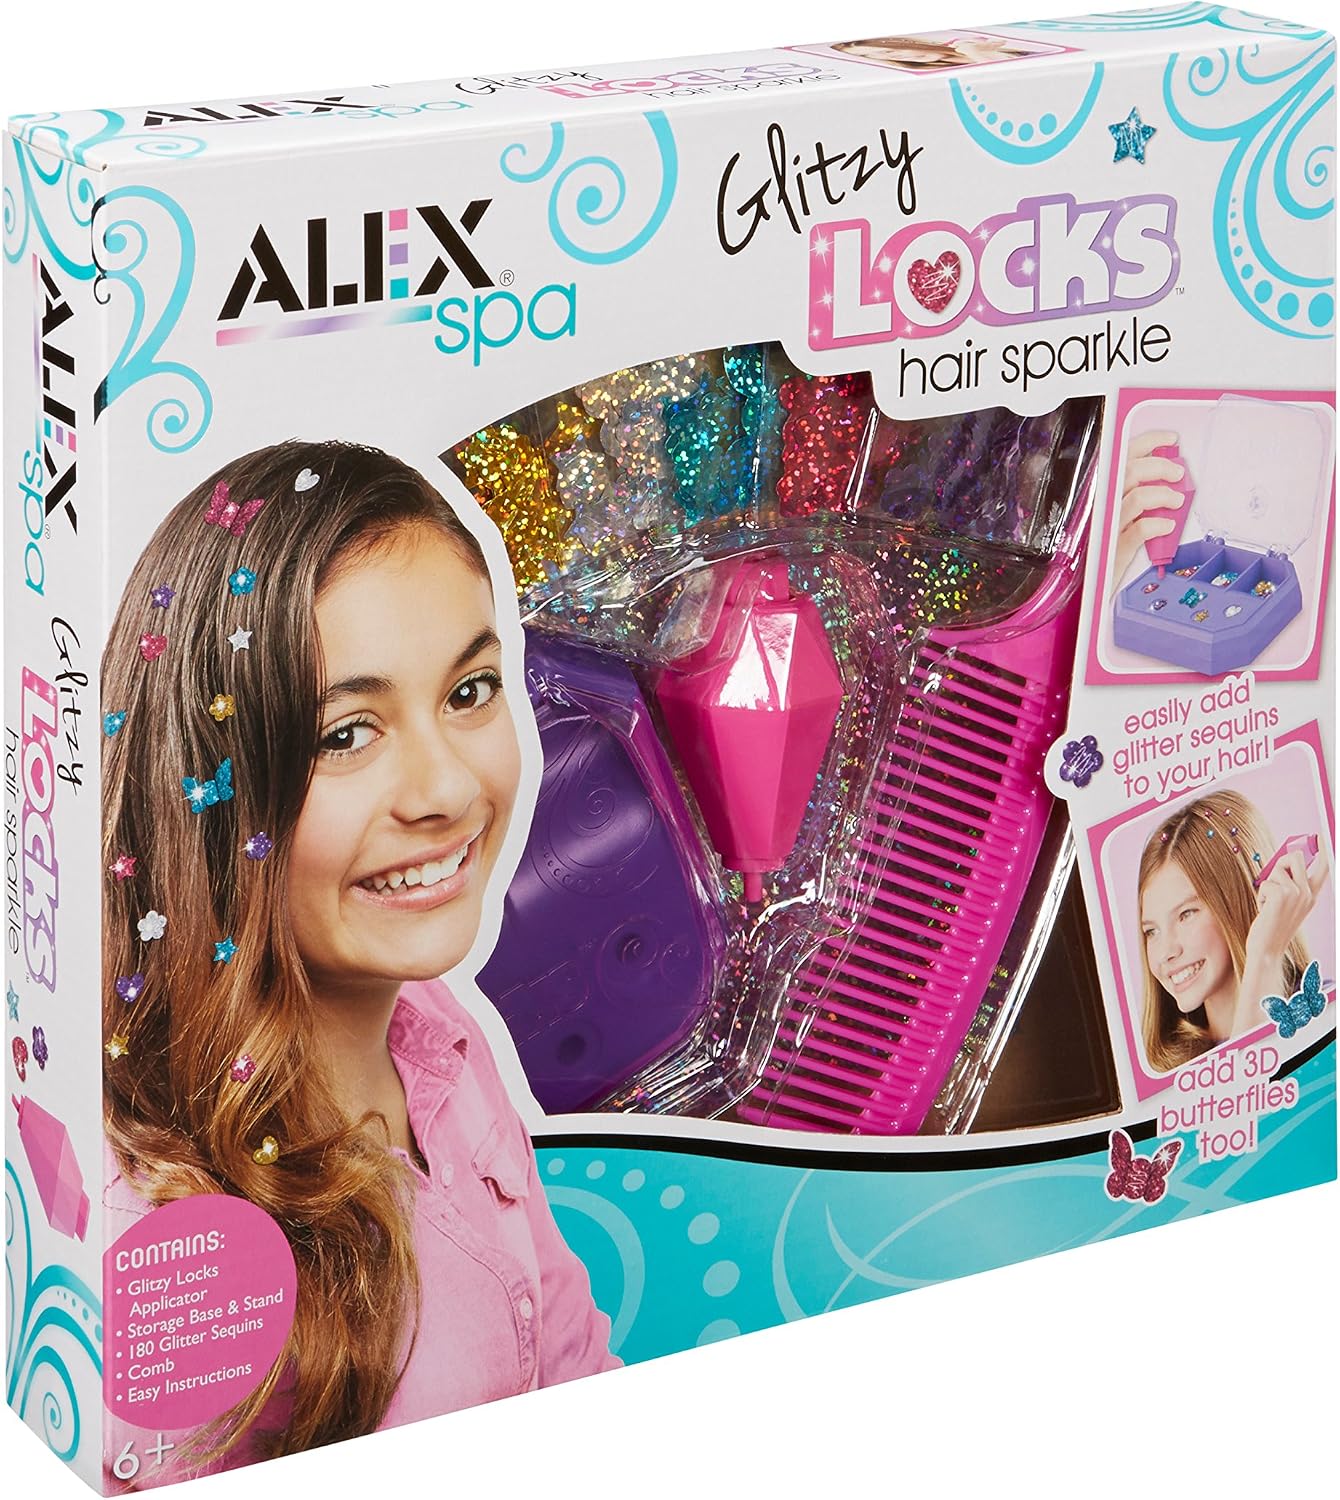
Today’s Amazon Deal of the Day is on Alex Brand toys including science kits! If you are a regular reader of this blog, you know how much we love giving science kits as gifts. They are a super fun way to gift an experience for kids and make great holiday gifts. Check out all the details here: https://amzn.to/37gGPtA
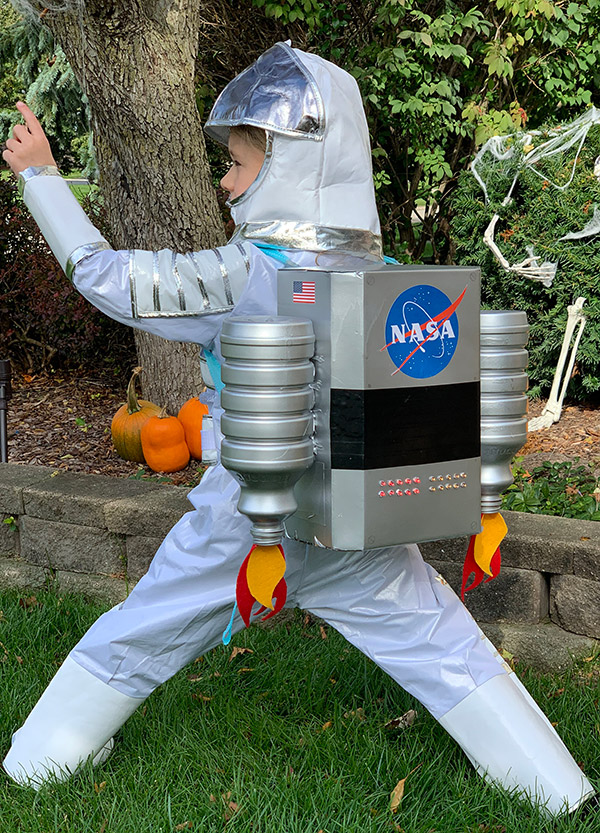
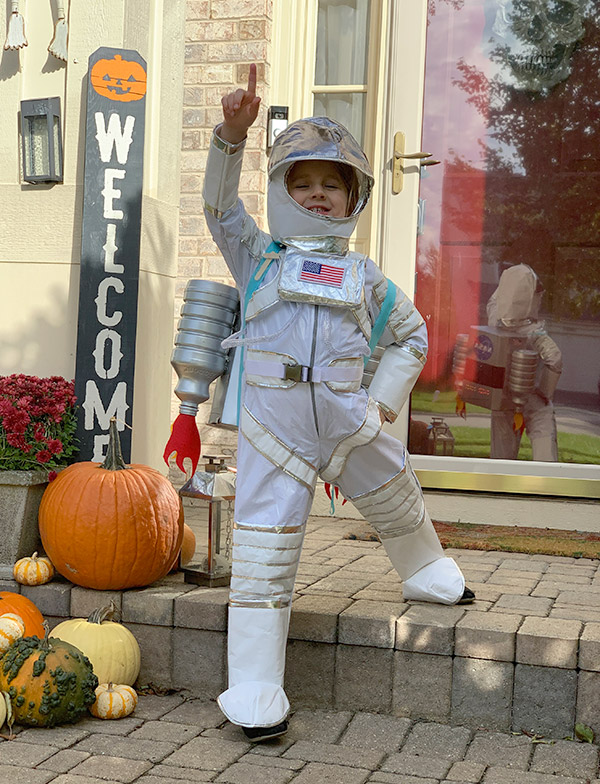
Guys, something amazing happened in female history this past Friday! The FIRST all-female spacewalk took place! I kinda can’t believe it took this long, but it is still an amazing achievement nonetheless. 👏 GO GIRLS! 👏 As it just so happens, my younger daughter is going as an astronaut this Halloween! We saw the costume in the store last month and both instantly thought it looked amazing. In honor of this historic event, I wanted to share how I created a DIY Light-Up Astronaut Jet Pack for her costume. She wanted it to be big, have fire coming out of the jets and light up. Never one to back down from a challenge, I got to work. Here’s what I did:
Jet Pack Materials
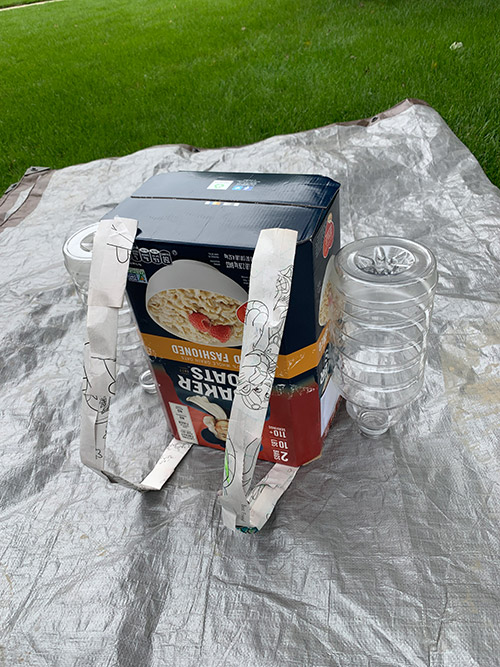
I wanted the jet pack to be light. My daughter is 5 and it needed to be light enough that she wouldn’t hand it to me half-way through trick-or-treating. (You know, like she’s done in years past with various costume accessories.) I found an oatmeal box which was the perfect shape for the middle portion and super light when empty. It had angled corners instead of standard right edges that I thought would make it look more, I don’t know the word for it, space-like. I also used two plastic juice containers for the jets. Below is a list of the materials I used. *affiliate links
First, I added straps made of ribbon to the box by cutting two holes on the top and bottom of the box. Then, I tied the ribbon in knots inside the box. I tied the ribbon to the top two holes first, then measured the strap length on my daughter while she held it to her back. I then used hot glue to connect the juice containers to each side, this formed the basic jet pack shape.
Painting & Design
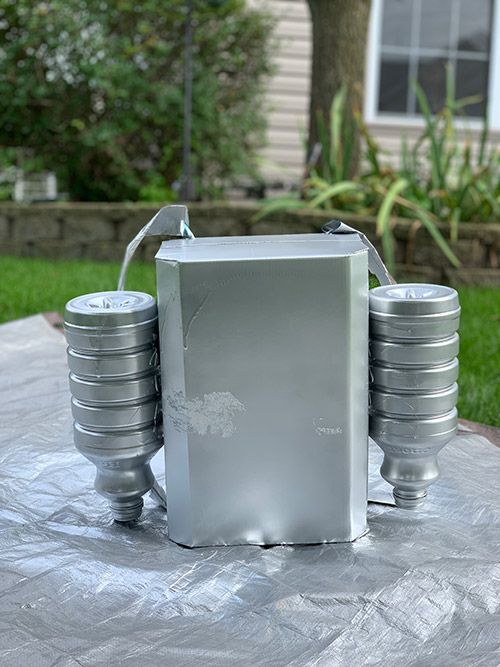
Once the glue cooled, I chose to paint the jet pack silver. To do this I used a silver spray paint + primer similar to this one (affiliate link). I covered the straps with paper before I sprayed anything. It took me two coats to completely cover the writing on the box.
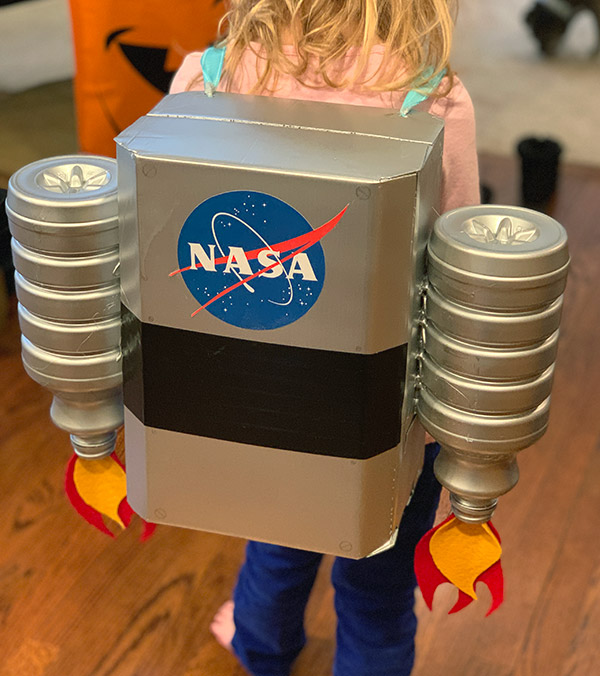
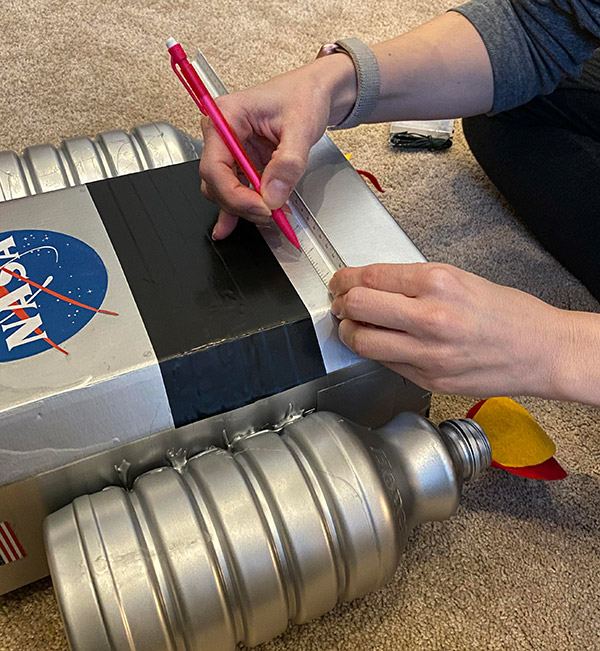
For the flames coming out of the jet pack, I cut out yellow and red pieces of felt in a flame shape. I hot-glued them into the bottle openings. I printed out a NASA logo and glued it to the front of the jet pack and made a black stripe using electrical tape under that. Here is what it looked like before I added the lights.
How I made the Jet Pack light up!
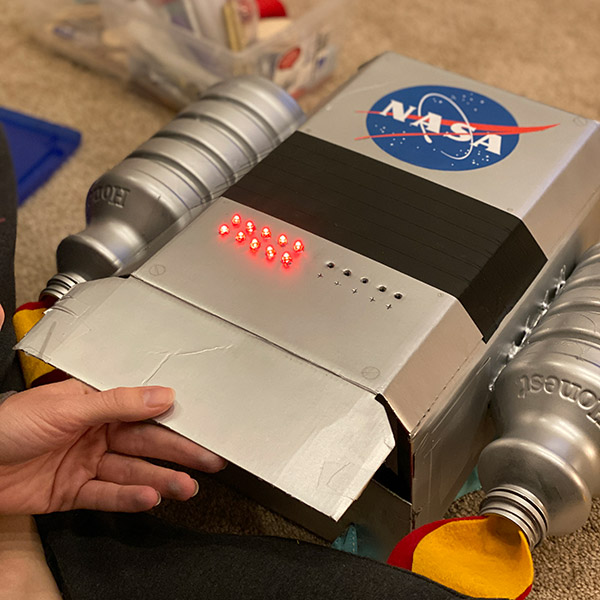
I could have stopped there, the jet pack looked great and fit my daughter well. But, she really, really wanted it to light up in some way so I thought, why not. I got two sets, one red and one yellow, of the battery-powered LED Lights from the dollar store. Yes, they only cost me a dollar! I decided to make two rows of each color lights underneath the black stripe.
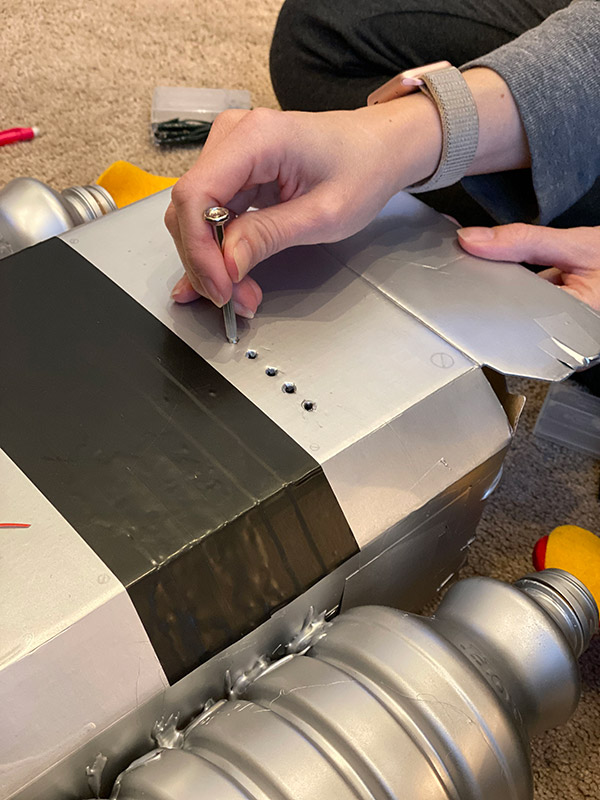
First, I measured out that a light would be placed every half-inch, based on the size of my LEDs. I marked a spot for each light with a ruler. Then I used an x-acto blade to cut x shapes on each spot. Once I had an x cut into the cardboard, I used a small screwdriver to push through the x. This made a hole the perfect size for each light. The holes were just about the exact size of my lights.
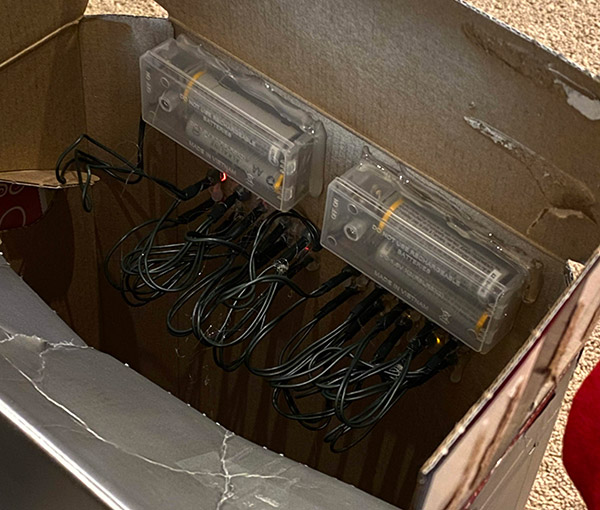
I pushed the lights through each hold, securing with hot glue as I went a light at a time. Then, I secured the battery pack on the inside of the box with hot glue as well.
I left the bottom of the jet pack open for now so I can access the lights and turn them on when needed. I just tape it shut with clear tape when she wears it. She is thrilled how it turned out and I am too!
Note: It’s hard to see the lights in the picture above because I took these pics when the sun was shining brightly. You can see in my other pictures at the top of the post that the lights are surprisingly bright! And there you have it, a DIY Light-Up Astronaut Jet Pack for a little one in your life! Have fun creating!
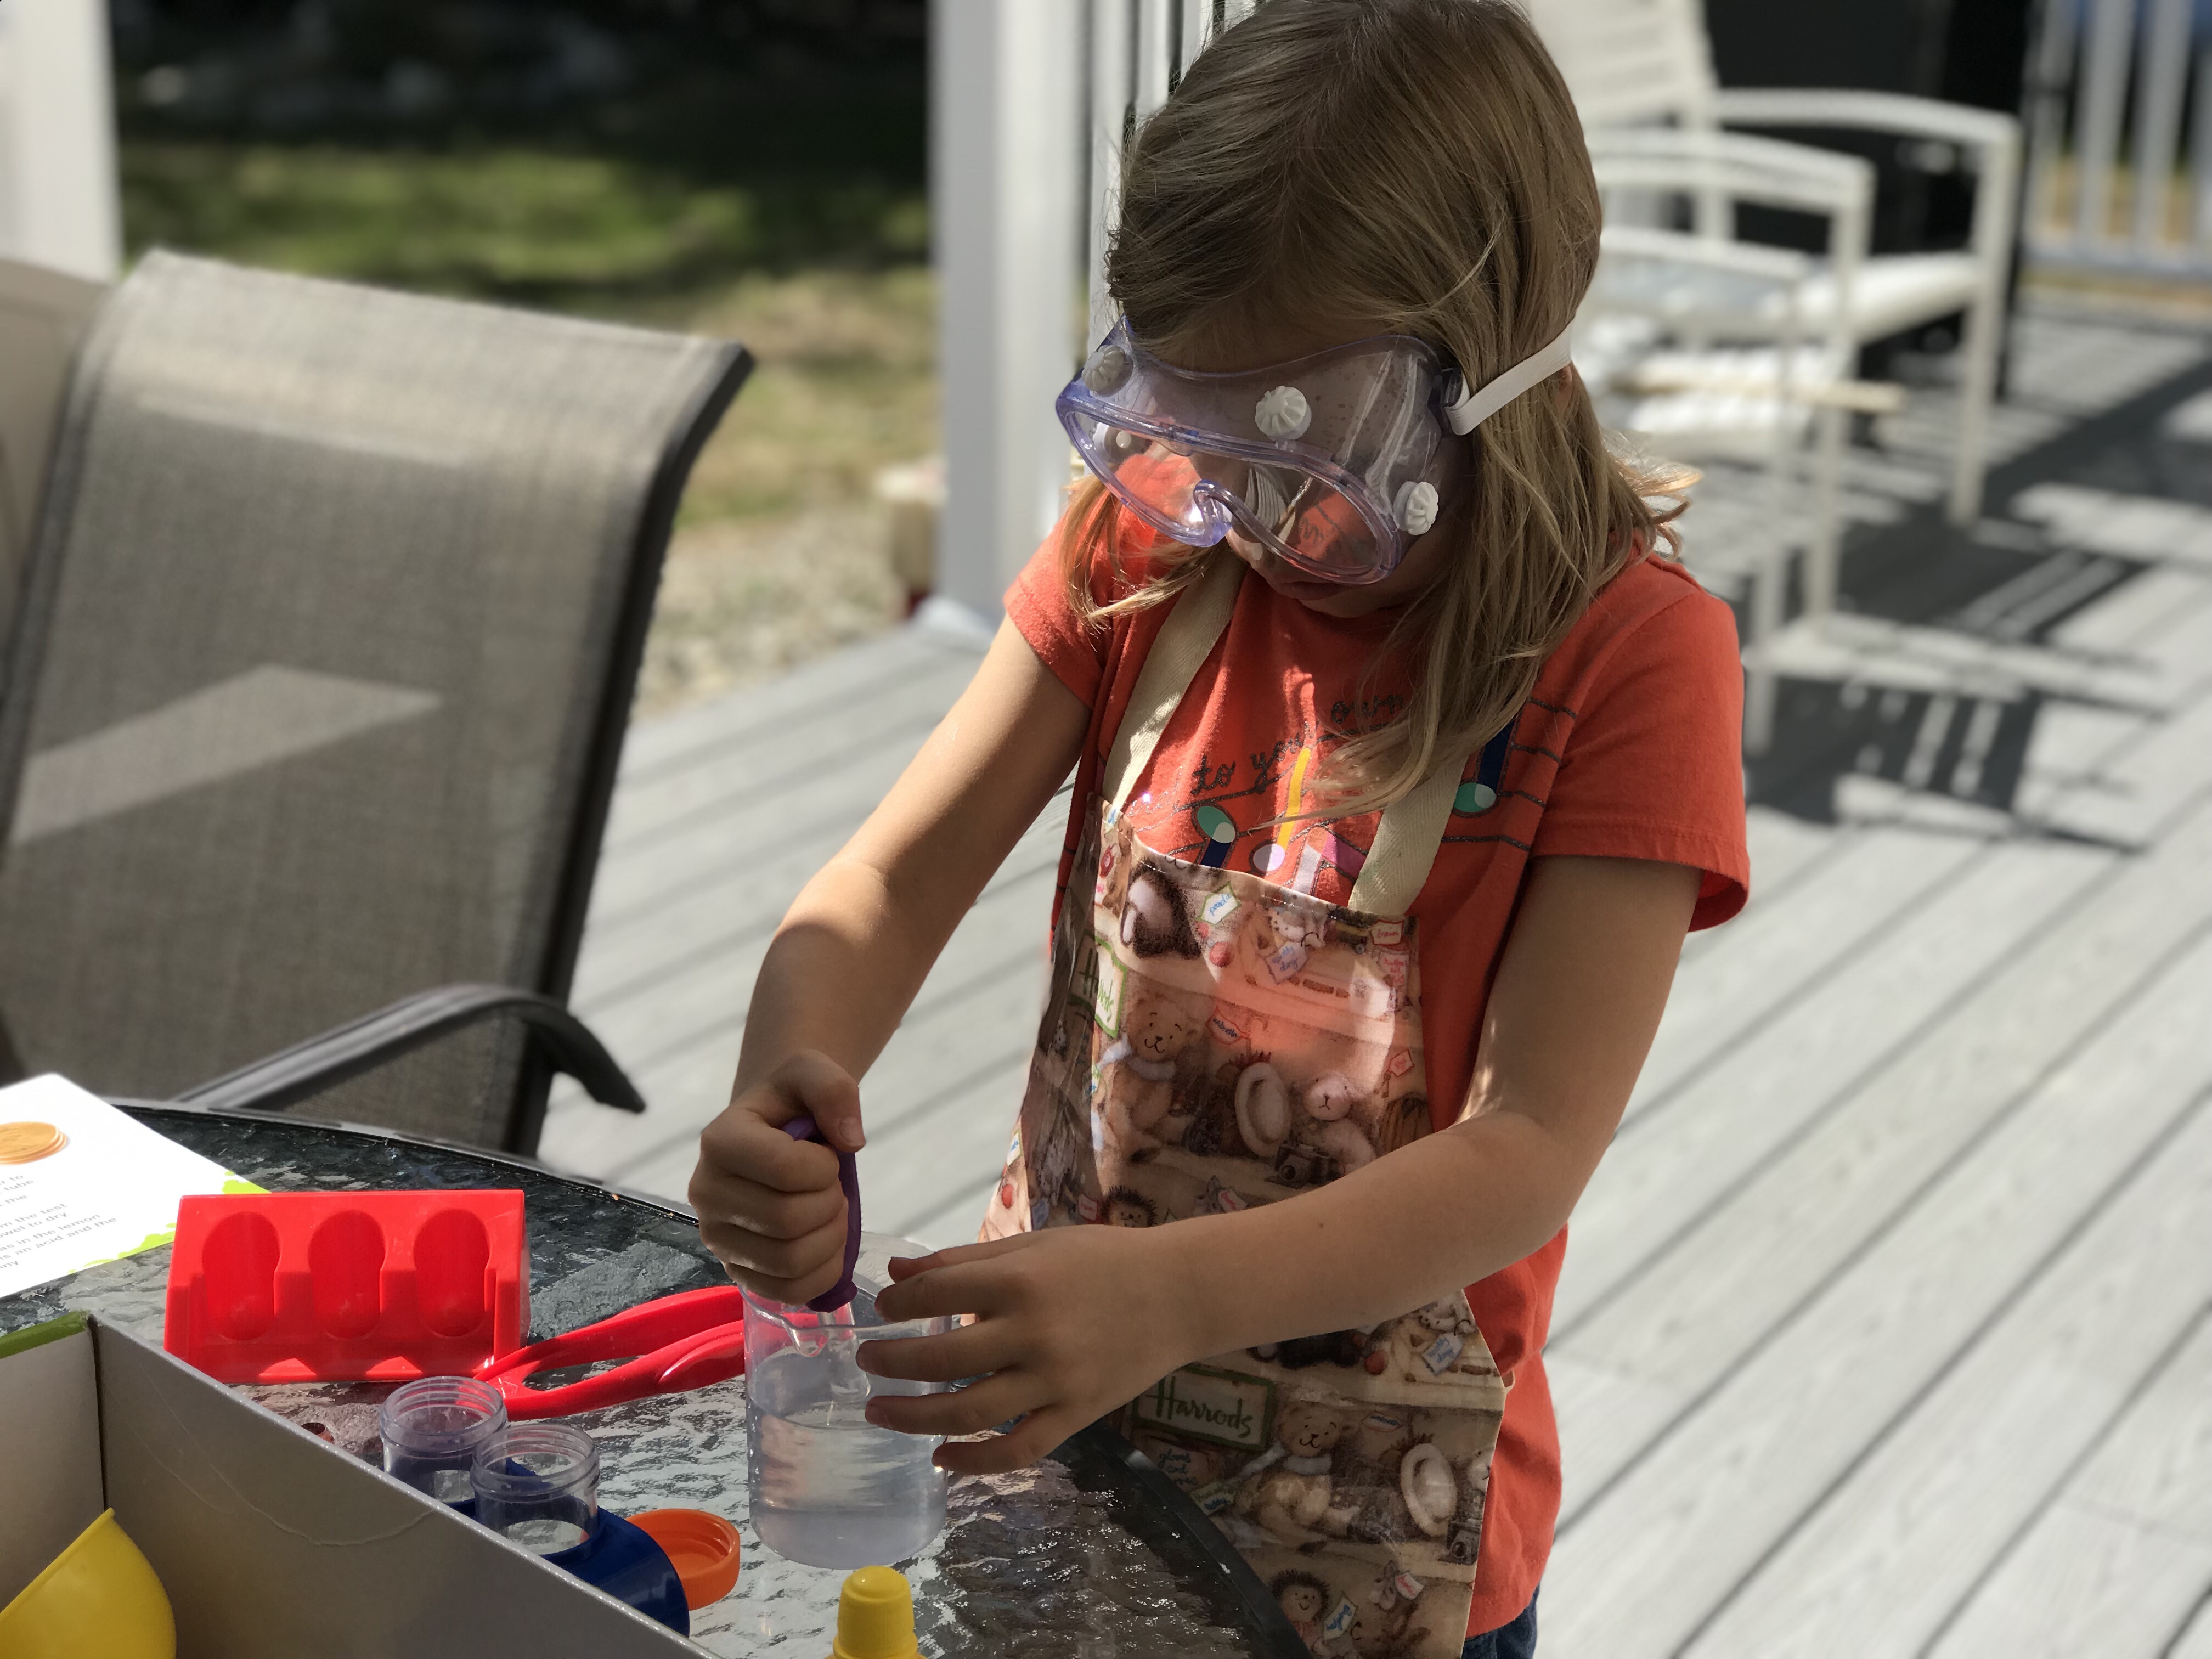
One of my all time favorite gifts to give kids of all ages are science kits, particularly this Primary Science Lab Set by Learning Resources. I purchased it as a holiday gift for my daughter back when she was only 3 years old and, as you can see in the picture above, it still gets plenty of use. 🛍️ This post contains affiliate links– thank you for supporting us.
Both of my daughters enjoy following the simple steps on the experiments cards included with the kit. They also have endless fun using the beaker, magnifying glass, eyedroppers, tweezers, goggles and test tubes with just water, vinegar and baking soda. Add some food coloring and they play for hours! I like this set in particular because the items included are sturdy and hold up over time.
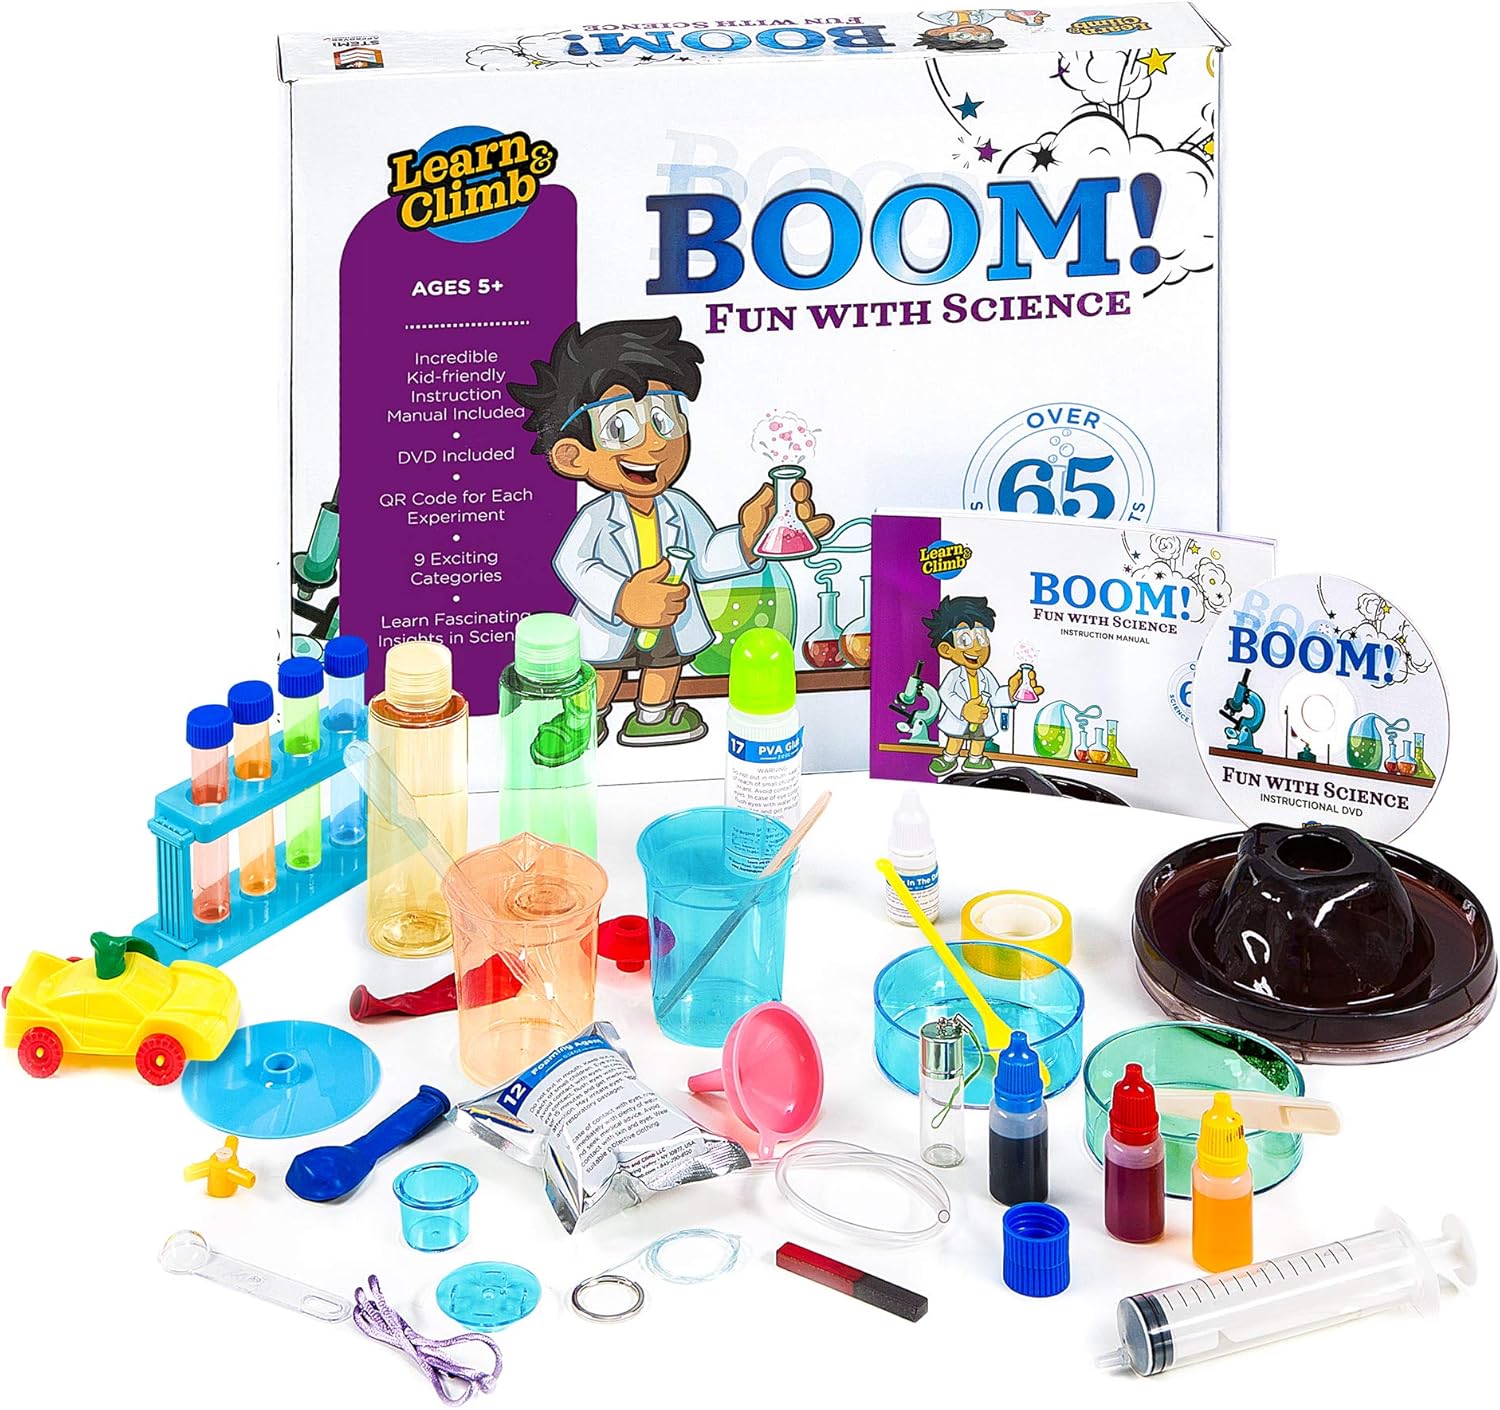
A science kit is a fantastic gift for any age. We have tried others like this My First Mind Blowing Science Kit by Scientific Explorer. This one doesn’t have all of the fancy supplies like the Learning Resources kit but the price is right for 11 different fun experiments. Some experiments in this kit may need adult assistance; it makes for a fun family activity.


