Category: Recipes

  • How to Decorate a Store Bought-Cake so you don't Have to Bake!

    How to Decorate a Store Bought-Cake so you don't Have to Bake!

    I love creating fun, themed parties for my daughter’s birthdays. A big part of the party theme is the cake, but with all the other planning that goes into a party, I stopped actually baking the cakes and starting buying cakes from Costco and re-decorating them. By doing it this way I know the cake will taste delicious, but I still get to be a part of decorating something more personalized for my kids. Below is the basic idea of how I do it. There are affiliate links at the bottom of the post to most of the items I used.

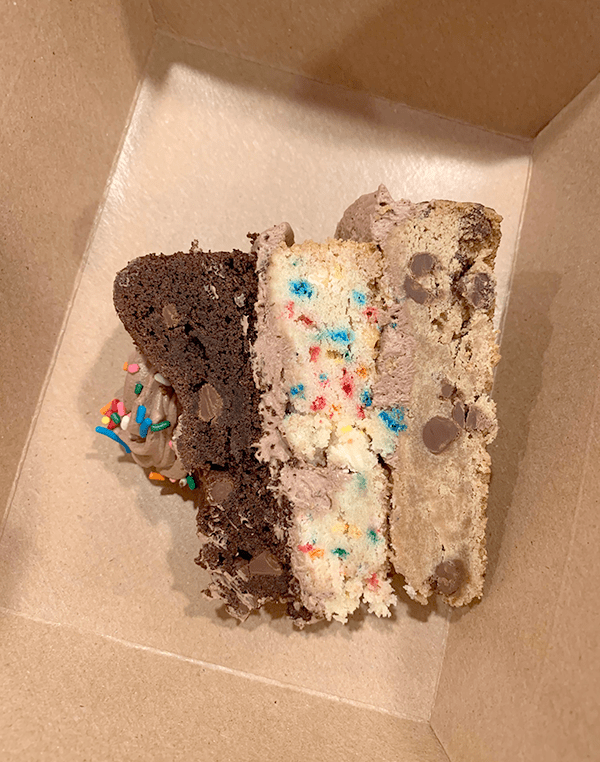
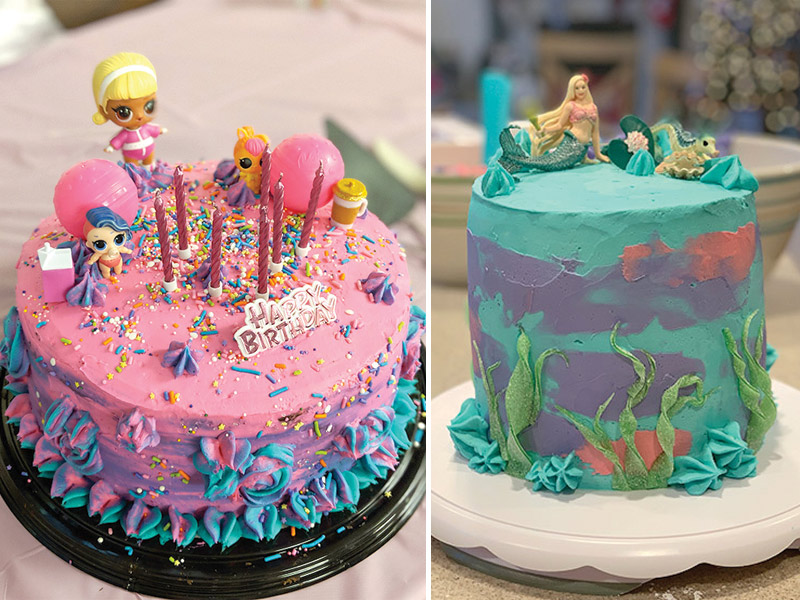
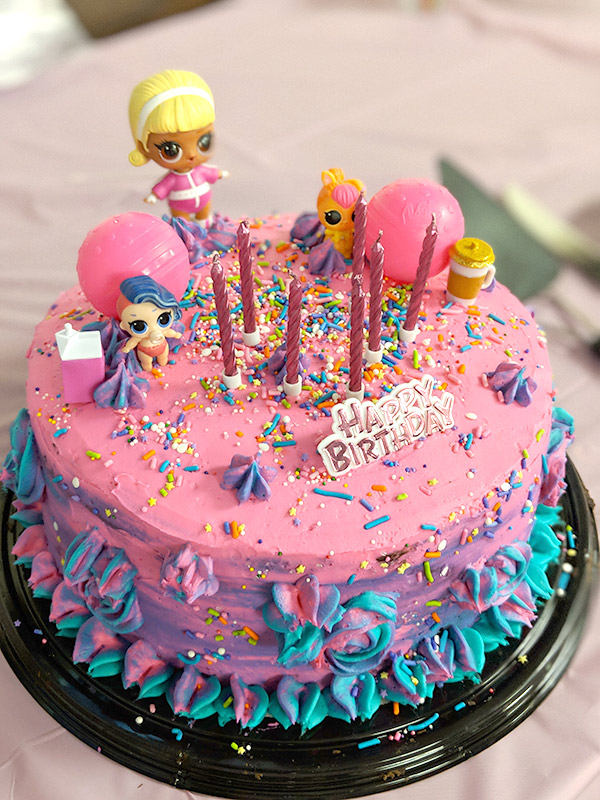
    Usually, I gently scrape the excess frosting off the cake and redecorate with my own frosting and party-themed style. In the picture below, I bought the round chocolate fudge cake (the one with all the chocolate shavings on the top) and added my own bright frosting, sprinkles, and LOL Doll decorations to the top. Pro tip: when you buy a cake with chocolate shavings on top, you get to eat them while removing them from the cake. Yum!

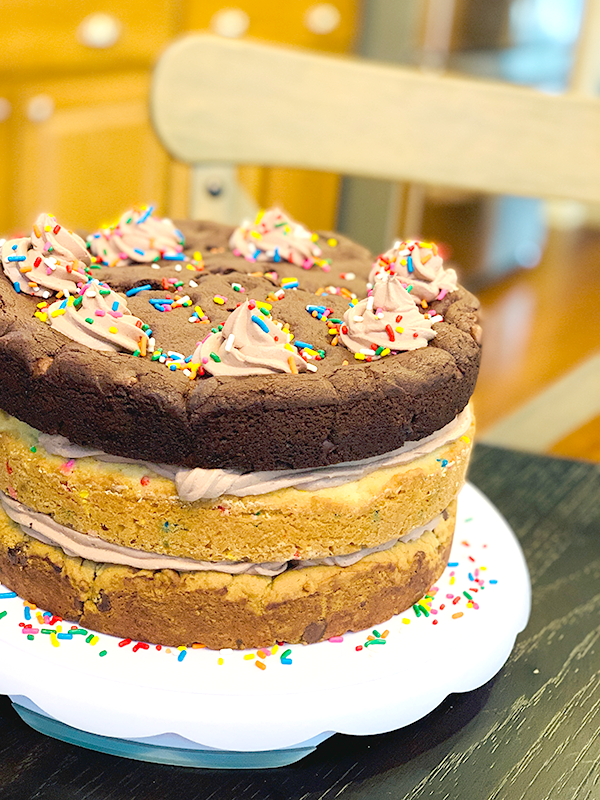
    This year, however, the round fudge cake was not available. So I decided to buy a plain sheet cake and try to wing it. It worked out surprisingly well! Everyone around here loves Costco’s chocolate sheet cake and it wasn’t as difficult for me to rework as I thought it would be. Take a look at how I did it below for my daughter’s mermaid cake!

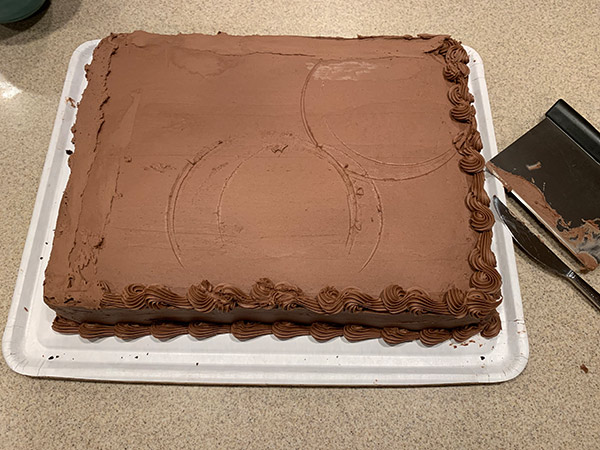
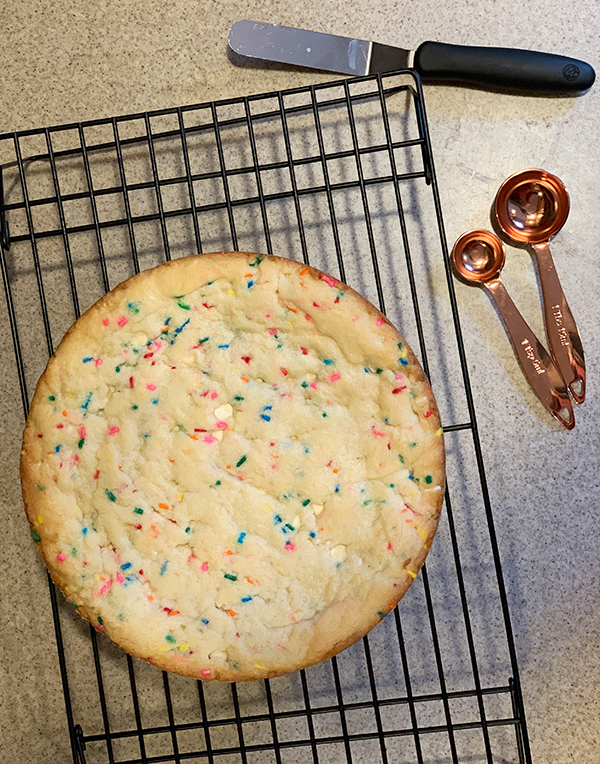
    I started with this plain chocolate sheet cake. I used a bench scraper to gently scrape off the excess frosting. Then, because I wanted to make a round cake, I needed to cut my cake into circles. (I know, I could have made my life easier and just decorated the cake as is, but where’s the challenge in that? Also, my daughter had seen some baking shows and really wanted a tall layer cake.) I experimented with a few different sized round bowls to see which size would get me three layers. You can see in the picture above the outlines of the bowl on the frosting.

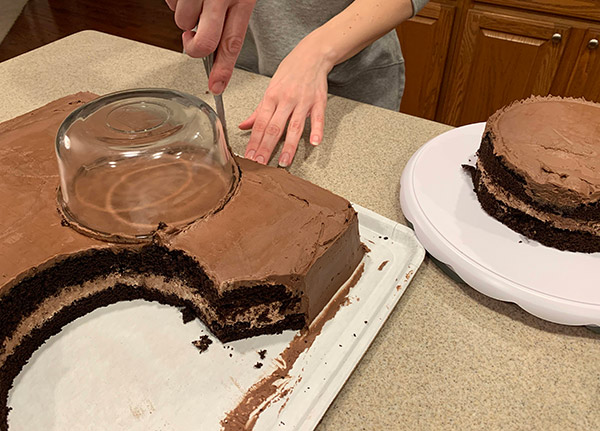
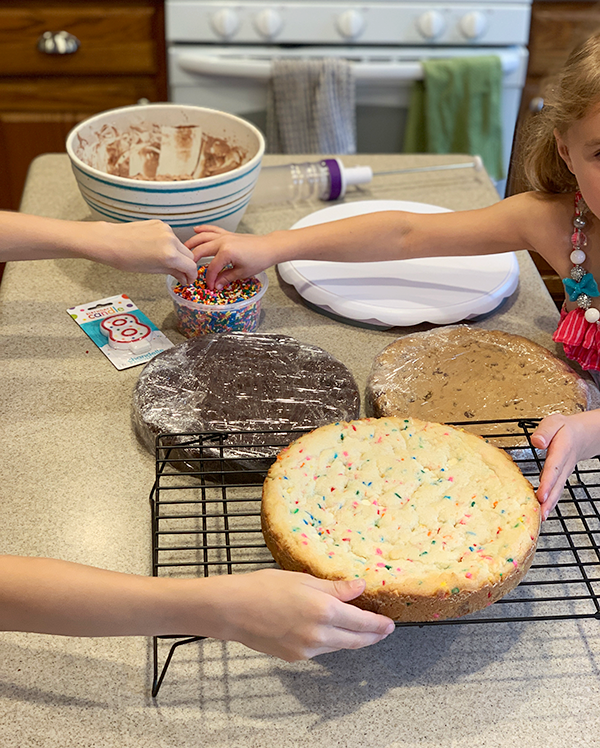
    Next, I cut three circles out of the cake. I used my bowl as my guide so they would all be perfectly round and the same size. This did leave a bit of leftover cake which I served to some of my guests who didn’t want as much frosting and I also froze some to bring out one cold February night when we all want a treat at home.

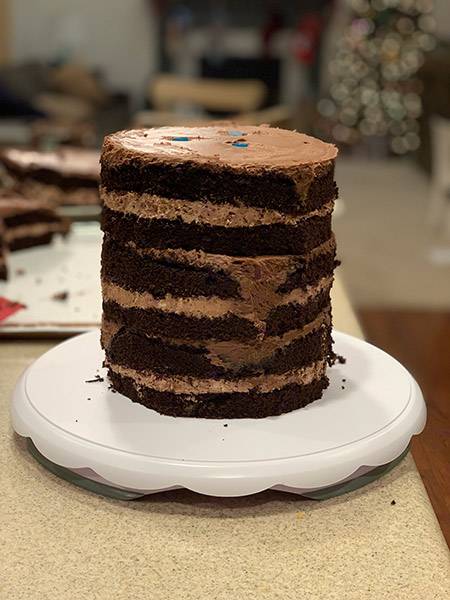
    I gently stacked the layers as I cut them out. I didn’t put anything in between them, but I did use large straws as dowels for stability. I pushed three straws down through all three layers. I needed to cut the tops of the straws so they didn’t show.

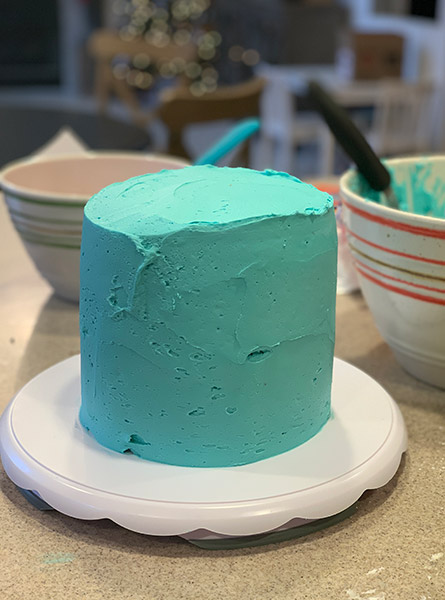
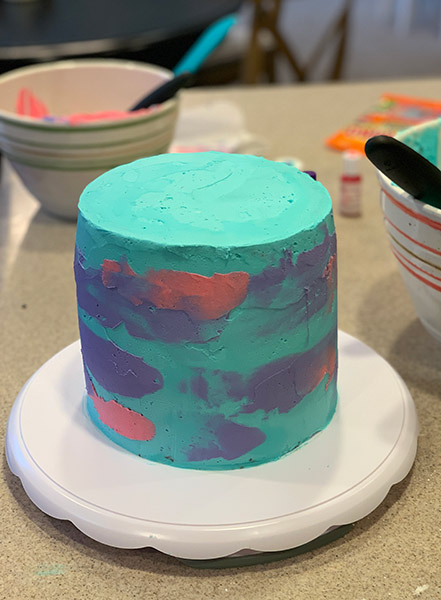
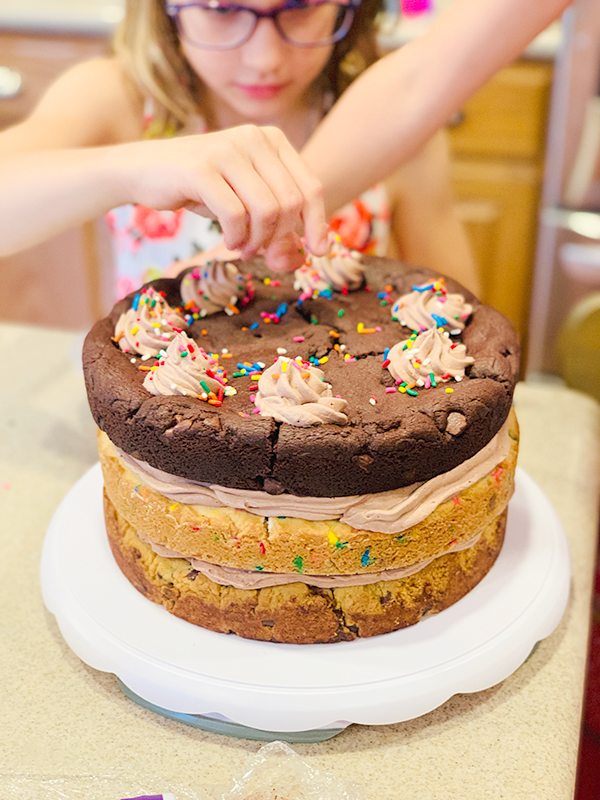
    Finally, I added a quick crumb coat from the frosting I scraped off at the beginning before putting the cake into the refrigerator until the next morning. This step was the hardest, I really needed to be careful to not pull off any of the cake. On the morning of the party, I quickly whipped up a batch of buttercream frosting and tinted it teal, pink and purple. Decorated my cake in a fun Mermaid theme and had a great party!

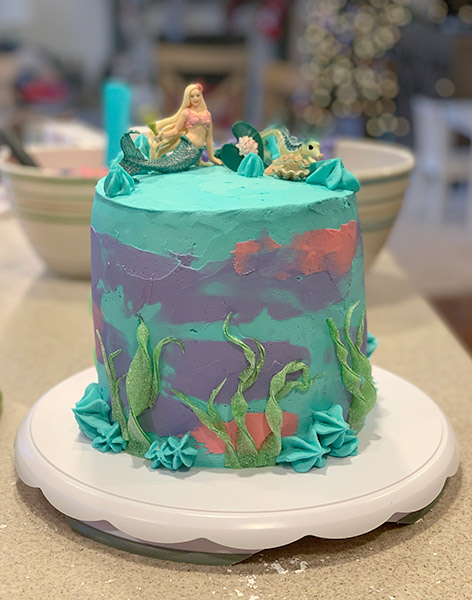
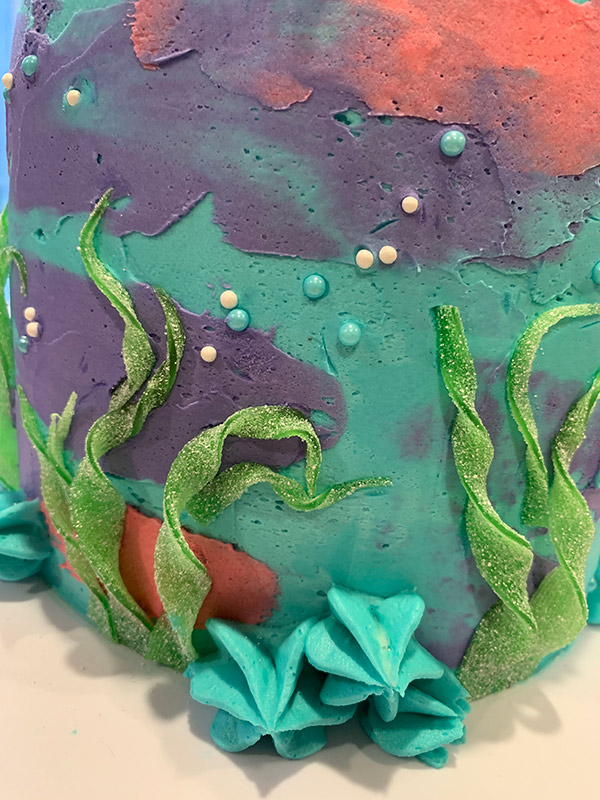
    For the cake details, I bought white and blue pearlized sprinkles to be water bubbles. For the seaweed, I bought Haribo Sour Streamers and cut the green ones into long pointed strips, then pushed them into the frosting on the bottom. I then twisted them and pushed them into the frosting on the top. They held very well and of course, all the kids wanted a piece with seaweed on it!

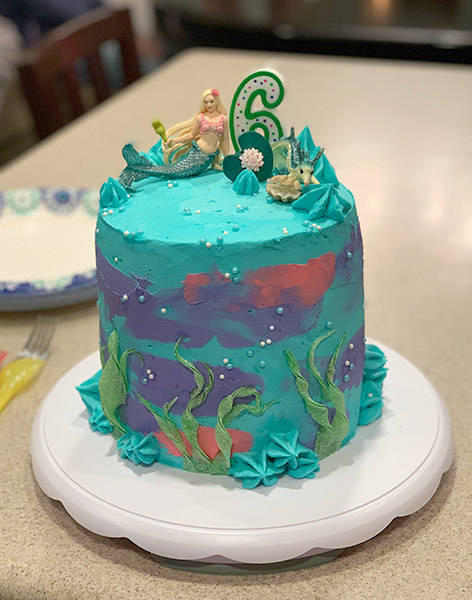
    And what mermaid cake would be complete without a mermaid? I bought this Schleich Mermaid figure from Amazon and placed it on top with some extra frosting details and a candle. While obviously not a professional cake, it was perfect for my six year old and perfect for me because I didn’t have to bake anything!

    Items in this post:

    Mermaid on top of cake: https://amzn.to/2NtN4lN
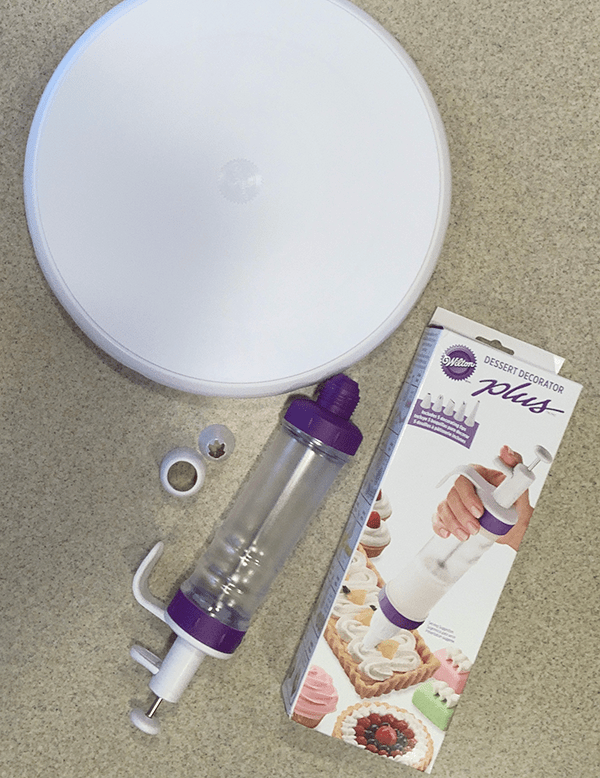
    Similar cake turntable: https://amzn.to/37S9iFv
    White “Bubble” Sprinkles: https://amzn.to/2NfWYat
    Blue “Bubble” Sprinkles: https://amzn.to/2R2qPnW
    “Seaweed” Haribo Sour Streamers: https://amzn.to/39XWeAn
    Similiar LOL Doll Cake Sprinkle Mix: https://amzn.to/2QHUfsz
    LOL Doll Series on Cake: https://amzn.to/35Ameys

    *affiliate links

    Looking for kid gift ideas? Check out some of our favorite gift ideas!
    Fossil and Gemstone Dig Kits
    Science Kits
    Name Puzzle

  • Festive Christmas Cranberry Margarita Cocktail & Mocktail

    Festive Christmas Cranberry Margarita Cocktail & Mocktail

    Cranberry Margarita Pitcher Cocktail & Mocktail

    Margaritas in December? Why not, especially when paired with festive cranberry spice! Happy Holidays!

    Cocktail Ingredients:

    • 2 cups Cranberry Juice
    • 3/4 cup Lime Juice – Fresh squeezed if possible
    • 1/2 cup Orange Juice
    • 3/4 cup Cranberry Simple Syrup – Like this Cranberry Spice Flavor from Royal Rose Syrups http://shrsl.com/20igx (affiliate link)
      Royal Rose Syrups is currently offering 20% off your $40+ order with code SWEET20OFF40 thru 12/31!
    • 1 1/4 cup Tequila (leave out if making mocktail)
    • If making mocktail1 1/2 cups Lemon-lime soda or more to your taste
    • any garnish you like – lime slices, sugared cranberries, rosemary sprig, etc.

    Instructions:

    Combine all ingredients besides the garnish in a pitcher. Mix gently to combine. Chill in refrigerator until ready to use. When ready, pour into glasses over ice and top with garnish.

    This recipe makes about 8 servings depending on the size of your glass and how much ice you use.

  • HelloFresh Review ~ Family Meal Box

    HelloFresh Review ~ Family Meal Box

    Yummy, this family loves HelloFresh! Read further for our full HelloFresh Review.

    This is our second time trying HelloFresh, 2 years ago we decided to get their meal delivery boxes after we found Blue Apron to be lacking in family friendly meals. They did deliver to our small town in Maine but the ‘fresh’ in HelloFresh was lacking and we had to cancel.

    Fast forward 2 years and we found the need to try meal delivery again so we decided to give HelloFresh another go. We chose them because of their family friendly meal options. Our two girls aren’t super picky but they can’t handle spice and prefer comfort food.

    HelloFresh

    HelloFresh Review

    I was very happy to see all of the changes they made. You can choose from MANY different meal options each week instead of just a handful. Their delivery is spot on and everything has been arriving very fresh. We have had a few leaky chicken and salmon packages but customer service is very slick and we have been issued credits quickly.

    The most impressive thing are the meals themselves. They are super flavorful and easy to adapt for children who prefer less spice or no sauce… or their veggies untouched by seasoning. There are audible “This is sooo good”, “Mom, I LOVE this!” and “This is the best meal ever.”

    Meal Cards vs. Actual Meals

    Below I have taken some meal card vs. actual meal shots. My presentation isn’t great but you get the idea. My kids favorite is the Crispy Parmesan Chicken and my husband loves all the burgers and the Tunisian-Spiced Meatballs.

    Hello Fresh
    HelloFresh
    Hello Fresh

    Tips on Picking a Recipe

    Tip: On every recipe you can see the approximate time it takes to cook and prep! You can choose a quicker meal for the weekday and something that takes a little longer for the weekend. If you can cook uninterrupted and know how to prep foods quickly these times are fairly accurate. If not, they may take a little longer. Getting the timing right takes a little practice – once you get going on a recipe there isn’t much room to stop so plan accordingly. Distract your kids with an activity so you can cook!

    HelloFresh
    Hello Fresh

    Check out our other Subscription Box Reviews

  • HelloFresh Review / Recipe Card vs. Reality

    HelloFresh Review / Recipe Card vs. Reality

    Yummy, this family loves HelloFresh!

    This is our second time trying HelloFresh, 2 years ago we decided to get their meal delivery boxes after we found Blue Apron to be lacking in family friendly meals. They did deliver to our small town in Maine but the ‘fresh’ in Hello Fresh was lacking and we had to cancel.

    Fast forward 2 years and we found the need to try meal delivery again so we decided to give HelloFresh another go. We chose them because of their family friendly meal options. Our two girls aren’t super picky but they can’t handle spice and prefer comfort food.

    I was very happy to see all of the changes they made. You can choose from MANY different meal options each week instead of just a handful. Their delivery is spot on and everything has been arriving very fresh. We have had a few leaky chicken and salmon packages but customer service is very slick and we have been issued credits quickly. The most impressive thing are the meals themselves. They are super flavorful and easy to adapt for children who prefer less spice or no sauce… or their veggies untouched by seasoning. There are audible “This is sooo good”, “Mom, I LOVE this!” and “This is the best meal ever.”

    Below I have taken some meal card vs. actual meal shots. My presentation isn’t great but you get the idea. My kids favorite is the Crispy Parmesan Chicken and my husband loves all the burgers and the Tunisian-Spiced Meatballs.

    Tip: On every recipe you can see the approximate time it takes to cook and prep! You can choose a quicker meal for the weekday and something that takes a little longer for the weekend. If you can cook uninterrupted and know how to prep foods quickly these times are fairly accurate. If not, they may take a little longer. Getting the timing right takes a little practice – once you get going on a recipe there isn’t much room to stop so plan accordingly. Distract your kids with an activity so you can cook!

    HelloFresh
    Hello Fresh
    HelloFresh
    Hello Fresh
    HelloFresh
    Hello Fresh
  • Quick & Easy Spicy Chicken and Bacon Pasta

    Quick & Easy Spicy Chicken and Bacon Pasta

    If you like spice or tomatoes, this is the recipe for you! A light sauce packed with flavor combined with earthy mushrooms and salty bacon makes this a meal that hits the spot each and every time I make it. This is also a great recipe to make quickly with a grocery store rotisserie chicken!

    For my kids who don’t like anything spicy, well they don’t like tomatoes either, so they get noodles with some of the chicken I save before it goes in the sauce and parmesan.

    Spicy Chicken & Bacon Pasta

    Ingredients:

    • 1 16 oz. box of pasta (I prefer farfalle, but penne or rotini will work)
    • 1/2 small white onion, chopped
    • 6 cloves garlic, minced
    • 2 14.5 oz cans of diced tomatoes
    • 8 oz fresh, sliced mushrooms
    • 1 pre-cooked chicken breast, cut into bite sized pieces (I try to make my life easier and use a rotisserie chicken from the grocery store)
    • 4 – 6 pieces cooked bacon, crumbled
    • 1-2 tsp of crushed red pepper – or more/less depending on how spicy you like it.
    • A handful of chopped basil
    • Parmesan cheese to taste

    Directions:

    Bring water to a boil in a pot and add the pasta. Follow directions on the box for recommended water and cooking time for al dente pasta. While the pasta is cooking, get started on the sauce, but make sure to stir the pasta every now and then.

    Next, on a stove, bring a large pan to medium heat. Add about two tablespoons of olive oil to the pan followed by the chopped onions and minced garlic. Stir and saute until the onions are semi-transparent, about 2-3 minutes. Add the mushrooms and continue to stir for about 2 more minutes. Finally, add the tomatoes, chicken, basil, crushed red pepper and crumbled bacon.

    Let the sauce heat through for about 5 minutes. When the noodles are done, drain but save about 1/2 cup of the pasta water. Add a small amount of the saved pasta water to the sauce if it gets too thick in the pan. You may not need to add any.

    Put a serving of pasta on each plate, layer on the pasta sauce from the pan and finally add some parmesan to top it off. Now, eat till your hearts content. I know I will!

  • Easy and Kid Friendly Halloween Mini Pizzas

    Easy and Kid Friendly Halloween Mini Pizzas

    Need something quick and easy to make on Halloween before you trick-or-treat? This is a family favorite and so easy – Cast Iron Cookie Cutter Mini Pizzas! You can make these as easy or fancy as you would like and use any cheese or toppings that you and your kids enjoy. Here’s what we did.

    Using either homemade (recipe is at the bottom of the post) or store-bought pizza dough, roll the dough out on a cutting board or clean counter. Each of my kids picked out the Halloween-themed cookie cutters they wanted to use and cut their own mini pizza crusts out.

    For toppings, my kiddos chose cream cheese, bacon and a small amount of shredded cheddar-jack on top. You can make any flavor combo you want and tailor it to each person.

    Once done adding toppings, preheat your cast-iron on medium heat on the stove. Add your mini pizzas to the pan once it is hot and cook the bottom of the crust for just about a minute (depending on how hot the pan is). This step will get the crust crispy. Then, take it off the heat and put under the broiler in your oven set to high to melt the cheese on top, about 1 – 2 minutes. Again, watch to make sure they don’t burn.

    And that’s it! Festive, easy and delicious Halloween dinner is done. Sorry for the bad pictures, it has been rainy and cold these past few days around here. It’s like we went straight from summer to winter with hardly any fall in between. Have a fun and safe Halloween everyone!

    Easy Pizza Dough Recipe

    This is the recipe I have been using for years and it never disappoints!

    Ingredients:

    3/4 cup warm water
    1 packet instant yeast
    2 tablespoons honey
    1 tsp salt
    2 to 2 1/2 cups all purpose flour

    Directions:

    Add warm water, yeast and honey to a large bowl. Stir to mix ingredients and let sit for about 15 minutes or until the yeast is frothy.

    Next, add 1 cup of flour and salt. Mix until combined, then start kneading with your hands adding more flour a little bit at a time until the dough isn’t sticking to your hands. The more flour you add, the tougher the dough will be so try not to add too much. I usually end up using about 1 1/2 cups of flour total.

    Form the dough into a ball and place in the bowl. Cover the bowl with a towel and place in a warm spot for the dough to rise for at least 30 minutes, but 2 hours works best. I use my microwave for this step.

    Once your dough has risen it should be ready to go. Lightly flour a cutting board or work surface and you are ready to roll it out with a rolling pin.

  • Triple Layer Cookie Cake – Easy but Impressive!

    Triple Layer Cookie Cake – Easy but Impressive!

    My kids just recently had a taste of their first cookie cake ever. They were amazed and obsessed immediately so when it came time for my daughter’s birthday, she insisted I make her this triple-layer cookie cake we saw over at Life, Love and Sugar. Never one to back down from a challenge I gave it a shot and it was amazing! What a great way to make a girl feel special on her birthday.

    We created 3 cookies to make the layers: one Chocolate Chocolate Chip Cookie, one Funfetti Chocolate Chip Cookie and one Chocolate Chip Cookie. I made the recipe as written for the cookies, but chose to create a chocolate whipped cream frosting instead because our family don’t really care for buttercream. It – was – delicious! I used this recipe for the frosting. The only thing I did differently was to add about 1/4 to 1/3 cup of dark cocoa powder.

    Let me tell you, holy cow! This frosting was so light, fluffy and delicious that I could have eaten the whole bowl right there in the kitchen. Thankfully, I didn’t and popped it into the refrigerator for a few hours to help it set up for piping on the cookie layers. I used this Cake Decorating Tool from Wilton to pipe and decorate the cake. I couldn’t find the exact cake stand I have, but I used a Turntable Cake Decorating Stand similar to this one to both frost and serve my cake on. My kids love helping by turning the stand while I frost the cake.

    Seriously decadent, impressive looking and actually not that hard to make! Here are some tips from my experience:

    • I cooked two of the cookies the day before, wrapped them well in plastic wrap and they held up perfectly overnight on my counter.
    • I did use some skewers that I cut to size to help prop up the cake layers so they didn’t completely squish my frosting. These cookie cakes are very heavy!
    • Make sure to keep the whipped cream frosting very cold before you start piping and put the cake in the refrigerator right afterwards. The cold will help your frosting keep it’s shape.
    • Use lots of sprinkles, life is better with sprinkles.

    *affiliate links

  • Easy Summer Rosé Spritzer Recipe

    Easy Summer Rosé Spritzer Recipe

    We are certainly enjoying these late summer evenings. Sitting by the fire, the girls doing cartwheels in the yard, I feel pretty lucky right now. I want to take a mental picture of this moment to look back on when we are in the deep part of winter. The actual pictures I took? My cocktail of course. (Thankfully I have thousands of pictures of my girls.)

    This night I made a Summer Rosé Spritzer. If you like Rosé or flavored seltzer water, or just prefer a drink that is not too sweet, then this is the cocktail for you! Bubbly and refreshing, it’s a perfect drink to sit back and relax with all summer long.

    Summer Rosé Spritzer Recipe – makes 2 servings

    • 6 oz. of your favorite Rosé – I used one can of Simpler Wines Rosé from Trader Joes. I love that the cans offer me a perfect portion.
    • 1 can of your favorite flavored seltzer water. I used a berry flavor.
    • 3 oz. Royal Rose Organic Simple Syrup or any simple syrup you have on hand. Choose a flavor that will complement the seltzer flavor you chose.
    • Optional: Fruit of your choice

    This is such an easy recipe. If you are using fruit, I used strawberries, chop and add them to the bottom of two glasses. Muddle/mash the fruit in the bottom of the glass. Next, fill the glass roughly 1/2 to 2/3 full with ice. Pour 3 oz. of the Rosé, half the can of seltzer water and 1.5 oz of simple syrup into each glass. Stir gently with a spoon and enjoy!

    *affiliate links

  • Summer Rose Margarita Recipe

    Summer Rose Margarita Recipe

    I love a good Rose Margarita Recipe, especially during the summer. I always make my own simple syrup mainly because I don’t love all the added ingredients in pre-made, bottled margaritas. Also, I usually only want one drink and don’t want to tempt myself with an almost full bottle every time I open the fridge. So when I found this line of Organic Simple Syrups from Royal Rose I knew I had to try them out.

    I was really intrigued by their Rose Simple Syrup and wanted to give it a try. So this weekend I tried out a margarita recipe and boy am I so glad I did. I mixed Royal Rose’s Rose Simple Syrup (say that three times fast), tequila and lime juice. That’s it. It was delicious with a slight floral hint for a little twist on a standard margarita. You can get the Rose Simple Syrup here: Rose Organic Simple Syrup 8 oz.

    Right now they are offering 15% off everything with code SYRUP15 at checkout. Check it our here!

    Rose Margarita Recipe

    Ingredients:
    2 oz tequila
    2 oz Royal Rose Simple Syrup – Rose Flavor
    2 to 3 Tablespoons Lime Juice (depends on how much lime you like- the more lime juice you add, the less you’ll taste the floral rose)

    Method:
    Combine all ingredients in a cocktail shaker with ice and shake. Pour over ice in your favorite glass and enjoy! If you like a sweeter drink you can add a little more simple syrup or a little less lime juice. This was the perfect combination for me. For a little extra fun, muddle in some chopped strawberries or add dried rose petals if you can find them!

    I loved this drink, my husband loved this drink and we will definitely be having more margaritas by the fire in the summer nights to come.

    *affiliate links

  • Easy Traditional Pizza – Cast Iron Style

    Easy Traditional Pizza – Cast Iron Style

    I couldn’t stop drooling over Carolyn’s Cast Iron Pizza Recipe and knew I had to try it. We are obsessed with pizza in our house. Every Friday night is Pizza & Movie Night. It is an open invitation for family and friends to drop by for some pizza, a beer and a family friendly movie. Last Friday we watched “Get a Clue” the 90’s movie based on the book “The Westing Game”. It was VERY 90’s!

    We tried our own “easy” version and were blown away by how much it tasted like a brick oven pizza! Carolyn has always been more skilled in the culinary arts – my cooking skills are fairly basic and I am so proud that I didn’t screw this up! We followed her directions, placed the topped pizza onto a piping hot cast iron skillet for a minute, then put it under the broiler set on high. All I can say is wow, this is how I am making pizza from now on. Crispy on the bottom, bubbly on the top, and delicious.  

    This is our Easy East Coast Version which doesn’t really have a recipe. We rolled pre-made pizza dough from Portland Pie Company, spread pizza sauce from Bove’s, a Vermont company, on top and then added our favorite mix of pepperoni and black olives. Be creative with your toppings, use what you love! We used our Old Mountain cast iron skillet purchased at Reny’s, if you are not from Maine you can also find them on Amazon: https://amzn.to/2Wdq6F7.

    And that’s it! Simple, fast and super delicious. 

    Needed to include this picture of my new ‘Vintage 1979’ stemless wine glass; a present from Carolyn and Jennifer for my 40th birthday. Gift ideas for milestone birthdays post coming soon!