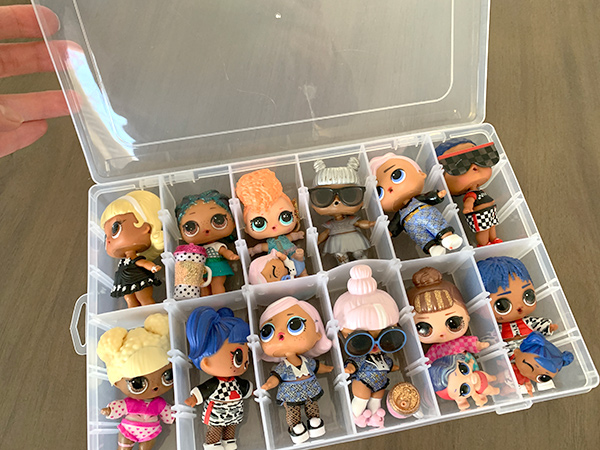
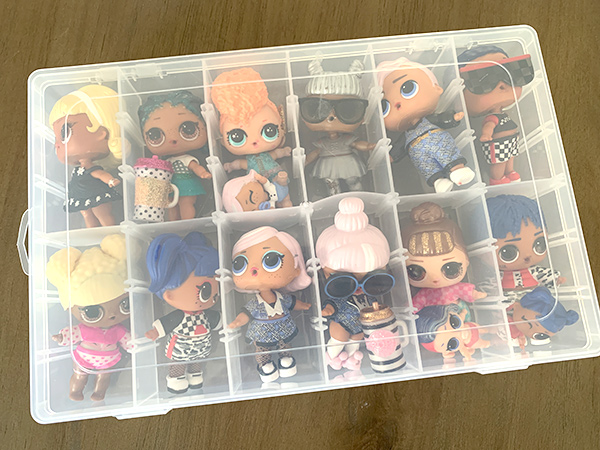
LOL Doll Storage is something I have been searching for for a long time. Are you are a parent of a kid who loves LOL Surprise Dolls? Then you have at some point in time lost it after vacuuming up yet another tiny doll shoe left on the floor. Or, if your kids are like mine, you can’t even step in their room without slippers for fear of being mortally injured when twisting an ankle on the LOL Dolls that have now formed a new carpet in front of their bed. Hey, at least they aren’t as sharp as Legos, am I right? I still shudder at the pain of a bare foot on a sharp lego corner.
But seriously, this post is just a quick tip on some divided containers I found. Much to my surprise, they help my kids keep their LOL Dolls organized. They actually really love to take the dolls out, put outfits on each one, and then choose a spot for each doll in the containers. I found them on Amazon here: https://amzn.to/2REtzsT. (affiliate link) I ordered the 36 grid option and then removed two dividers for each section to fit a full-sized LOL doll. You can leave the dividers in for shoes and other accessories if you want.
Organization is life
These containers really do make the perfect LOL Doll storage, but can be used for other items later on. I have a few more that my girls use to store their rock and crystal collections. I like that I can remove the dividers to make them custom to what I am storing. It’s a small item that can really make a big difference. Now, if I could find fun containers for everything on my kids’ floors I’d really be happy.
If your kids love LOL Dolls, check out our LOL Themed Birthday Cake here.
Valentine’s Day is just around the corner! At our house, with my craft-loving kids we love making homemade classroom valentines to hand out! This year my 8-year-old decided she wanted to hand out Harry Potter Howler Valentines, but the only Harry Potter related valentines we could find in the stores had pencils. Which, if I’m being honest, are not the most exciting. I have so many pencils from every school function over the past few years that they just keep piling up. And I don’t know about you guys, but my kids aren’t allowed to bring anything edible so candy is a no-go.
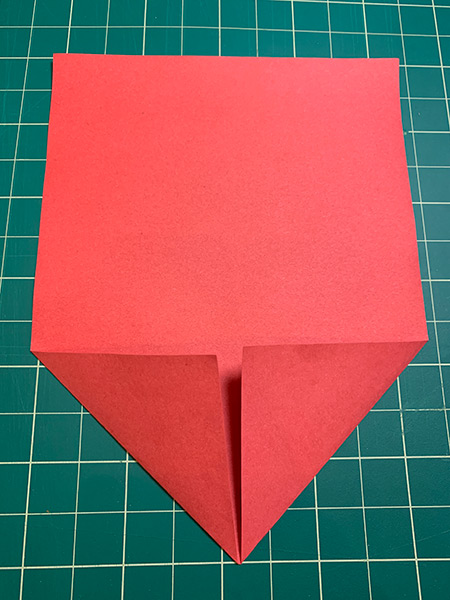
For those reasons, we decided to make some Howler letters and include Harry Potter Stickers inside. See the stickers we used at our affiliate link here: https://amzn.to/38MYERa. My daughter loves them and helped throughout the entire process! A little paper folding and tape made her valentines come to life. Below I have pictures and instructions. Hopefully, they inspire you to make your own.
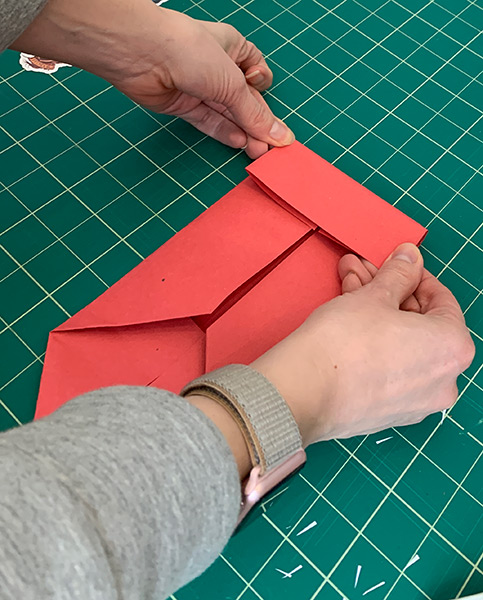
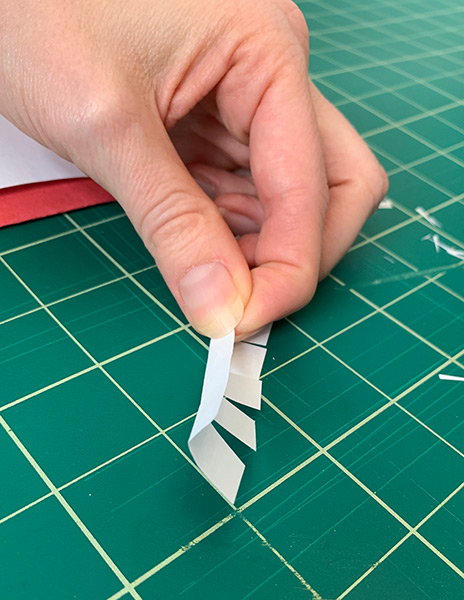
Fold two corners of the red piece of paper so they come to a point in the middle like the first picture above. Then, fold each long side in towards the middle. Fold the straight end in about an inch and a half and tape in place. This step is simply to make the paper a little shorter so it is totally optional.
Next, fold the whole paper in thirds. Print the valentine template and cut evenly into 3 pieces. On each piece, cut an inch of the white paper off the top and bottom. We will be using these cut pieces for the teeth. Cut slits along each inch wide piece making sure not to cut all the way through. Fold the teeth along the edge of your cuts like the picture above on the right.
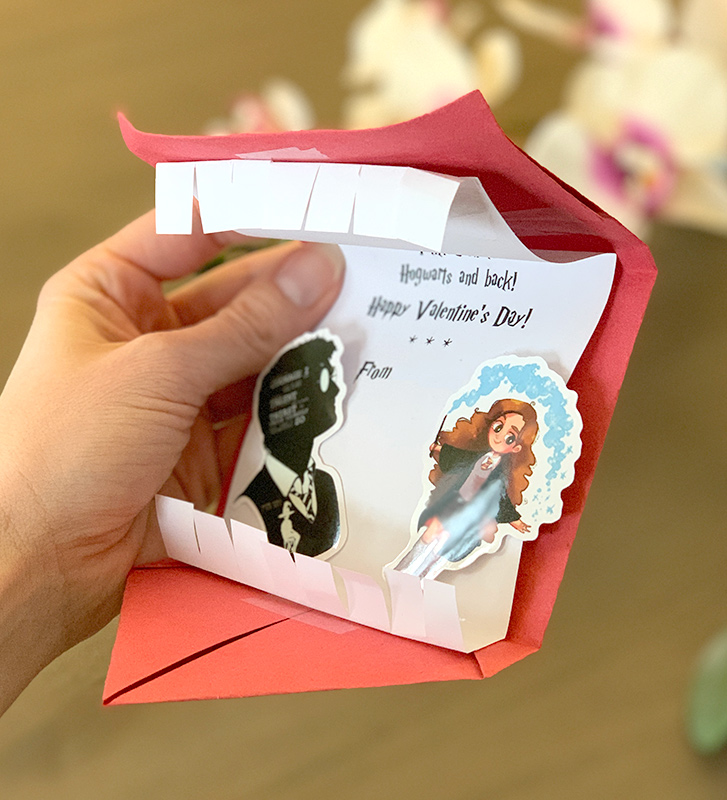
Finally, assemble your valentines. I used tape because it is so much faster than waiting for glue to dry, but you could use that too. Tape the valentine template to the folded red paper, on the side with all the paper folds. After that, tape the teeth on the top and bottom and then use a pencil to curl the edges of the top corners of the valentine. Lastly, tape the Harry Potter stickers inside, have your child sign their name and voila you have your own Harry Potter Howler Valentines!
I used heart stickers to keep the valentines closed, but wouldn’t these faux wax seals be so cute! You could also add a little giveaway other than stickers, just get creative. I found some cute bracelets, broom pens, or temporary tattoos as options (affiliate links). Happy Valentine’s Day everyone!
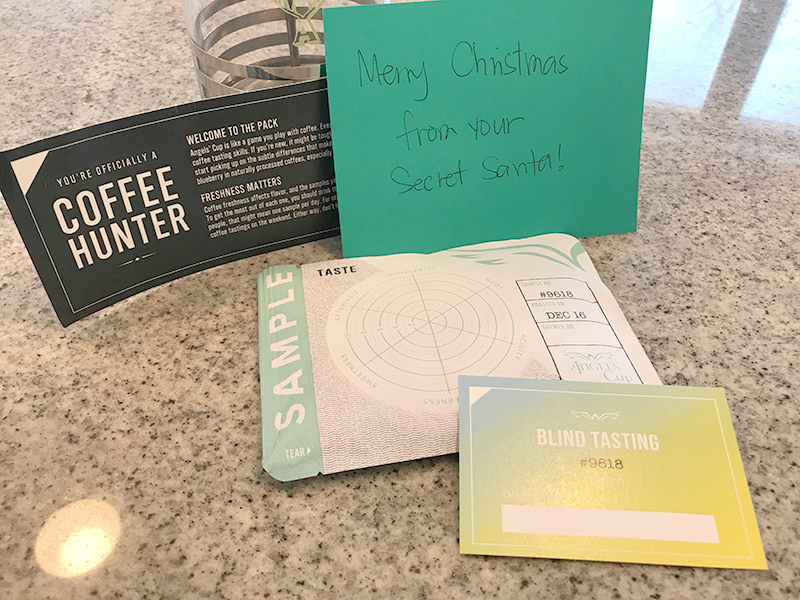
It all began Christmas of 2018 when my husband stumbled upon Angels’ Cup. Luckily, he gifted me their “The Cupping Flight” subscription and my journey to learning more about coffee began. I enjoyed the subscription so much that I requested it from my Secret Santa this year, who happened to be Carolyn!
I love coffee but I’m not a coffee aficionado. Coffee is a much needed step in my daily routine, I love coffee for the caffeine! With Angels’ Cup blind pack I’ve been able to learn more about coffee and develop a better palate.
Before we get into specifics we have an exclusive offer for readers. Use code TodayINeedACup for 25% off your order. Visit Angels’ Cup through our affiliate link: HERE
Nanette’s Angels’ Cup Subscription Review
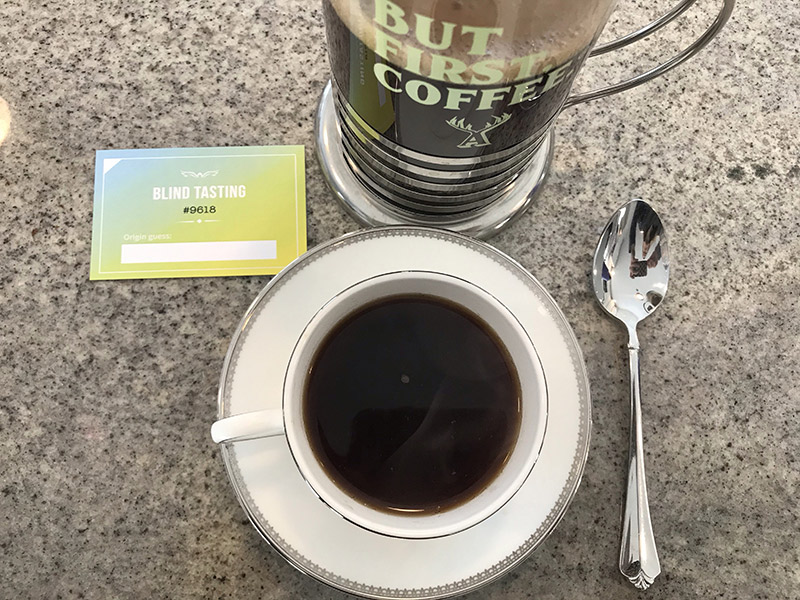
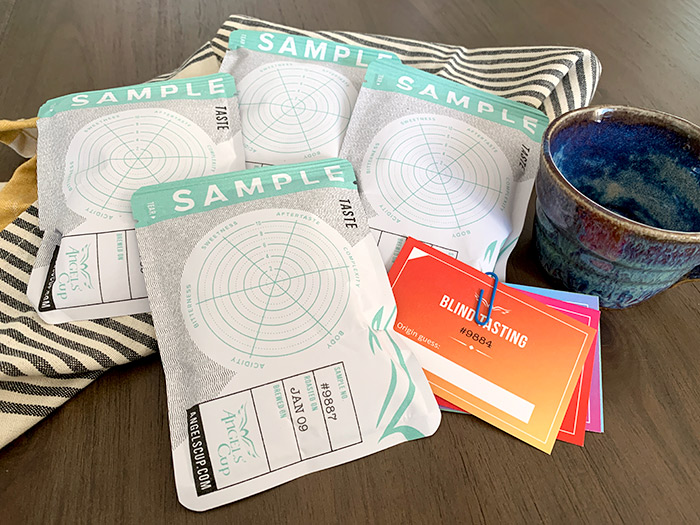
With “The Cupping Flight” subscription you receive 4 32g samples per month, each sample makes about 2 cups of coffee. The samples come in a blind bag with a number clearly written on the front. You can enter this number into the Angels’ Cup app to start your tasting.
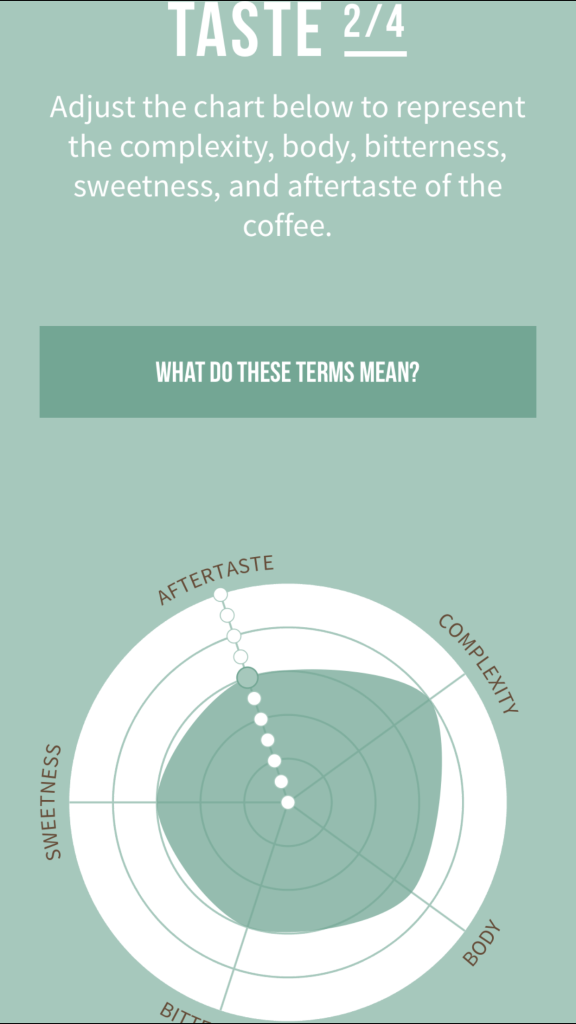
You have 3 tasting options, Quick, Beginner or Advanced. Since I’m fairly new at coffee tasting I like to use the Beginner. When starting the tasting you can choose brew method and note the color of the grounds. Next, you assess the taste using a chart that details complexity, body, bitterness, sweetness and aftertaste. (see below)
After that, you move on to Aroma & Flavor, this is my favorite part. The app provides a wheel with a large selection of flavor/aroma options such as fruits, flowers, herbs, grains, vegetables and more.
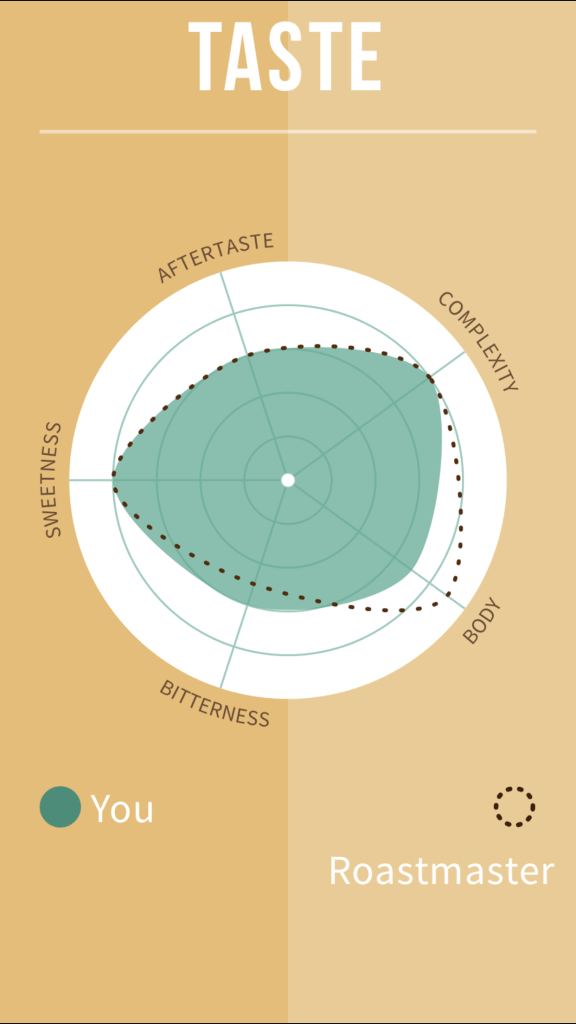
Compare to Roastmaster
Finally, you can rate how much you enjoyed the coffee from 0-10 and add any additional comments. The next step is my favorite, once you submit your review you can compare it to a Roastmaster! Are you on target or completely in left field? The more tastings I do the closer I get to tuning my tastebuds and matching the Roastmaster.
Overall, I HIGHLY recommend Angels’ Cup, it makes a unique gift for any holiday – Valentine’s Day, Father’s Day or even National Gourmet Coffee Day (Jan. 18th)!
Eric’s Angels’ Cup Subscription
Eric’s Coffee Subscription Review
Carolyn didn’t only purchase a subscription for me, she also surprised her coffee loving husband. So don’t just take my word for it, read what he has to say.
Eric’s Review: Angel’s Cup was a pleasant surprise gift this year. I had no clue something like this existed but am glad it’s does. Each month I get several choice selections of coffees varying in origin and tasting notes. Even though I always look at what I’m drinking, the packaging provides an opportunity for mystery as each coffee bag is unlabeled (except a number correlated to its description card). I’m excited to try out next month’s coffee adventure. This was a great gift for a daily coffee drinker like me.
Other Subscription Box Reviews
Check out our Reviews for Causebox and Stitch Fix if you are you a subscription box lover.
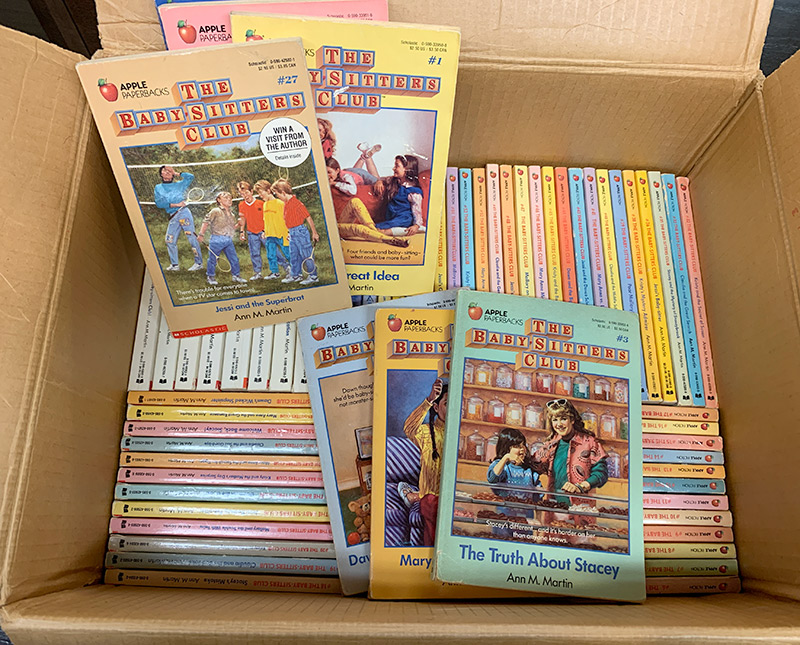
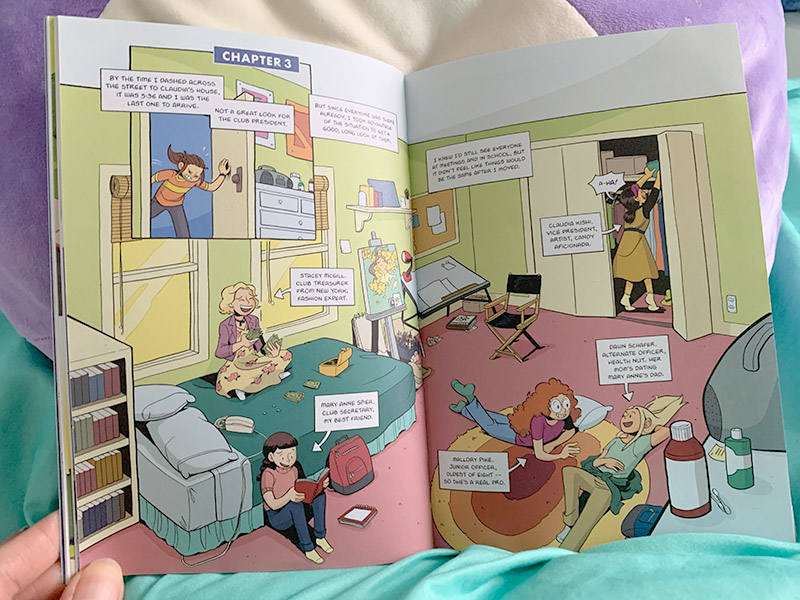
80’s & 90’s kids rejoice, The Baby-Sitters Club books are back as graphic novels. Our kids now get to experience the babysitting antics of the club in their own way and I, for one, am super excited about it. I loved The Baby-Sitters Club books as a girl, the entire series is in a box in my basement. I’m just waiting for my girls to be old enough to finally read them. I mean, look at this picture!
Just look at this collection! Memories, right?
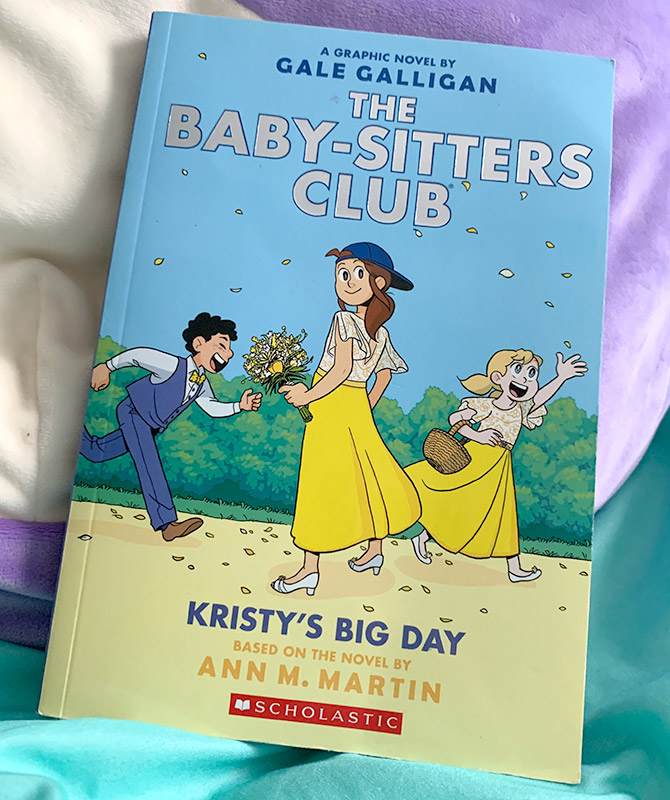
But, before I could get them out, my daughter saw one of the new graphic novels at her school book fair and asked me to get it for her. Of course, I couldn’t say no! She started reading #6 in the series, Kristy’s Big Day, and didn’t want to put it down. Direct quote from my 8-year-old: “Mom, can you get me the rest of these books, I love them!” She also loves how the girls work together to problem-solve and the funny situations the girls get into while babysitting.
From what I could see, the characters are still there and the graphic novels retain their original friendships and humor. So, I am more than happy to get the rest of the set for my daughter.
Get The Baby-Sitters Club graphic novels today, find them using our affiliate links below.
Looking to refresh your home for the New Year? Target has some great deals on home items right now! Up to 25% off plus an additional 15% off with code HOME on Bedding, Bath & Storage. Check it out here: https://goto.target.com/nxONx(affiliate link)
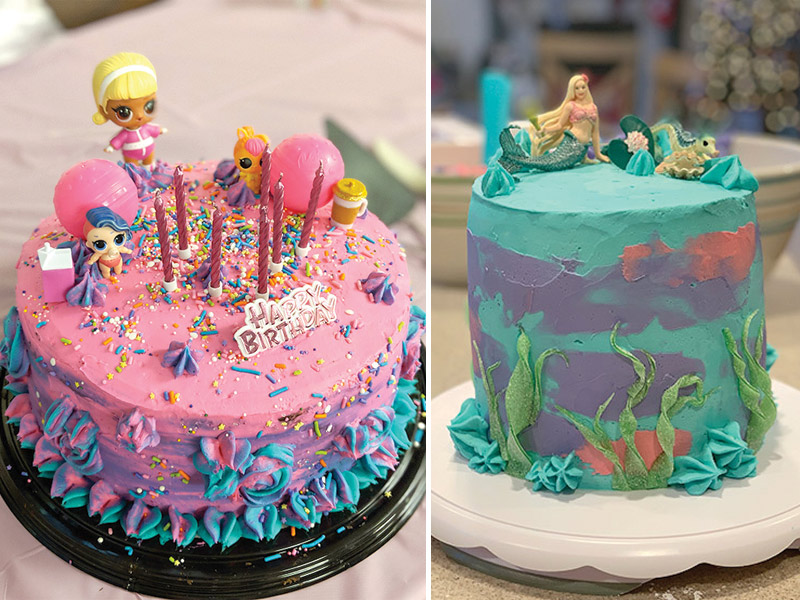
I love creating fun, themed parties for my daughter’s birthdays. A big part of the party theme is the cake, but with all the other planning that goes into a party, I stopped actually baking the cakes and starting buying cakes from Costco and re-decorating them. By doing it this way I know the cake will taste delicious, but I still get to be a part of decorating something more personalized for my kids. Below is the basic idea of how I do it. There are affiliate links at the bottom of the post to most of the items I used.
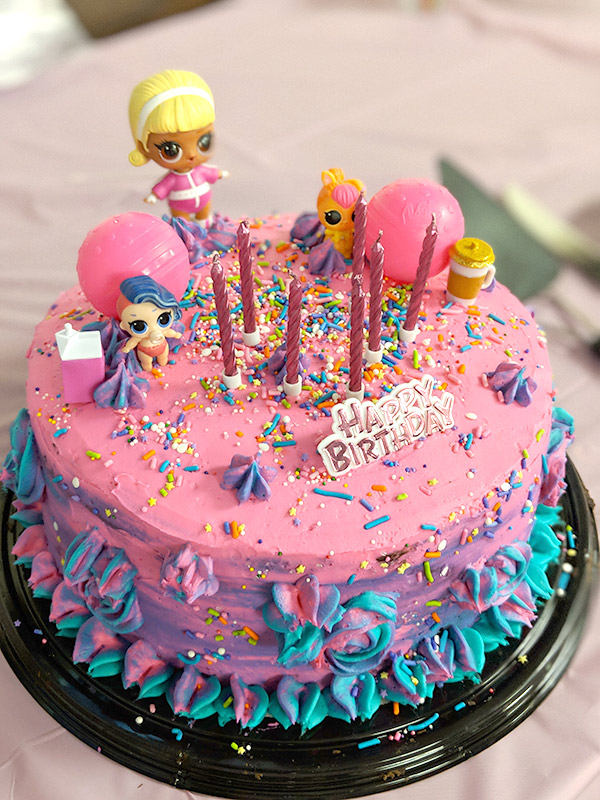
Usually, I gently scrape the excess frosting off the cake and redecorate with my own frosting and party-themed style. In the picture below, I bought the round chocolate fudge cake (the one with all the chocolate shavings on the top) and added my own bright frosting, sprinkles, and LOL Doll decorations to the top. Pro tip: when you buy a cake with chocolate shavings on top, you get to eat them while removing them from the cake. Yum!
This year, however, the round fudge cake was not available. So I decided to buy a plain sheet cake and try to wing it. It worked out surprisingly well! Everyone around here loves Costco’s chocolate sheet cake and it wasn’t as difficult for me to rework as I thought it would be. Take a look at how I did it below for my daughter’s mermaid cake!
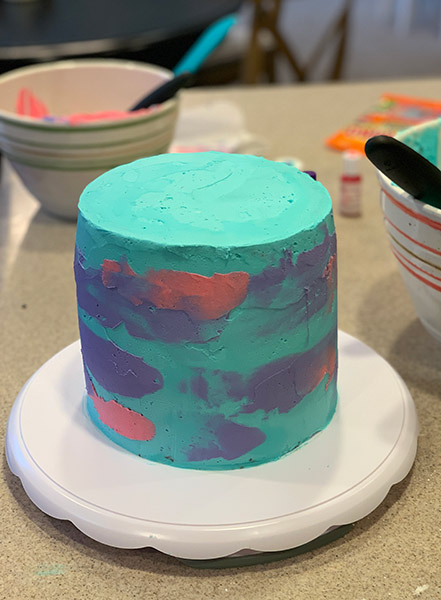
I started with this plain chocolate sheet cake. I used a bench scraper to gently scrape off the excess frosting. Then, because I wanted to make a round cake, I needed to cut my cake into circles. (I know, I could have made my life easier and just decorated the cake as is, but where’s the challenge in that? Also, my daughter had seen some baking shows and really wanted a tall layer cake.) I experimented with a few different sized round bowls to see which size would get me three layers. You can see in the picture above the outlines of the bowl on the frosting.
Next, I cut three circles out of the cake. I used my bowl as my guide so they would all be perfectly round and the same size. This did leave a bit of leftover cake which I served to some of my guests who didn’t want as much frosting and I also froze some to bring out one cold February night when we all want a treat at home.
I gently stacked the layers as I cut them out. I didn’t put anything in between them, but I did use large straws as dowels for stability. I pushed three straws down through all three layers. I needed to cut the tops of the straws so they didn’t show.
Finally, I added a quick crumb coat from the frosting I scraped off at the beginning before putting the cake into the refrigerator until the next morning. This step was the hardest, I really needed to be careful to not pull off any of the cake. On the morning of the party, I quickly whipped up a batch of buttercream frosting and tinted it teal, pink and purple. Decorated my cake in a fun Mermaid theme and had a great party!
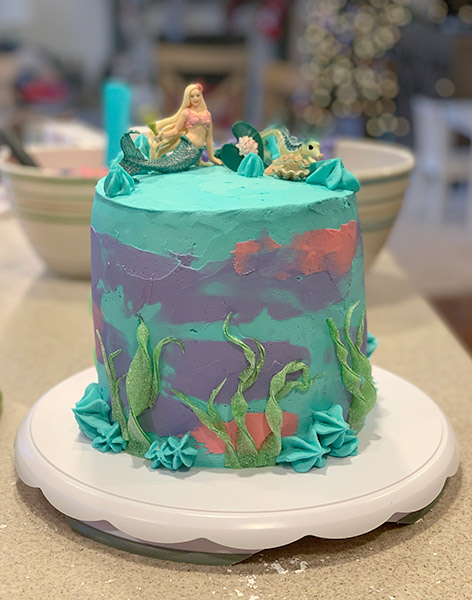
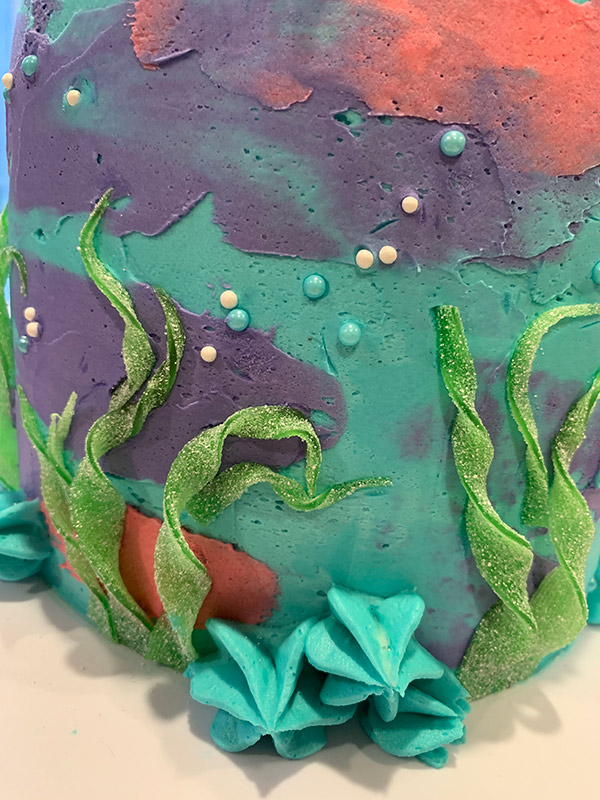
For the cake details, I bought white and blue pearlized sprinkles to be water bubbles. For the seaweed, I bought Haribo Sour Streamers and cut the green ones into long pointed strips, then pushed them into the frosting on the bottom. I then twisted them and pushed them into the frosting on the top. They held very well and of course, all the kids wanted a piece with seaweed on it!
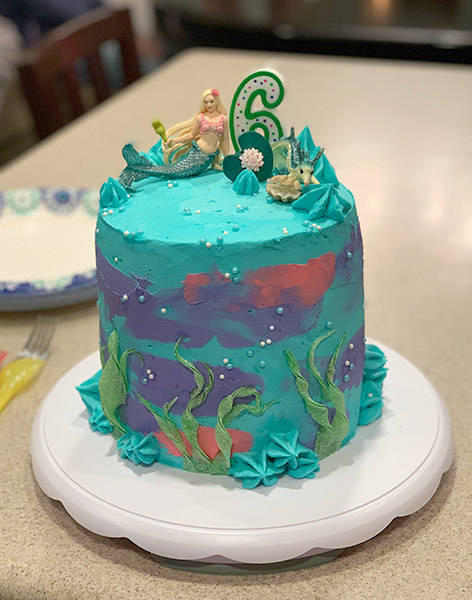
And what mermaid cake would be complete without a mermaid? I bought this Schleich Mermaid figure from Amazon and placed it on top with some extra frosting details and a candle. While obviously not a professional cake, it was perfect for my six year old and perfect for me because I didn’t have to bake anything!
I love creating fun, themed parties for my daughter’s birthdays. A big part of the party theme is the cake, but with all the other planning that goes into a party, I stopped actually baking the cakes and starting buying cakes from Costco and re-decorating them. By doing it this way I know the cake will taste delicious, but I still get to be a part of decorating something more personalized for my kids. Below is the basic idea of how I do it. There are affiliate links at the bottom of the post to most of the items I used.
Usually, I gently scrape the excess frosting off the cake and redecorate with my own frosting and party-themed style. In the picture below, I bought the round chocolate fudge cake (the one with all the chocolate shavings on the top) and added my own bright frosting, sprinkles, and LOL Doll decorations to the top. Pro tip: when you buy a cake with chocolate shavings on top, you get to eat them while removing them from the cake. Yum!
This year, however, the round fudge cake was not available. So I decided to buy a plain sheet cake and try to wing it. It worked out surprisingly well! Everyone around here loves Costco’s chocolate sheet cake and it wasn’t as difficult for me to rework as I thought it would be. Take a look at how I did it below for my daughter’s mermaid cake!
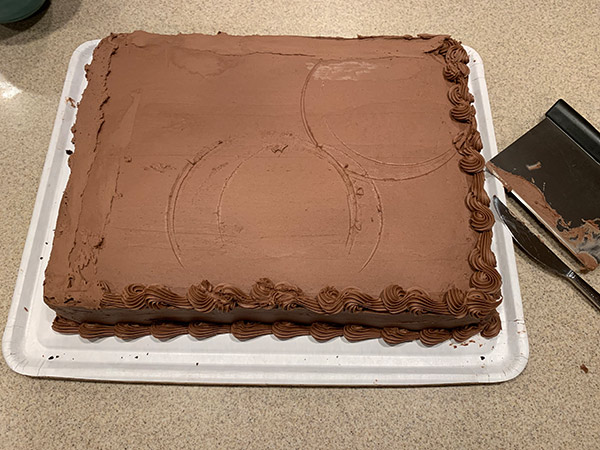
I started with this plain chocolate sheet cake. I used a bench scraper to gently scrape off the excess frosting. Then, because I wanted to make a round cake, I needed to cut my cake into circles. (I know, I could have made my life easier and just decorated the cake as is, but where’s the challenge in that? Also, my daughter had seen some baking shows and really wanted a tall layer cake.) I experimented with a few different sized round bowls to see which size would get me three layers. You can see in the picture above the outlines of the bowl on the frosting.
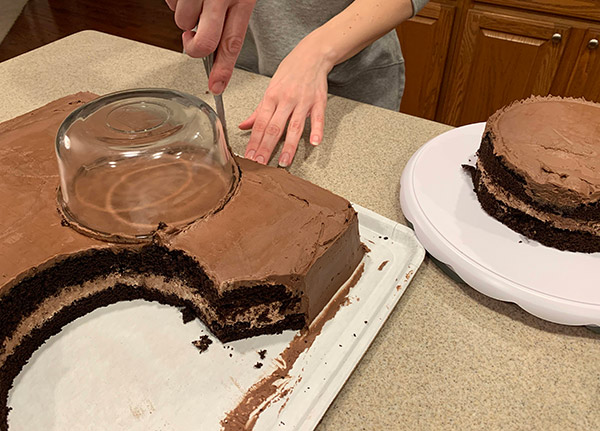
Next, I cut three circles out of the cake. I used my bowl as my guide so they would all be perfectly round and the same size. This did leave a bit of leftover cake which I served to some of my guests who didn’t want as much frosting and I also froze some to bring out one cold February night when we all want a treat at home.
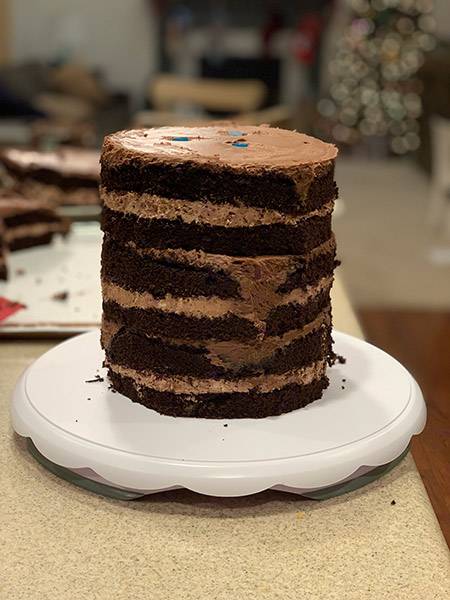
I gently stacked the layers as I cut them out. I didn’t put anything in between them, but I did use large straws as dowels for stability. I pushed three straws down through all three layers. I needed to cut the tops of the straws so they didn’t show.
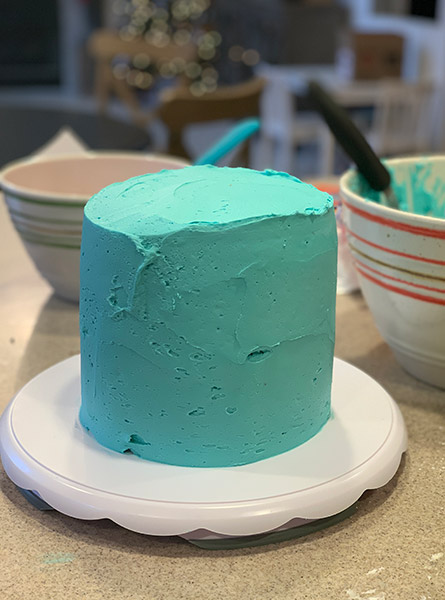
Finally, I added a quick crumb coat from the frosting I scraped off at the beginning before putting the cake into the refrigerator until the next morning. This step was the hardest, I really needed to be careful to not pull off any of the cake. On the morning of the party, I quickly whipped up a batch of buttercream frosting and tinted it teal, pink and purple. Decorated my cake in a fun Mermaid theme and had a great party!
For the cake details, I bought white and blue pearlized sprinkles to be water bubbles. For the seaweed, I bought Haribo Sour Streamers and cut the green ones into long pointed strips, then pushed them into the frosting on the bottom. I then twisted them and pushed them into the frosting on the top. They held very well and of course, all the kids wanted a piece with seaweed on it!
And what mermaid cake would be complete without a mermaid? I bought this Schleich Mermaid figure from Amazon and placed it on top with some extra frosting details and a candle. While obviously not a professional cake, it was perfect for my six year old and perfect for me because I didn’t have to bake anything!
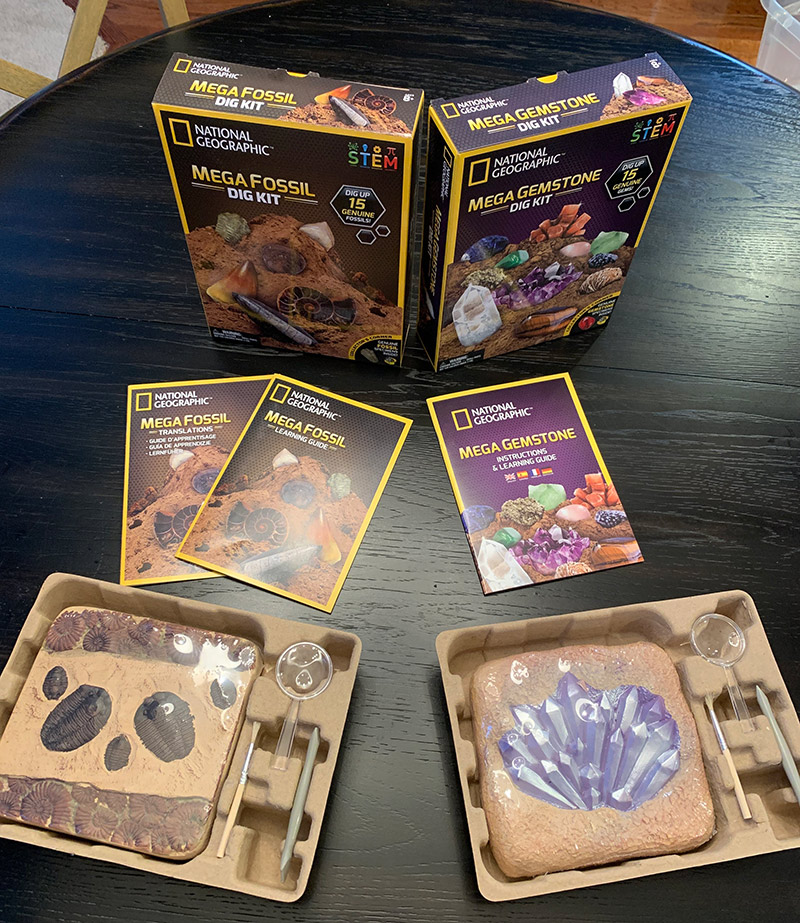
This year for Christmas my girls received Dig Kits (National Geographic Mega Gemstone Dig Kit and National Geographic Mega Fossil Dig Kit*affiliate links) from their lovely aunt. This was the perfect gift for them as my 8 year old is currently in love with everything crystal and gemstone related and my 6 year old wants to be a paleontologist when she grows up. I’ll start off by saying they LOVED this gift and are proudly displaying their “specimens” on their dressers as I write this. I love that they got to have an experience with this gift and it is not just another plastic toy that they will play with for a week and eventually end up in a landfill. Good job, Auntie! Ok, let’s get to the details.
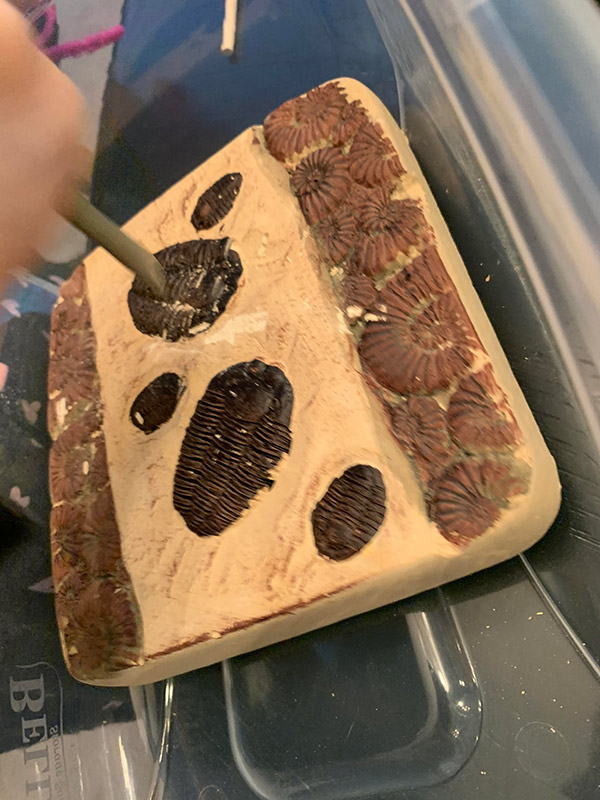
How these kits work: There are many different types and brands on the market. They start as blocks of hardened, plaster-like material. The kit comes with a plastic digging tool as well as a small brush to brush away dust. The child digs and chips away at the “dirt” on the block until they find a gem/fossil and continue to excavate it. In the pictures above, you can see how the block starts out and if you look closely you can see the rose quartz gem in the middle of the right picture as my daughter brushes away dust.
Details: These blocks can be hard at times to dig into. If you add some water and let it sit for a moment, it does get easier. I had to help my 6 year old along, but my 8 year old excavated all 15 gems on her own. With these particular sets from National Geographic, my daughters found quite a bit of specimens as they worked. The box states the kit includes 15 different gems/fossils, however my 6 year old only found 14 fossils in her kit.
As you can see in the picture above, this process does get quite messy. I placed them inside plastic bins which helped to contain the dust, but we still needed to clean the table and vacuum afterward. This would be a great outdoor activity!
Below are the final fossils and gems that my daughters excavated. They were so proud when they finally finished. The fossils still have a little bit of the dirt/plaster still stuck to them that we need to wash off, but you get the idea. The kits came with booklets that had information about each item they excavated so not only was this a fun gift, but it was educational as well.
I ended up buying my girls these small plastic divided containers to hold their fossils and gems in. They are great, have dividers that can be removed for larger items and are affordable. I have a link to these exact boxes below.
Well, the holiday season officially got the best of me! I am just now getting to post my November Stitch Fix Try-On. Sorry for the delay! This time, I gave my stylist very specific items I was looking for: comfortable jeans, a casual blazer, high-top slip on sneakers, comfy tops that are not itchy. I also asked for the prices to be on the low end.
Overall, I thought my stylist got my personal style dead on here, but I ended up only keeping one item from this fix. See my notes below.
Stitch Fix Haul
Estefany Lace Detail Split Neck Blouse by Daniel Rainn I loved the pattern and comfort of this top, but it was simply too see-through for me. I couldn’t wear it without something on top which makes it really limiting. Not to mention, the price didn’t match the quality. Sent back.
Raja Collarless Blazer by Skies Are Blue – This blazer is a medium turquoise-blue color which I liked. It looked great with the plum and white colored items that came with the rest of this fix. The material is smooth and the sleeves are 3/4 length and ruched a little in the mid-arm area. It was a little pricey, but I thought versatile enough to spend on. This is the only item I kept from this fix.
Arnold Three Quarter Sleeve Raglan Knit Top by Mix by 41 Hawthorn – This shirt was cute and comfortable. It is a nice staple to wear through the season and went well with the blazer and shoes in this fix, but it was slightly short for me and I was concerned the fabric would pill easily. Sent back.
10″ High Rise Skinny Jean by Madewell – The jeans included in this fix were a very high rise. I hadn’t really worn high rise jeans in the past and I did not like them. I just did not feel comfortable in them at all and they were also the most expensive item in this fix by far. For $135 I have to LOVE an item of clothing that I know could get any number of stains on them from my children. I sent these back.
Scout Splash Weather Resistant Bootie by Keds – These shoes were a cute plum/burgundy color and fit, but they were very thin feeling, didn’t have much support and I felt were not flattering on my feet (they made my feet look super long). I also don’t love having to lace shoes so high, I like to be able to slip my shoes on and go, which is not an option for this style.
Final Thoughts
Overall, I kept one item, the blazer, because I liked it enough to not throw away the styling fee. I was happy with the styles, but not with the prices or the way the items just didn’t work out for various reasons. What I did like is that Stitch Fix noticed my negative reviews of the items and offered a replacement fix free of the styling fee for the next week. It was a nice gesture. I will post that fix later.
If you are interested in trying Stitch Fix use my referral link, and get $25 off your first fix!
If you are looking for other fix posts, visit the links below:
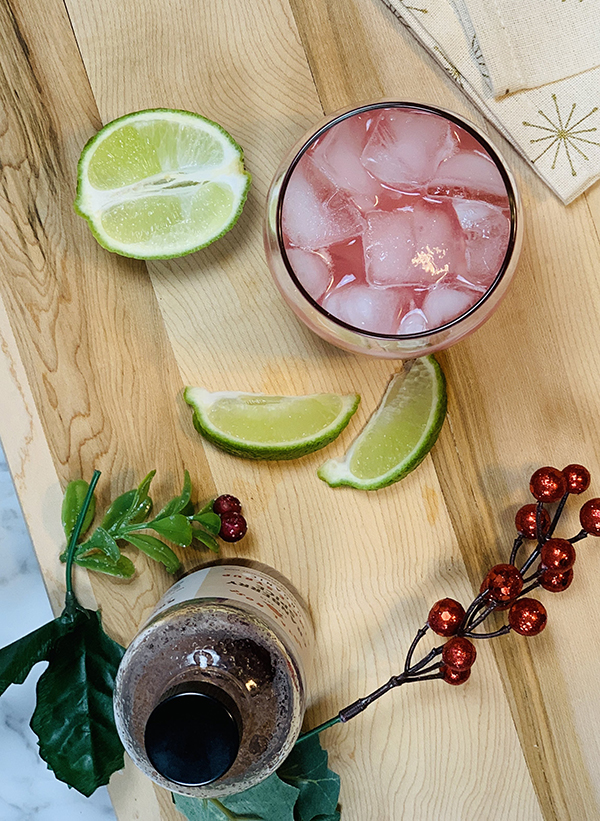
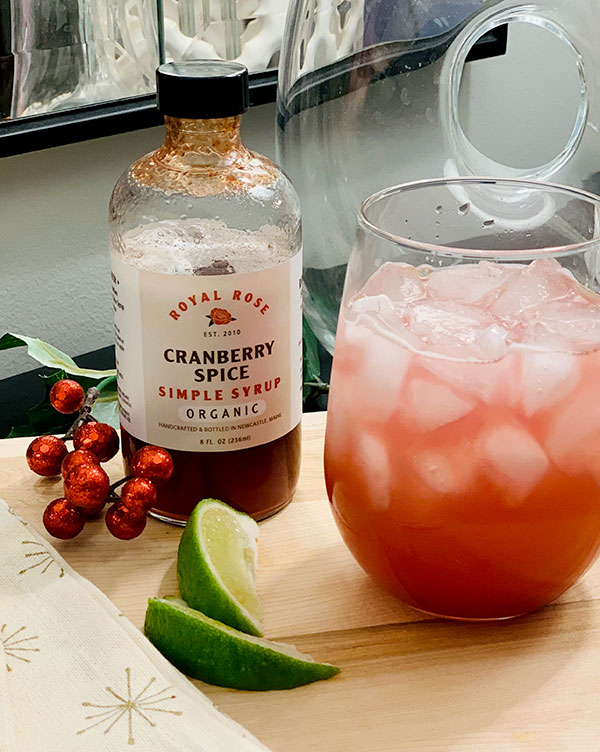
Margaritas in December? Why not, especially when paired with festive cranberry spice! Happy Holidays!
Cocktail Ingredients:
2 cups Cranberry Juice
3/4 cup Lime Juice – Fresh squeezed if possible
1/2 cup Orange Juice
3/4 cup Cranberry Simple Syrup – Like this Cranberry Spice Flavor from Royal Rose Syrups http://shrsl.com/20igx (affiliate link) Royal Rose Syrups is currently offering 20% off your $40+ order with code SWEET20OFF40 thru 12/31!
1 1/4 cup Tequila (leave out if making mocktail)
If making mocktail – 1 1/2 cups Lemon-lime soda or more to your taste
any garnish you like – lime slices, sugared cranberries, rosemary sprig, etc.
Instructions:
Combine all ingredients besides the garnish in a pitcher. Mix gently to combine. Chill in refrigerator until ready to use. When ready, pour into glasses over ice and top with garnish.
This recipe makes about 8 servings depending on the size of your glass and how much ice you use.


